Why is everyone going on about the blowout? I clearly said that I was aware of it, and my post clearly says that the info I'm after has nothing to do with blowout. But since ya'll are bringing it up, perhaps you can be helpful and provide suggestions for a different blade, around 100t, that has negative hook angle, mid to full kerf, without blowout under or behind the miter cut?
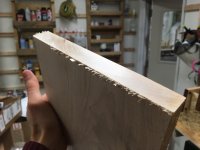
Also, yes, my picture shows endgrain, but if you read my post, I never specified the type of cut. I was asking about the smoothness of
any cuts in general affecting gluing. The picture was only for reference for the smoothness of cuts I'm getting, as an example.
Packard said:
When I was a picture framer I had a Lion Miter Trimmer (they are out of business now). The trimmer used a razor sharp knife to slice slivers of the miter off after sawing. It was a corrective device, if a miter was not tight or if the length of the piece was off by a few thousandths.
The slices were so thin that you could see light through them and the surface was smooth as glass. Because of the smoothness, the joint would hold less glue. The key to this was to make sure that there was adequate squeezeout of glue at the joint.
I still have the miter trimmer (and the sliding table miter saw). I will try to find time to make sample joints this weekend and compare the strength of a standard sawn miter and a miter with mirror-smooth joining surfaces.
I've done tests like this in the past so I know how to do this. I can test in increments of 5 pounds. The results should be interesting.
This is the type of answer I'm after, thank you! Looking forward to the results.
Svar said:
No. As already mentioned when gluing panels you use plane or jointer to get the surface perfectly smooth.
For end grain I'd also prefer perfectly clean cut to open vessels for glue to go in.
Perhaps if you burnish the surface with very fine sanding, you might decrease adhesion because pores will be packed with dust.
My question is, if the vessels are burnished, or finished too smoothly, doesn't that in essence close them, not open them up?
ChuckM said:
My handplanes including the shooting plane give very fine edges and surfaces. Glue works well on them.
This is a very good point. Would you say that planes burnish the surface at all?