Tool for demo of tile countertop and backsplash?

Rob Z said:
Anthony,

The pics help to get an idea of your project.  Looking at the screws on the inside of the cabinet carcass, up near the top:  are those screws run into the carcass next to it or are they run upward  to bite into the plywood substrate? I was hoping you had the traditional corner blocks in the cabinets that could be cut with a multimaster so you could release the substrate.  But maybe your substrate is as you suggest screwed from the top into the sides of the cabinets and the braces.

I'll check on those screws in the morning. There are a couple that appear to connect to the adjacent cabinet, but it's possible that a few of them go into the substrate. Also, there are two triangles in the front left of the two outside cabinets. This is the one on the right (the leftmost cabinet also has this triangle in the same location):
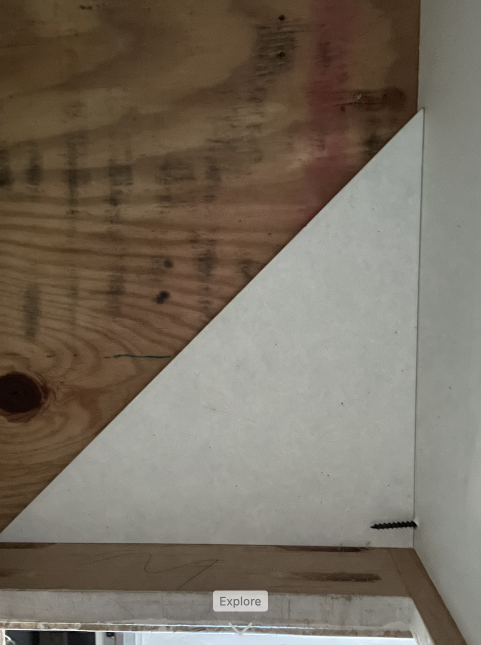
Monosnap_2021-11-25_19-59-49.png


I can't figure out what the original installer did along the front of the counter.  Do you have the clearance to run a grinder wheel up between the face frame and the backside of the counter edging so you can cut through those screws? Before I read your comment about 1/2" thick layer of thinset on there my first thought was that they used Denshield as a substrate.  In some ways that would be good for you now because it might come out easily. Are you sure it's thinset?

I do not have a grinder, but I might be able to get at those screws with a multi-tool. I'm not positive it's thinset. However, the drawer side is much thicker than the back side. On the back side, there's a small overhang/bar. The tiles on top are full size so I'm guessing they needed to pad out the overhang with extra thinset for the edge tiles to be flush with the top tiles.
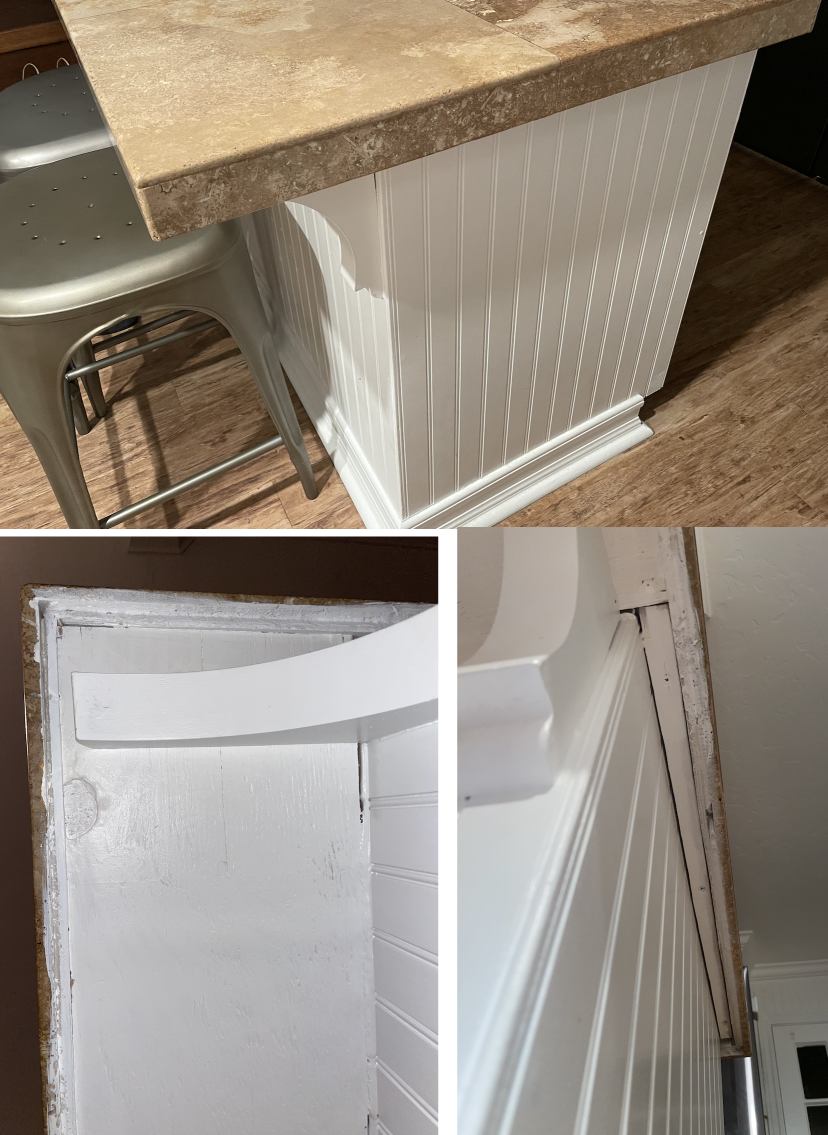
Monosnap_2021-11-25_20-19-47.png


I think your best step now is to get some of that edging tile off and get an idea of the cross section of the counter.  Maybe it's two layers of plywood. Whether it's double layer plywood or backer board over a single layer of plywood, let's hope there is low bond strength for the setting material and you can pop the tiles off with a wedging action from the side. If so you might be able to expose the screw heads and back those out and lift the sheets without much trouble.  If sure doesn't look like they used very many screws on this.

When I see skimpy work on the substrate details then I think there is a decent chance they cut corners on the setting materials and trowel technique.  So you might well find that these tiles come off without too much brute force.

I'll start on the edge and go from there.

When we moved in, I was chatting with the neighbors and learned that this house had been a rental since the early 70s. Knowing that, I'm expecting to find that that a lot of corners were cut in this place.
 
If you have a decent compressor the best whey I have found is a air chisel. They are cheep and light and you can regulate the force by changing the air pressure. I have  also use my rotary hammer but is slower and more unwieldly and I hate to put all that wear on a expensive tool.
 
Dongar said:
I have  also use my rotary hammer but is slower and more unwieldly and I hate to put all that wear on a expensive tool.

Huh? Isn't that what it's for?  [scratch chin]
 
It cost $375 the air chisel cost $25 and it works much faster and is less than 1/2 the length. I would rather wear the drill out drilling holes.
 
Anthony

If your multimaster doesn't cut through the screws or can't reach some of them, one thing to try is a long, fine tooth (12" + ) blade in a sawzall. You can get the sawzall inside those cabinets that are large enough and flex the blade and ride it along underneath that plywood substrate. It helps to drive a shim or use a flat bar here and there to wedge the counter assembly upwards a small amout and the blade will ride along more easily. You can also run the sawzall all along the top of the face frame in the front and cut all the screws that might be holding the front down.

Also, once you get the sink out you will see a cross section of what the original installer did, as well as that provides a convenient point of attack for getting under the tiles that are set on the countertop.

The area of the sink is a good place to separate sections of countertop assemblies so they can be taken out in bigger pieces and with less demo. Unless a lot of reinforcement was installed, the counter substrate is narrowed considerably in front of the sink and behind it, and as a result it's relatively easy to break the counter into pieces there.
 
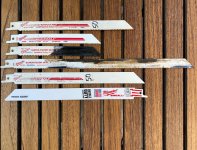
Just to add to Rob's description, the Sawzall blade that you want to use is not one in Milwaukee's current line of demolition blades. They are way too thick and will not flex at all. You need a narrow & thin Milwaukee fine tooth blade that will flex & cut at the same time.

In this photo, you want to use something similar to the 4th blade down from the top. I use this particular blade for sneaking between/underneath cedar siding boards and cutting the nails. It may be difficult to locate the blade because in the last 5-7 years the focus has been on demolition, while the blades Rob & I are discussing are more finesse blades, used for house surgery... [smile]

[attachimg=1]
 

Attachments

  • 9191.jpg
    9191.jpg
    620 KB · Views: 595
Cheese--thanks for the assist [big grin]!  I have a lifetime supply of sawzall blades remaining so I haven't shopped for blades in the past 6+ years. That's interesting that the flexy, sexy blades aren't easy to find. Hopefully, Anthony can find some so he can do some sawzall surgery on this job.
 
Quick update: the screws on the upper panel are screwed into the adjacent cabinet so no detaching the counter from that point.

Tool_for_demo_of_tile_countertop_and_backsplash_2021-11-28_11-35-38.png


Also, my multi-tool blades are just long enough to get at the other screws so I probably won't need to use the sawzall (at least for the screw removal).

On a related note, I learned my dishwasher is trapped.  [eek]

The counter and flooring were probably installed with the dishwasher in place. No flooring was installed under the dishwasher so the lip of the flooring prevents the feet from sliding out. The overhang of the counters are just low enough to prevent the body of the dishwasher from tipping out (but high enough for the door to open). Good that the counter is coming out as the dishwasher is on its last leg and will need to be replaced in the coming months.

I'll probably start removing the countertop after New Years. I don't think my wife would be too happy not having use of the kitchen during Christmas and New Years.
 
I'm in full agreement with Dongar on the air chisel.  I have used this a few times on morter bed\expanded metal tile tops and backsplashes which had to be pulverized to remove.  I've removed tile glued straight to plywood and almost all popped up and could have been re-used.  If the tile is set on hardi backer I can't say as I have never had to remove any that were installed that way.  I would see what driving a prybar under that front edge accomplished and go to the air chisel if needed.
 
4nthony said:
The_wooden_kitchen_in_Copenhagen__Nordiska_Kk_2021-11-25_16-00-15.png


My wife, getting excited at the prospects, commented that she'd LOVE a new countertop, and so here I am.  [cool]

[/size]

It appears that the countertop in this illustration is part of the sink.  John Boos (the butcher block manufacturer) makes these countertops and I think they also offer one-piece sink/countertop assemblies, but I am not seeing it in their website.
https://www.johnboos.com/Items_page...ksplash &nsf=False&nsfc=True&csa=False

I demo-ed wall and floor tiles from two bathrooms with Harbor Freight's hammer/drill.  It probably will not be as durable as commercial-grade products, but it worked fine for the two bathrooms.

Their bits are not very good and I bought different brands from Amazon.com.  I can look that up if you need that information.
 
Will a magnet work through the tile to indicate where screws are? If so, on the screws you can’t reach from underneath, get a Diamond hole saw and drill through tile to reach screw heads?
 
[member=75283]4nthony[/member]  I see you are in California.  I have never been or plan on it but aren't most of the homes there block/concrete construction?  If so I would think you would get plenty of use from dch273.  It is light years ahead of drilling with a drill driver in hammer mode.  That little DCH273 is nice tool.  I use for drilling concrete, driving concrete form stakes, and light tile demo.  Anyone who bad mouths it has probably never used it.  I stick by my original statement.  Are there more powerful units out there...YES and they have their place. I own those too, but not every job requires a TE1000 or TE75.  I own several different hammer/chipping hammers and if that countertop was at my house I would be grabbing the dch273 to remove it.  You can always buy it from HD and if you hate (which I dont think you will ) they will take it back.  Im not sure who some people think they are talking to, and while I dont claim to know everything. I have been a union carpenter for close to 30 years and done just about everything from building commercial buildings to building my last house mostly solo from pouring the footings to setting the ridge, including doing the electric and plumbing. That house was pushing 6k SF.  I subbed out the well, septic, pouring the basement floor and shingling that's it. Everything else I did, I had a buddy or two come out a few days for setting the big windows and such but mostly solo. 

If you are already invested in Dewalt platform its a no brainer to me. An air chisel will work and be cheaper but you will need a decent sized compressor to run it and have a hose to deal with.  The dch273 will do the same plus add the drilling and cordless benefits. I took a quick peak on you tube and found this just to prove Im not crazy.
=173s
 
Not many block or concrete homes in CA (earthquake would tear it up and would retain heat for too long).

Why is a power tool needed? I've always had success with a simple demo hammer, flat, and pry bar. Elbow grease and proper leverage will usually get the job done.
 
Packard said:
It appears that the countertop in this illustration is part of the sink.  John Boos (the butcher block manufacturer) makes these countertops and I think they also offer one-piece sink/countertop assemblies, but I am not seeing it in their website.

I built my drawers oversized so I can replicate the look of the cabinets with their vertical slats and horizontal pulls on taller drawer fronts.

As for the new countertop, I'm thinking I'll either:
1. Install butcher block counters (easiest)
2. Pour concrete (I've poured concrete outside -- steps, footings, small foundations -- but have not done countertops)
3. Have quartz counters installed (something I'd rather hire out than DIY)

Koamolly said:
Will a magnet work through the tile to indicate where screws are? If so, on the screws you can’t reach from underneath, get a Diamond hole saw and drill through tile to reach screw heads?

The magnets I have didn't seem to grab onto any screws. Maybe stronger magnets might.

afish said:
[member=75283]4nthony[/member]  I see you are in California.  I have never been or plan on it but aren't most of the homes there block/concrete construction? 

My previous house was timber and stucco construction (Spanish style) built in 1927. My current house is timber with cedar shingles (Cape Cod-ish style) built in 1949. I have a hammer drill that did the job when drilling into stucco and cinder blocks. I'm not averse to getting the DCH273 but I just want to make sure I'll have continued use for it after the counters.

afish said:
I own several different hammer/chipping hammers and if that countertop was at my house I would be grabbing the dch273 to remove it.  You can always buy it from HD and if you hate (which I dont think you will ) they will take it back.

If you are already invested in Dewalt platform its a no brainer to me. An air chisel will work and be cheaper but you will need a decent sized compressor to run it and have a hose to deal with.  The dch273 will do the same plus add the drilling and cordless benefits. I took a quick peak on you tube and found this just to prove Im not crazy.

I'll swing by the local HD and have a look. As for air tools, my compressor is only 1 HP, 8 gallons. It's great for nailers and such, but not sure how well it'll work with other air tools that require more continuous flow.

SDWW2019 said:
I've always had success with a simple demo hammer, flat, and pry bar. Elbow grease and proper leverage will usually get the job done.

Valid point. I don't demo tile all that often. The last time was the kitchen in my previous house, around 2009. The countertops were little 5x5 tiles. Piece of cake to take out with a hammer and chisel. The floor was another story. I managed with a couple sledge hammers and a chisel but it took much longer than I liked. A power tool probably would've saved a couple days. I don't know if my current counter and backsplash will be easy like the last countertop or a pain like these terracotta floors were:

kitchen_beforeafter.jpg_2021-12-02_13-00-46.png
 
One would hope that the counter would be easier to remove than floor tile, but since they used floor tile on the counter, I understand your trepidation at tackling it with a sledge and chisel.
 
4nthony said:
As for the new countertop, I'm thinking I'll either:
1. Install butcher block counters (easiest)
2. Pour concrete (I've poured concrete outside -- steps, footings, small foundations -- but have not done countertops)
3. Have quartz counters installed (something I'd rather hire out than DIY)
4. Solid Surface, like Corian. Festool gets the job done. There are full tutorials available online on how to do coves etc.

I would try to lift the counter enough to get a reciprocating saw blade in to cut the screws. Then remove as a unit.
 
This really starts to border on analysis paralysis, if this were my project I'd first attack it with a wide chisel and a 2#/3# hammer. If that works, then go forth using those items unless it's a 300 sq ft area...because then you definitely need an alternative method even if you think you'll be fine. This type of demo gets old in a hurry and if you've removed all the tile, that doesn't mean you've removed all of the adhesive/tile/tile pieces/grout and have attained a relatively smooth surface which is what needs to be done.

If the going is slow with the hammer & chisel, then just implement the next aggressive demolition step. Rinse & repeat until you find the tools that work...bigger is still better for this application guys.
 
I would go with simplest and cheapest option first. Do a little testing and see how it was built. Depending on the build it may be easier than you expect. For example, I have found that most of the big home developers in San Diego do not really focus on high quality finishes and try to save every penny on construction and finishes. Therefore, most of the stuff you would want to rip out is cheap, poor quality, and likely installed by laborers and not trades people vs. some old build where they needed to float a mortar bed before installing tile. It's actually really horrible and so sad to think how many of these homes would not likely last 50 years and the environmental issues with our throw away culture...and considering the cost of real estate in CA.

Over last week I just demo'ed out my kitchen (20x16), a family room (18x25), and master bath (16x16) down to studs (home built in 1998 and I purchased 3 years ago). Kitchen backsplash popped out easy with a pry bar and I got lucky with the builder grade floor tile ...since it was installed over sheet vinyl. I feared the worse with the floor tile and thought it was going to be a horrible job, but after a quick few minutes of exploring the floor install method I quickly noticed the vinyl under the tile and each popped up with little effort. I had the whole floor pulled up and in a dumpster in a few hours.  I can only wish you the same good luck.
 
Back
Top