jonny round boy
Member
- Joined
- Jul 21, 2007
- Messages
- 3,223
It's my little nephew Luke's first birthday coming up, and I decided to make him a present.
His mum (my little sister) had mentioned a while ago that she needed a toy-box for all his junk, so decided to make him some mini-skips. I did an initial design for these about 6 or 7 years ago when my mate's kid was Luke's age, but never got round to making them.
I've tweaked that initial design a little, but they're pretty much what I envisaged back then. I'm toying (no pun intended!) with the idea of advertising these on ebay, or on a dedicated website, and making them to sell, so I've used these as kind of a 'prototype run' to iron out a few issues.
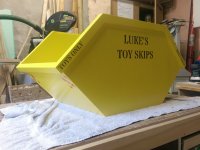
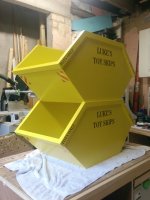
They're made from 1/2" standard MDF, dominoed and glued. No mechanical fixings. A full sheet makes 2 skips. They're designed to stack, so in order to allow room between the top edges the ends are splayed slightly (they're 1mm wider at the top than at the bottom). All the parts are made from a template with a flush-cutting router bit, so they're all identical. Rough cutting done with my TS55R and cordless carvex; final shaping done with OF1400 in my router table; sanded with ETS150.
These initial ones are finished with Dulux Diamond Eggshell, rollered on. The yellow colour does not cover well at all. They've had 3 full coats, and it's still patchy in places. They'd definitely need to be sprayed if I were to sell them!
The 'reflectors' on the ends are vinyl. I got them from VistaPrint, they're meant to be bumper stickers but I did the design so that they could be cut up into smaller pieces; each bumper sticker makes 4 reflectors.
The text is done with bespoke stencils, and a spray-can of matt black car paint. This worked well & gave the look I wanted, though the overspray went further than I thought & got onto the yellow in a couple of places.
They're fairly big - 815mm long, 450 wide, and 400 deep, so should hold quite a lot!
[attachimg=1]
[attachimg=2]
[attachimg=3]
[attachimg=4]
I took them over to my sister's earlier today - she loves them, and before I got home she'd put a picture of them on Facebook, and I've already got one enquiry for them. As luck would have it they fit perfectly in an alcove in their living room. Luke's 1st birthday party is on Saturday, so lots of parents of young kids will see them, and hopefully some more enquiries will ensue...
His mum (my little sister) had mentioned a while ago that she needed a toy-box for all his junk, so decided to make him some mini-skips. I did an initial design for these about 6 or 7 years ago when my mate's kid was Luke's age, but never got round to making them.
I've tweaked that initial design a little, but they're pretty much what I envisaged back then. I'm toying (no pun intended!) with the idea of advertising these on ebay, or on a dedicated website, and making them to sell, so I've used these as kind of a 'prototype run' to iron out a few issues.
They're made from 1/2" standard MDF, dominoed and glued. No mechanical fixings. A full sheet makes 2 skips. They're designed to stack, so in order to allow room between the top edges the ends are splayed slightly (they're 1mm wider at the top than at the bottom). All the parts are made from a template with a flush-cutting router bit, so they're all identical. Rough cutting done with my TS55R and cordless carvex; final shaping done with OF1400 in my router table; sanded with ETS150.
These initial ones are finished with Dulux Diamond Eggshell, rollered on. The yellow colour does not cover well at all. They've had 3 full coats, and it's still patchy in places. They'd definitely need to be sprayed if I were to sell them!
The 'reflectors' on the ends are vinyl. I got them from VistaPrint, they're meant to be bumper stickers but I did the design so that they could be cut up into smaller pieces; each bumper sticker makes 4 reflectors.
The text is done with bespoke stencils, and a spray-can of matt black car paint. This worked well & gave the look I wanted, though the overspray went further than I thought & got onto the yellow in a couple of places.
They're fairly big - 815mm long, 450 wide, and 400 deep, so should hold quite a lot!
[attachimg=1]
[attachimg=2]
[attachimg=3]
[attachimg=4]
I took them over to my sister's earlier today - she loves them, and before I got home she'd put a picture of them on Facebook, and I've already got one enquiry for them. As luck would have it they fit perfectly in an alcove in their living room. Luke's 1st birthday party is on Saturday, so lots of parents of young kids will see them, and hopefully some more enquiries will ensue...