You are using an out of date browser. It may not display this or other websites correctly.
You should upgrade or use an alternative browser.
You should upgrade or use an alternative browser.
Transit Van Fit Out - GunnyR
- Thread starter gunnyr
- Start date
gunnyr
Member
ForumMFG said:Nevermind, i just saw one of your previous posts. Is the house battery just for charging while the van is turned off?
The house battery will provide power both when the van is running and when it's turned off. There is an isolator between the positive terminals of the house and vehicle batteries that prevent the house battery from drawing power from the vehicle when the voltage of the vehicle battery is below 14v or so. What this means is that power will only flow from the vehicle battery to the house battery when the vehicle is running and prevent the house battery from draining the vehicle battery.
My house battery is located under the driver's seat, along side the vehicle battery. Note that if you have a Transit and don't need/want a house battery that Ford has provided a fuse protected 60 amp power connection point at the rear of the driver's seat. I recommend you do a search on the Ford Transit USA Forum for more ideas about house power to your van. You'll find references to solid grounding points that Ford has provided as well as recommendations on attachment points.
I do not have any hardwired provisions to charge the house battery with shore or solar power at this point. What I've found is that the house battery gets sufficiently charged for my needs during normal driving. I've also mounted my chargers and power strip on a removeable board so that I can easily take the chargers into the job site. I've also sometimes run an extension cord out to the vehicle to plug my charging station into. My set up is not really strong enough to charge two of the DeWalt FlexVolt batteries at the same time using the inverter. I've really not found that to be an issue.
gunnyr
Member
ForumMFG said:Does your m12 battery ever fall out of the charger while you are driving? Just curious if a good bump will knock it out.
No, I've not had any problems with M12 batteries falling out. The holders have held up well also. I keep thinking I want to mount them at an angle to recoup some wall space but haven't yet gotten to it.
gunnyr
Member
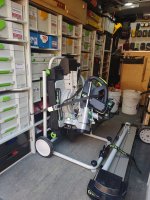
I've made several updates to my 2020 Transit over the holidays. I modified part of my racking to allow for the use of the Sys3 Rail System and a major upgrade to the electrical system.
Racking
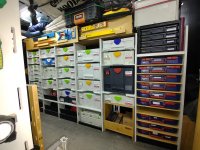
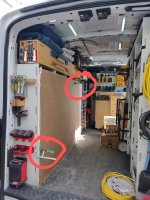
Like many, I have all three generations of Systainers. I now have enough to the Sys3 versions to make it worth updating my van shelving. I chose to update the two bays closest to my parts bins to permit the installation of the Sy3 rails. I had to increase the with of each of the two bays 9mm (18mm total) to allow for the width of the rails. Finding that 18mm was easy but executing it made it necessary to remove the entire drivers side shelving system. The result was very much worth it! The removal of the racking also allowed me to add shore power to my electrical system and run the wiring in the body cavity rather than leaving it exposed along the interior of the roof line.
[attachimg=1]
[attachimg=3]
I also added a long overdue storage platform for the space over my table saw. I've been trying to put stuff on top of the saw since I first started storing the saw in the side door opening. I used a bit of RV J-Channel and some plywood to make a removeable platform. At one point I thought I'd make a box for the saw with a bin for my tool bag on top. I think this is a much more elegant, and flexible, solution! I'm still playing around how to best secure the bag, for now it's just clipped to the grab handle.
[attachimg=2]
Electrical
The upgrade to my house electric system was not so much functional as it is performance oriented. There are two major areas of improvement.
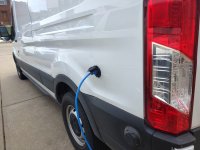
The first is I added shore power. This was primarily to add on a hardwired 110v battery charger for the house battery. The removal of the drivers side racking gave me easy access to add the shore power port and run the wiring inside the wall rather than surface mount the wiring along the interior roof line.
[attachimg=4]
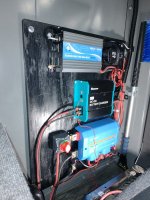
The second area of improvement improved the performance and safety of the overall house power system. I added a fused bus bar to separate the feeds to the inverter and general 12v circuits. The bus bar also provided a way to easily connect the onboard 110v battery charger. I also added a 12v DC to DC battery charger to more effectively charge the house battery when the engine is running. In my first installation I used an isolator to provide charging to the house battery. The issue with an isolator is that it feeds the house battery with whatever power it can. The DC to DC Charger is a 3 stage charger that also isolates the house battery from the vehicle battery to prevent discharge of the vehicle battery.
I moved the power management and charging portion of the system to the area behind the drivers seat. This has the advantage of keeping the equipment safe and provides me with easy access to 110v power in the cab.
The electric improvements would not have been possible without the superb videos from Nate at Explorist Live - DIY Campers
[attachimg=5][attachimg=6]
So, two years in to my Transit I can say that I am very happy with both the vehicle itself and the fit out. I have a few more minor improvements in mind. I'll likely add a few more drawers and some task lighting in the near future.
Racking
Like many, I have all three generations of Systainers. I now have enough to the Sys3 versions to make it worth updating my van shelving. I chose to update the two bays closest to my parts bins to permit the installation of the Sy3 rails. I had to increase the with of each of the two bays 9mm (18mm total) to allow for the width of the rails. Finding that 18mm was easy but executing it made it necessary to remove the entire drivers side shelving system. The result was very much worth it! The removal of the racking also allowed me to add shore power to my electrical system and run the wiring in the body cavity rather than leaving it exposed along the interior of the roof line.
[attachimg=1]
[attachimg=3]
I also added a long overdue storage platform for the space over my table saw. I've been trying to put stuff on top of the saw since I first started storing the saw in the side door opening. I used a bit of RV J-Channel and some plywood to make a removeable platform. At one point I thought I'd make a box for the saw with a bin for my tool bag on top. I think this is a much more elegant, and flexible, solution! I'm still playing around how to best secure the bag, for now it's just clipped to the grab handle.
[attachimg=2]
Electrical
The upgrade to my house electric system was not so much functional as it is performance oriented. There are two major areas of improvement.
The first is I added shore power. This was primarily to add on a hardwired 110v battery charger for the house battery. The removal of the drivers side racking gave me easy access to add the shore power port and run the wiring inside the wall rather than surface mount the wiring along the interior roof line.
[attachimg=4]
The second area of improvement improved the performance and safety of the overall house power system. I added a fused bus bar to separate the feeds to the inverter and general 12v circuits. The bus bar also provided a way to easily connect the onboard 110v battery charger. I also added a 12v DC to DC battery charger to more effectively charge the house battery when the engine is running. In my first installation I used an isolator to provide charging to the house battery. The issue with an isolator is that it feeds the house battery with whatever power it can. The DC to DC Charger is a 3 stage charger that also isolates the house battery from the vehicle battery to prevent discharge of the vehicle battery.
I moved the power management and charging portion of the system to the area behind the drivers seat. This has the advantage of keeping the equipment safe and provides me with easy access to 110v power in the cab.
The electric improvements would not have been possible without the superb videos from Nate at Explorist Live - DIY Campers
[attachimg=5][attachimg=6]
So, two years in to my Transit I can say that I am very happy with both the vehicle itself and the fit out. I have a few more minor improvements in mind. I'll likely add a few more drawers and some task lighting in the near future.
Attachments
-
 Transit Rack Update 220127(1).jpg194.9 KB · Views: 1,218
 -
 Transit Rack Update 220127(3).jpg203.1 KB · Views: 1,206
 -
 Transit Rack Update 220127(4).jpg205.7 KB · Views: 1,215
 -
 Transit Elect System Update 220127(3).jpg143.2 KB · Views: 1,197
 -
 Transit Elect System Update 220127(1).jpg182.5 KB · Views: 1,204
 -
 Transit Elect System Update 220127(2).jpg201.9 KB · Views: 1,183
Here is my Systainer Storage solution for my van the units are made just need to fit the van out when I have time ps that is the wheel arch unit keep your eyes peeled on instagram more than. On here
https://instagram.com/karvd__?igshid=YmMyMTA2M2Y=
https://instagram.com/karvd__?igshid=YmMyMTA2M2Y=
Attachments
- Joined
- Jun 25, 2016
- Messages
- 466
[member=42009]gunnyr[/member] - the level of seasoned refinement displayed in the most recent version of your van upfit really shows others who are still stuck with Pick-ups and low roof height vans what is possible.
Thanks for sharing here for everytone's benefit!
Keep it up while keeping everyone posted.
Hans
Thanks for sharing here for everytone's benefit!
Keep it up while keeping everyone posted.
Hans
- Joined
- Oct 16, 2015
- Messages
- 5,834
That's a fantastic looking, well equipped set up you have there. Great job.
Those high vans are so much better for this kind of thing.
Back when I first started in the cabinet shop (2004) we used ramp-door trailers. One big 24' model for hauling product and a couple of 16' that were equipped mostly for tools/supplies. They could also haul product, especially for smaller jobs, so a separate delivery wasn't necessary. It was never ideal though. Parking was always a problem, as well as getting installers who could actually handle a trailer.
Once the company stepped up to a 24' straight truck with a lift gate, the installers use regular vans and don't really have to deal with materials or products much anymore. They would all be envious of a system like that though.
What's in the TSO Systainer? since the GRS is hanging out on the wall.
Also, I see Match-fit clamps, but nothing obvious to use them with?
gunnyr
Member
Crazyraceguy said:That's a fantastic looking, well equipped set up you have there. Great job.
What's in the TSO Systainer? since the GRS is hanging out on the wall.
Also, I see Match-fit clamps, but nothing obvious to use them with?
Thank you! In my case I am generally able to haul materials, deliver product and work out to the van. Only occasionally do I need to rent a straight truck for deliveries. In my Silverado it seemed that I was limited to hauling tools or materials but not both....
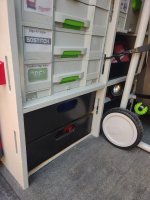
The TSO Container holds my GRS 16 along with some TSO parallel guide bits and pieces.
As for the Matchfit clamps they are used primarily to clamp material using the slots in the shelving during transport. I also have added a 2x4 to the top of my sawhorses that have Matchfit grooves on the top and sides along with a table saw sled with a grid of grooves that I used to hold work. I'm always finding new used for the Matchfit clamps; I've ground all of mine down so that they will fit into my Festool Guide Rails.
- Joined
- Oct 16, 2015
- Messages
- 5,834
Oh ok, that makes sense.
I have only begun to experiment with the Match-Fit clamps.
So far all I have done is add the grooves to by bench legs to aid in the holding where I have Domino slots too and made a small tapering jig. I used to just make single-use tapering jigs and throw them away after use. Even I can't keep them all.
I know there is more I can do with them, just haven't had time.
gunnyr
Member
This picture shows the slots in the shelving in use to secure sheet goods. I like to use the screw type MatchFit clamps because they have a longer reach than my Festool Clamps. I've secured as many as 10 sheets of plywood using combinations of clamps and straps. The system also works very well for transporting doors! Transporting sheet goods on edge makes it much easier to load and unload and leaves room for other cargo.
In this case I'm transporting some drywall for the much less fun part of trim carpentry. I had the pleasure of ripping out a 4x8 section of tile back splash this morning, tomorrow I get to replace the drywall in preparation for the new backsplash.....
[attachimg=1]
In this case I'm transporting some drywall for the much less fun part of trim carpentry. I had the pleasure of ripping out a 4x8 section of tile back splash this morning, tomorrow I get to replace the drywall in preparation for the new backsplash.....
[attachimg=1]
Attachments
gunnyr
Member
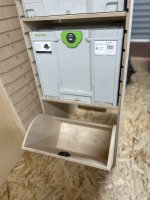
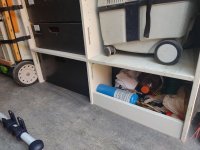
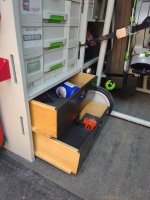
The improvements continue! This spring I made a few updates to the lower rear storage bins. The lower two bins on each side are partly taken up by the wheel wells.
On the curb side I added a tilt out bin to hold my cargo tie-downs and 'stuff' (thanks to [member=72830]w66der[/member] for the inspiration!). The rear most compartment on the curbside is normally partially blocked by my ladder so I wanted to leave it open as a place to throw 'stuff'. The issue was that I could not see what was in the bin. I added a small LED light wired to my house 12v system to solve the problem.
[attachimg=1]
[attachimg=2]
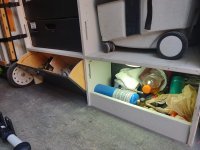
On the drivers side I added two drawers to the rearmost compartment. The bottom drawer is notched to fit around the wheel well. I moved all my drill and misc driver bits to the top drawer, the bottom drawer hold odds and ends for now.
[attachimg=3]
[attachimg=4]
Next up is a more elegant way of securing my KSC 60! I haven't quite figured it out other than using a ratchet strap to secure it. I'd love to hear any ideas.
[attachimg=5]
On the curb side I added a tilt out bin to hold my cargo tie-downs and 'stuff' (thanks to [member=72830]w66der[/member] for the inspiration!). The rear most compartment on the curbside is normally partially blocked by my ladder so I wanted to leave it open as a place to throw 'stuff'. The issue was that I could not see what was in the bin. I added a small LED light wired to my house 12v system to solve the problem.
[attachimg=1]
[attachimg=2]
On the drivers side I added two drawers to the rearmost compartment. The bottom drawer is notched to fit around the wheel well. I moved all my drill and misc driver bits to the top drawer, the bottom drawer hold odds and ends for now.
[attachimg=3]
[attachimg=4]
Next up is a more elegant way of securing my KSC 60! I haven't quite figured it out other than using a ratchet strap to secure it. I'd love to hear any ideas.
[attachimg=5]
Attachments
gunnyr
Member
And BAM, this happened! [eek] [scared][crying] [eek] [scared] [crying]
Fortunately no one was injured. Unfortunately it will be nearly 8 weeks before I can get it in the shop for repairs. At present I am using my PickUp to work out of.....no fun at all! I am very pleased to report that my shelving stayed rock solid and kept all my tools in place!
I now have the unplanned opportunity to make some improvements!
[attachimg=1]
Attachments

six-point socket II
Member
- Joined
- Jun 26, 2016
- Messages
- 2,247
Glad to hear no one was injured! Still sucks. Hope once the 8 week wait on the appointment is over, it’s quickly repaired.
Kind regards,
Oliver
Kind regards,
Oliver
- Joined
- Oct 16, 2015
- Messages
- 5,834
Aw man, that sucks. [sad]
Going back to a pickup truck really has to suck, in comparison to that setup you have going.
What happened?
Going back to a pickup truck really has to suck, in comparison to that setup you have going.
What happened?
gunnyr
Member
I was traveling southbound and a young lady was turning northbound from my right, seems she didn't see me.... I saw her just as she hit me and the air bags deployed. I never even hit my brakes until after impact. She pushed me into the oncoming lane, again fortunately, no one was coming at me.
I really shouldn't have driven it home but I didn't want it towed into some poorly secured lot. I've unloaded the tools and shelving from the passenger side. Estimate is $16K, likely to increase when they get the doors open.
Trying to look for the opportunity to improve the fit out. Might not be much more that some fresh paint on the shelves while I have them out. I've been thinking about adding a water pump and faucet, this is likely a good time to do it!
Vondawg
Member
Such drag [member=42009]gunnyr[/member] ….ive salivated seeing your improvements along the journey and the best van set up I’ve seen hope all is resolved soon
Packard
Member
What is retaining the plywood drawers so they don’t slide out in a sudden turn? A small deadbolt would do it.
gunnyr
Member
Packard said:What is retaining the plywood drawers so they don’t slide out in a sudden turn? A small deadbolt would do it.
The drawers are Ron Paulk designs. The bottoms ride in a rabbet that has a small stop in the front. You simply lift the drawer a 1/4" and slide out. They are really easy to make and have held up for me for 2 years or so. As a bonus they stayed put when I got hit! The problem with a deadbolt is one has to TAKE ACTION to secure it. Paulk's design is passive, if the drawer is closed, the lock is engaged.
Here's a link to the YouTube video with the details.
Paulk Drawers.
Packard
Member
gunnyr said:Packard said:What is retaining the plywood drawers so they don’t slide out in a sudden turn? A small deadbolt would do it.
The drawers are Ron Paulk designs. The bottoms ride in a rabbet that has a small stop in the front. You simply lift the drawer a 1/4" and slide out. They are really easy to make and have held up for me for 2 years or so. As a bonus they stayed put when I got hit! The problem with a deadbolt is one has to TAKE ACTION to secure it. Paulk's design is passive, if the drawer is closed, the lock is engaged.
Here's a link to the YouTube video with the details.
Paulk Drawers.
I like that arrangement (which was not apparent from the photos). I thought you were relying on friction to get the job done. I doubt that friction would have stood up to the impact that caused the body damage.
An amusing sidebar: In 1970 I bought a used ConEd service van (Ford Econoline). A shop bid on buying all the retiring vans and he had about 75 on the lot I was shopping at. The rest were at another lot. He wanted $1,100.00 for any of the vans on the lot.
I found one with no rust and no body damage. The original steel interior racks were still in the van along with the bins that went with it.
Also a commercial grade ladder rack mounted to the roof.
I offered him $800.00.
He said he had to take care of the body damage and remove the ladder rack and the interior rack system.
I said that I would take care of removing all the bins and the ladder rack, and since I found an example that needed no body work, he was off the hook for that too.
He agreed.
I sold the interior rack system (my mechanic knew someone that needed it) for $250.00. And the ladder rack for $100.00.
Apparently this guy was going to be throwing all those racks in the dumpster. Or maybe he was just in a hurry to get some cash.
In any case I used it for two years and sold it to a local custom speaker builder and it was around the neighborhood for several more years.
Apparently the racks were very expensive ($1,500.00 to $2,000.00). A reliable car/truck.
Similar threads
- Replies
- 3
- Views
- 1K
- Replies
- 16
- Views
- 2K
- Replies
- 32
- Views
- 12K