Trimming edge banding with MFK 700

Jasmin

Member
Joined
May 9, 2022
Messages
13
Hi!

I am starting to use the Conturo and have a question about trimming edge banding. Right now, I am using a Makita trim router on a DIY vertical. Always worked pretty well with hardwood strips edge banding but I had no access with edge banding applied with the Conturo. The bit gums up pretty quickly. How does the MFK avoid this problem?

I already reduced the glue amount substantially...

Thanks!
 
the mfk has a separate bearing not attached to the bit. the biggest issue or problem is if the bearing gets gummed up. the mfk keeps the bearing clean.  I on'y use my mfk for real wood edge banding for pvc I prefer a single sided virutex razor type trimmer RP28. its cleaner and no gummy issue.
 
I thought the separate bearing is only for the horizontal base, not for the vertical?

I will take a loom at the virtuex trimmer.
 
correct, the vertical base does have a bearing brake.  I only use the mfk in horizontal mode. I do own the festool 1mm bit but I use it in a cordless dewalt trimmer not in the mfk.  I know festool promots the one step vertical trim/profile but I always perform the trim and profile/roundover/no file as a secondary operation. it only takes a second to switch trimmers if you have 2 and that way your bearing always stays clean.

 
I have never been a fan of the bearing brake idea, from the beginning. It defeats the whole point of the bearing, which is to roll along the surface. The brake does 2 bad things IMHO, stopping the bearing from rolling forces it to drag/slide on the surface, which is bad enough, and by stopping the outer shell of the bearing, it means that every second that the motor is running, that bearing is "working". Those little, tiny balls can't take that indefinitely. When a regular bearing bit is free running, the bearing shell "catches up" with the spinning bit, so it isn't spinning internally. This has an effect on bearing life.
Bearing failure, during a cut, generally spells disaster.
I like the copy wheel style, to use Festool's word, where the bearing is separate from the bit. Clearance issues mean that you can't always use those though.
That said, I almost never use my MFK700s with the vertical base. I have one set up with a zero degree base, for thicker wood edges. The other one uses the 1.5 degree base and a smaller hinge mortising bit. I use it for laminate or PVC edges. No bearing issues and a much better registration point, but again, space constraints mean that this won't always fit either. At that point, you are down to a "no-file" bit and some spray lube. I use the "No fish eyes" version of Lami-lube. It is not as good as the original stuff, but we do a lot of finish work too, so I am stuck with it. It's ok, you just have to work in smaller sections, it dries to quickly. While it does give some protection against scratches and lube for the bearing itself, the main benefit (for me at least) is that it cuts down the stickiness of the chips as they come out of the cut. It reduces clumping, keeps the bearing cleaner, and helps with cleanup too.
 
I am new to the MFK, and bought the kit wiht the vertical and horizontal bases.  With this particular kit, it is intended that you use the horizontal base.  In this case, the bit travels perpendicular to the glue line and snags it all away.

I used ti use a home made jig with a larger desalt router for all my edge banding.  It worked okay, but never felt as accurate.  Just the slightest twitch, tip or funny look, would produce a swirl if I wasn't careful.  I tended to leave some and sand, file or trim it down tight.

But, I did a bunch of drawers the other day, 22 I think.  Anyway, I edge banded them and used the MFK in the horizontal.  I zipped those things out!  It was so much easier than my old method!  I doubt I would ever try to do it with the router mounted vertically ever again.

But., I imagine, if you used the MFK in the vertical position, you might run into the same issue... the center of the bit doesn't turn as fast as the rim, and glue gets a chance to stick or gum up, instead of being swept away and throw out in the the dust collector.
 
Axis39 said:
I am new to the MFK, and bought the kit wiht the vertical and horizontal bases.  With this particular kit, it is intended that you use the horizontal base.  In this case, the bit travels perpendicular to the glue line and snags it all away.

I used ti use a home made jig with a larger desalt router for all my edge banding.  It worked okay, but never felt as accurate.  Just the slightest twitch, tip or funny look, would produce a swirl if I wasn't careful.  I tended to leave some and sand, file or trim it down tight.

But, I did a bunch of drawers the other day, 22 I think.  Anyway, I edge banded them and used the MFK in the horizontal.  I zipped those things out!  It was so much easier than my old method!  I doubt I would ever try to do it with the router mounted vertically ever again.

But., I imagine, if you used the MFK in the vertical position, you might run into the same issue... the center of the bit doesn't turn as fast as the rim, and glue gets a chance to stick or gum up, instead of being swept away and throw out in the the dust collector.

not sure how you applied the banding but with a conturo it applies tje glue to the banding. this is opposite to most edgebanders.  the problem is you have more glue than usual to deal with. the more the banding over hangs tje worse it is. 1-1.5mm pvc is best trimmed with the rp28 or similar. however real wood edgebanding can splinter or tear so the MFK is safer bet.  with pvc the mfk can start to reheat the conturos glue and spit out warm sticky shavings. its more of a conturo issue but a small one with work arounds and love the conturo despite
 
I have not quite convinced myself to buy the Conturo yet (I'm working myself up to it, though).  I mostly use hardwood strips glued on, or pre-glued, iron on stuff.  (Back East, I rarely did Euro style cabinets.  Here in California, things are different)

I think my theory of why the horizontal base works better than the vertical one sounds like a winner for the Conturo too.  The direction of the bit/speed dealing with the glue, etc.  Either way, the results I got with the horizontal base and the MFK were simple, and clearly the way to go!

 
Thanks everyone so far!

I think I mixed up the horizontal and vertical base in my original post  ::)

I have a DIY horizontal base for the Makita trim router and the router bit gummed up super quickly. I still don't understand how the MFK avoids that. Several possibilities:

[list type=decimal]
[*]Less glue. I already dialed down the glue amount on the Conturo. Anyone has a picture of the glue line before trimming to see how much squeeze out you get?
[*]Router bit. Festool recommends a two flute, 19 mm router bit. I used a 1/4'' downcut bit, which I had on hand. That was the wrong choice and I will try something else.
[*]Waiting longer before trimming to let the glue cure. I probably did after 15 min or so. How long do you usually wait?
[/list]

Any ideas or other suggestions?

 
Axis39 said:
I have not quite convinced myself to buy the Conturo yet (I'm working myself up to it, though).  I mostly use hardwood strips glued on, or pre-glued, iron on stuff.  (Back East, I rarely did Euro style cabinets.  Here in California, things are different)

I think my theory of why the horizontal base works better than the vertical one sounds like a winner for the Conturo too.  The direction of the bit/speed dealing with the glue, etc.  Either way, the results I got with the horizontal base and the MFK were simple, and clearly the way to go!
I have both the vert. and horz. base and there is a reason the vert. has NEVER been used.  The task the MFK is designed for the horz. base is the clear winner to me.  Followed by a profile bit of your choice in a cordless trimmer.  As far as the conturo goes its an amazing machine for small shop.  Theres really nothing that compares except for the MAfell wich is 3x-4x the price.  The ability to change color, no glue pot, handle curves, simply turn off and cool down then pack away in a tidy little systainer is a god send.  It has a few quirks like the extra glue on the banding but thats minor.  The conturo is probably my favorite tool festool makes its a shame its getting discontinued.
 
Jasmin said:
Thanks everyone so far!

I think I mixed up the horizontal and vertical base in my original post  ::)

I have a DIY horizontal base for the Makita trim router and the router bit gummed up super quickly. I still don't understand how the MFK avoids that. Several possibilities:

[list type=decimal]
[*]Less glue. I already dialed down the glue amount on the Conturo. Anyone has a picture of the glue line before trimming to see how much squeeze out you get?
[*]Router bit. Festool recommends a two flute, 19 mm router bit. I used a 1/4'' downcut bit, which I had on hand. That was the wrong choice and I will try something else.
[*]Waiting longer before trimming to let the glue cure. I probably did after 15 min or so. How long do you usually wait?
[/list]

Any ideas or other suggestions?

I dont have any pics of the glue line and Im taking a few days off so I wont for a bit but I can answer 1-3

1. I almost always use the middle setting without issue.
2. This is the bit I use in my MFK for 1-3mm banding.
3. I usually wait 15-30 min depending on climate 15 might be a little light.  However it doesnt take much heat to start to reactivate the glue

I would say to change out the bit first ASAP. On solid wood glued on with a glue that hardens like wood glue a spiral bit would be fine but on EVA glue that can reactivate and get gooey a spiral bit is most likely your biggest problem.  Either way its bad a down spiral is going to want to push the glue onto the finished surface and an upcut could cause some splintering issues.  I think a straight bit with a large gullet will perform much better in the MFK. 
 
Are you talking about veneer edge banding?  I always trim mine using just a random orbital sander with 120 grit paper.  I'm going to have to sand the piece anyway and the sander trims very quickly.

If you are using pre-finished plywood or melamine laminated particle board, then that won't work. 
 
  • Jasmin said:
    • Waiting longer before trimming to let the glue cure. I probably did after 15 min or so. How long do you usually wait?

    Any ideas or other suggestions?

    I'm now in the habit of doing all the edgebanding and then going back to trim after the edgebander has been put away.  That means I let the glue cure for 1-2 hours and it makes a huge difference.
 
Jasmin said:
Thanks everyone so far!

I think I mixed up the horizontal and vertical base in my original post  ::)

I have a DIY horizontal base for the Makita trim router and the router bit gummed up super quickly. I still don't understand how the MFK avoids that. Several possibilities:

[list type=decimal]
[*]Less glue. I already dialed down the glue amount on the Conturo. Anyone has a picture of the glue line before trimming to see how much squeeze out you get?
[*]Router bit. Festool recommends a two flute, 19 mm router bit. I used a 1/4'' downcut bit, which I had on hand. That was the wrong choice and I will try something else.
[*]Waiting longer before trimming to let the glue cure. I probably did after 15 min or so. How long do you usually wait?
[/list]

Any ideas or other suggestions?

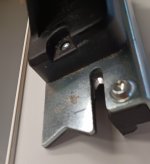
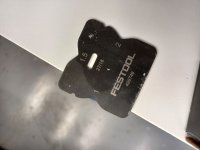
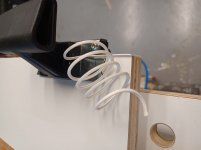
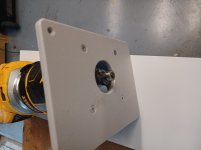
I was able to get some work done today between the storms.  I know its not MFK pics but you wanted a pic of conturo glue squeeze out so I took a few pics of the process showing the rb28 in action and the results.  Its important to make sure your workpiece is secure so you can focus on even steady pressure.  If you do it right there is zero and I mean zero overhang or glue left. a light pass with a 1mm roundover or whatever matches the banding you are using and thats it no file or sanding needed.  the festtol scraper was just set there because I was having trouble pulling focus on all that white.  Its kind of hard to tell bot I would say the glue is about 1mm wide x 1mm high or a little less. The best part is there is no shavings flying around just nice easy to clean pigtails. 
 

Attachments

  • 20220520_172228.jpg
    20220520_172228.jpg
    618.3 KB · Views: 246
  • 20220520_172727.jpg
    20220520_172727.jpg
    63.1 KB · Views: 191
  • 20220520_173346.jpg
    20220520_173346.jpg
    89.2 KB · Views: 220
  • 20220520_173500.jpg
    20220520_173500.jpg
    92.3 KB · Views: 270
Oh and just FYI that trimmer gets some bad press and truthfully out of the box its pretty bad.  It needs a little love to perform really good.  There are 4 screws I think, remove those and pull out the cutter blade.  Get yourself something hard and flat I used a piece of granite (tile) and attach a piece of sandpaper to the granite I used some spray glue I think I used either 320 or 400.  then take the blade and lay it flat on the sandpaper with the face that will touch the finished surface of your part and sand back and forth.  There is a black paint or coating on it and typically a bur or two which is the issue with it out of the box. Sand back and forth till all the coating and burs are gone. Keeping it nice and flat you could double face tape it to a small block if you wanted.  Once done its super smooth and will just glide along and not leave any black marks or damage behind. 
 
Those blade-type trimmers work fine on the resin banding, but you have to watch the grain on wood banding otherwise it will bite in and trash the banding. It is the main reason I prefer using a sander. I have a 2” wide chisel that I keep sharp, and once you get the hang of it, I think it works better than those trimmers.
 
The other restriction to them is that they only work with thin PVC (1mm or less) and veneer edgebanding. If you are edging with HPL (Formica), or 3mm PVC, it's a no-go.
 
That trimmer is for 1mm and 1.5mm anything thicker needs the MFk but 1mm is pretty standard if thats a thing.  It also wont go into a corner so I do as much with it then finish with a sharp chisel not sure I would say chisel is better but everyone is different.  It will do wood to but yes you have to be more careful and woods like white oak.

Packard are you applying edge banding with a conturo or Iron?  It is different for those who dont use one. 
 
afish said:
That trimmer is for 1mm and 1.5mm anything thicker needs the MFk but 1mm is pretty standard if thats a thing.  It also won't go into a corner so I do as much with it then finish with a sharp chisel not sure I would say chisel is better but everyone is different.  It will do wood to but yes you have to be more careful and woods like white oak.

Packard are you applying edge banding with a conturo or Iron?  It is different for those who dont use one.

I don't believe I have ever seen 1.5mm?
I have used 2mm a few times, some rather odd .7mm once, .5mm enough to know I hate it, 3mm fairly regularly on counter tops, 1mm is pretty much the standard.
I do more of my trimming on 3 dimensional assemblies than just narrow edges though. As you said, part of the beauty of the MFK is that it can go into inside corners.
 
rehau lists many different thicknesses including 1.2, 1.5, 1.7, 2.0, 2.2 Im pretty sure 1.5mm is pretty common and tried to look up my local supplier but they changed their site and no longer list the colors and sizes.  [mad] and I agree .5mm is awful. Its actually hard to believe .5mm can make such a difference but the difference between half mm and 1mm is night and day. 
 
Back
Top