You are using an out of date browser. It may not display this or other websites correctly.
You should upgrade or use an alternative browser.
You should upgrade or use an alternative browser.
Trion. I can see!
- Thread starter bill-e
- Start date

Jeff Magnus
Member
- Joined
- Feb 3, 2007
- Messages
- 35
Thats a great idea Bill! I did the same thing with my Trion, but I used one of those small flexible LEDs like the ones used in the Microfence router bases, http://www.microfence.com/pages/Plunge/Zoom5.html. I love the ability of being able to get down on my workpiece without dust blowing back in my eyes.
brandon.nickel
Member
- Joined
- Jan 23, 2007
- Messages
- 240
Bill, did you partially dismantle the light in order to bring the LED down to the blade guard? It definitely doesn't look quite the same as how they're selling it.
TahoeTwoBears
Member
- Joined
- Jun 24, 2007
- Messages
- 194
Bill,
Is that some sort of wire hanging down in front, or did you wire this light in some manner?
Mike
Is that some sort of wire hanging down in front, or did you wire this light in some manner?
Mike
mavrick1903
Member
- Joined
- Jan 22, 2007
- Messages
- 142
I'll look forward to the DIY instructions, too, but I'm betting there's a drop of hot glue or something at the light, which has been pulled from the housing, and the button/battery box unit is velcro'd to the foward part of the saw? just my guess. stellar idea, that's for sure!
I have a link on my page,http://NHWoodworker.com/temp/trionled.html, as well as this description below.
Ok, this first pic is the back side of the light. We're going to remove those 4 screws. Also, though not shown, put a piece of Velcro on this side making sure to leave the screw holes clear
[attachthumb=#1]
This is how it looks inside. The switch slides the battery forward and it contacts with the LED to light. We're removing the LED and remoting it with wire.
[attachthumb=#2]
I used solid phone cord wire. I heated a pin and punched a hole on the left side of the case so that the black wire could poke through...then I bent if over on the outside to hold it in place. Strip the wire so that it's bare over the range of movement of the battery, but so that there's insulation near where the second wire will be formed around the posts for the connection.
The second wire, in this case yellow, was stripped and formed around the molded pins in the case. A dab of hot glue was then used to hold things in place.
The wire around the posts (yellow) is the lead that attaches to the curved lead of the LED. Since this is a diode, hooking it up backwards = no light.
[attachthumb=#3]
[attachthumb=#4]
After some experimentation, I settled on this as the best position for the LED. This LED is very directional and it needs to be pointed directly at the blade/wood interface. The two previous attempts could not yield a sufficiently steep angle to accomplish that. I used my TDK chucked with a 3/16" drill to drill the hole. It will not work unless you use either a TDK or C12 so please pick one of those up first.
The best way to drill is to install the dust guard and very slowly and carefully drill the hole. Because you're drilling through a slot the first penetration will not actually make a 3/16th hole. You'll have to fiddle with it, putting pressure to the left and right, in order to complete this.
You want an interference fit so that you can press the LED in the hole and it'll stay there until you decide to remove it. The LED does not get hot.
[attachthumb=#5]
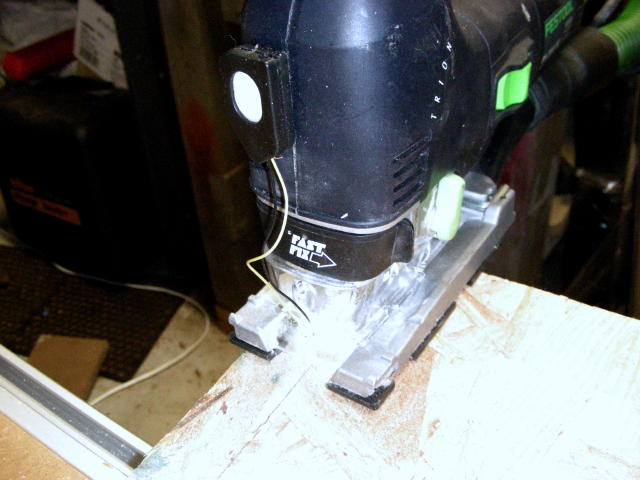
These next 2 pics just show the installation. If you expand the second one you can see the blade and cut line. I exposed on the bright light then re-framed the pics and took the shots, so the light doesn't wash out the pictures. I ran over alloted attachment size so some are links.
[attachthumb=#6]
http://nhwoodworker.com/temp/tl7.jpg
If I were to start over, the only hole I'd drill would be the lower one.
http://nhwoodworker.com/temp/tl8.jpg
This is the finished installation with the switch Velcro'ed to the Trion. Soldering is still just tacked on at this point.
http://nhwoodworker.com/temp/tl9.jpg
Ok, this first pic is the back side of the light. We're going to remove those 4 screws. Also, though not shown, put a piece of Velcro on this side making sure to leave the screw holes clear
[attachthumb=#1]
This is how it looks inside. The switch slides the battery forward and it contacts with the LED to light. We're removing the LED and remoting it with wire.
[attachthumb=#2]
I used solid phone cord wire. I heated a pin and punched a hole on the left side of the case so that the black wire could poke through...then I bent if over on the outside to hold it in place. Strip the wire so that it's bare over the range of movement of the battery, but so that there's insulation near where the second wire will be formed around the posts for the connection.
The second wire, in this case yellow, was stripped and formed around the molded pins in the case. A dab of hot glue was then used to hold things in place.
The wire around the posts (yellow) is the lead that attaches to the curved lead of the LED. Since this is a diode, hooking it up backwards = no light.
[attachthumb=#3]
[attachthumb=#4]
After some experimentation, I settled on this as the best position for the LED. This LED is very directional and it needs to be pointed directly at the blade/wood interface. The two previous attempts could not yield a sufficiently steep angle to accomplish that. I used my TDK chucked with a 3/16" drill to drill the hole. It will not work unless you use either a TDK or C12 so please pick one of those up first.
The best way to drill is to install the dust guard and very slowly and carefully drill the hole. Because you're drilling through a slot the first penetration will not actually make a 3/16th hole. You'll have to fiddle with it, putting pressure to the left and right, in order to complete this.
You want an interference fit so that you can press the LED in the hole and it'll stay there until you decide to remove it. The LED does not get hot.
[attachthumb=#5]
These next 2 pics just show the installation. If you expand the second one you can see the blade and cut line. I exposed on the bright light then re-framed the pics and took the shots, so the light doesn't wash out the pictures. I ran over alloted attachment size so some are links.
[attachthumb=#6]
http://nhwoodworker.com/temp/tl7.jpg
If I were to start over, the only hole I'd drill would be the lower one.
http://nhwoodworker.com/temp/tl8.jpg
This is the finished installation with the switch Velcro'ed to the Trion. Soldering is still just tacked on at this point.
http://nhwoodworker.com/temp/tl9.jpg
Tim Sproul
Member
- Joined
- Jan 22, 2007
- Messages
- 319
bill-e said:...... I used my TDK chucked with a 3/16" drill to drill the hole. It will not work unless you use either a TDK or C12 so please pick one of those up first.....

was wonderin' if anyone would catch that.Tim Sproul said:bill-e said:...... I used my TDK chucked with a 3/16" drill to drill the hole. It will not work unless you use either a TDK or C12 so please pick one of those up first.....
")
Mike_Chrest
Member
- Joined
- Jan 26, 2007
- Messages
- 385
Bill,
Great idea! Is the LED glued there or is it removable?
Mike
Great idea! Is the LED glued there or is it removable?
Mike
Similar threads
- Replies
- 69
- Views
- 1K
- Replies
- 2
- Views
- 276