TS 55 driving me crazy

mystudio

Member
Joined
Jan 1, 2017
Messages
16
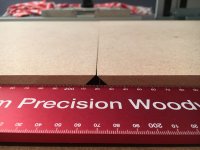
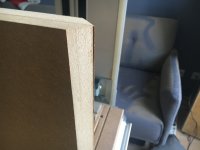
Have been back to Festool with my new TS 55 REBQ, they have measured the blade in the 90 degrees position, was fine. They can't measure the blade in the 45 degrees position, so, when it's okay in the 90 degrees position, they assume it's okay in the 45 degrees position. However, after buying the large Woodpecker square, dog benches for the MFT/3 and assuring that the MFT/3 is absolutely square (it is, I'm very sure, as well the dog benches as the woodpecker say so), alligning the MDF really nice on the table and doing some 45 degrees cuts, I end up again with this. And ow, I also bought a new blade for the 55, just to be sure. This is driving me crazy. I spent hours on alligning and doing just 4 cuts, just to be absolutely sure the table is okay and the MDF on the table is absolutely straight. Now I really don't have ideas anymore of what I can try. Maybe I am just expecting too much from this setup? All cuts in 90 degrees position are just fine. Also tried all the tips regarding the TS 55 in the 45 degrees position: move the base when the saw is not resting on the base, tighten the back first before tighten the front, push really hard on the base when cutting in 45 degrees to be sure the saw keeps its position during the cut, do a 90 degrees cut first and then the 45 degrees cut, go from the end to the beginning, so the opposite position for the cut. I'm lost. Is it my technique or am I too precise for these kind of cuts and is this the result I could expect?
 

Attachments

  • 20170322_193220183_iOS.jpg
    20170322_193220183_iOS.jpg
    1.8 MB · Views: 997
Is the deviation consistent? I.e. you get this at the beginning (or end) of the cut every time? Put some scraps of MDF under the rail on both sides of your piece.
Anyway, I think you worry too much. Once you put that miter joint together it'll look fine.
 
How you push your saw may have something to do with it. Use two hands on the saw and from lead in to exit keep the pressure consistent.

Also make sure the tension on the saw to track connection is correct.
 
mystudio said:
.... I'm lost. Is it my technique or am I too precise for these kind of cuts and is this the result I could expect?

What do you mean by "off" and not precise?
How much?
Tapered? Or bowed?
Or is the 45 degrees not 45?
 
When you are making a non-beveled cut, the height of the saw (not to be confused with blade depth) does not impact the position of the cut. However, when making a beveled cut, the height of the saw, which can change simply by letting there be a gap between the guide rail and workpiece, the position of the cut will shift.

An example of where this can be very noticeable is when making a bevel rip where the workpiece is supported by saw horses, and the sheet undulates up and down depending on whether it is supported below or not.

Another example would be on an MFT where your guide rail supports on either end are holding the guide rail away from the workpiece at the ends of the cut. (It would look similar to your picture.)

If you are not sure what I'm describing here, simply stick a thin shim under the center of your guide rail and make a bevel rip. In the vicinity of the shim, the blade will cut closer (or even under) the guide rail. You'll be able to see a wave in your cut when you're done.
 
My suggestion is that the rail is not flat on your material. Make sure that the rail supports are both adjusted to the height of your material and put some extra support at the same height for the rail in front of your material.

It is very important that, when cutting at an angle, there is absolutely no movement up and down in your rail.
 
Thx for all input and suggestions gentlemen. To answer some of your suggestions:
-Rail is okay. Changed it for another one already to exclude that
-Rail is absolutely flat on the surface. I'm aware of that and it's positioned carefully at the surface
-I'm pushing with the same strenght during the whole cut. Two hands on the 55: one on the regular position and the other on the base of the 55 because of the stability. During the whole cut they are there with the same pressure
-Changed the blade of the 55
-Before entering the surface, 55 is down and at full speed. At the end of the cut, I make sure the blade has left the surface before lifting the 55
-What I mean by 'off' is that at 45 degrees, the cut is not parallel 90 degreees anymore, like it is at the 90 degrees cuts. So, on the end of the surface/cut, you see that there is some surface visible under the rail, while there is no surface visible at the begin of the cut and neither at a 90 degrees cut. See pics.
 

Attachments

  • 20170316_104544810_iOS.jpg
    20170316_104544810_iOS.jpg
    1.8 MB · Views: 626
  • 20170316_160052314_iOS.jpg
    20170316_160052314_iOS.jpg
    1.9 MB · Views: 562
Is the rail the same thickness the whole way down?
(Not sure how an extrusion could be tapered...)
 
A couple of suggestions.

1) Can you eliminate the MFT guide rail brackets from the equation, maybe try using the guide rail with rail or parf dogs in the 20mm holes?
2) Try making the cut 2mm longer than needed then use a second pass to trim the exact dimension, or make two passes at the correct dimension with the first plunge at half the depth?

As Bohdan suggested you also need to put some scrap material, of the same thickness, under the rail for support both before and after the cut. It doesn't seem that you are in the picture?

My guess is that the MFT brackets are somehow manipulating the guide rail height on one end of the cut.
Or less likely this is being caused by deflection in the blade due to the cut being made too quickly and in one pass?

I'm sure it will be something simple...  It's a process of elimination!
 
I have also experienced this, no matter how meticulous I am with the setup. For whatever reason I always see the same result as mystudio; that is material left beyond the splinter guard at the end of the cut. I'm not using it on an MFT so it's not the guide rail brackets for me. I'm using parf dogs for alignment (which I screw-down to eliminate any movement on the rail or workpiece). I support the rails with off-cuts at either end too. I've used different guide rails with the same result and using the same technique as explained by mystudio.

I never got to the bottom of why the blade marginally deviates at the end of a 45 cut leaving material beyond the splinter guard so have no helpful suggestions I'm afraid but thought I would share that you're not the only one; it's been an ever-present issue for me.
 
IADE said:
I have also experienced this, no matter how meticulous I am with the setup. For whatever reason I always see the same result as mystudio; that is material left beyond the splinter guard at the end of the cut. I'm not using it on an MFT so it's not the guide rail brackets for me. I'm using parf dogs for alignment (which I screw-down to eliminate any movement on the rail or workpiece). I support the rails with off-cuts at either end too. I've used different guide rails with the same result and using the same technique as explained by mystudio.

I never got to the bottom of why the blade marginally deviates at the end of a 45 cut leaving material beyond the splinter guard so have no helpful suggestions I'm afraid but thought I would share that you're not the only one; it's been an ever-present issue for me.

[member=58714]IADE[/member]

Ah okay fair enough, may I ask if the rear of the saw blade also passes the end of the working panel in these scenarios?
I have not had that same experience with my rails and cuts at 45.
 
Ian Oracles said:
IADE said:
I have also experienced this, no matter how meticulous I am with the setup. For whatever reason I always see the same result as mystudio; that is material left beyond the splinter guard at the end of the cut. I'm not using it on an MFT so it's not the guide rail brackets for me. I'm using parf dogs for alignment (which I screw-down to eliminate any movement on the rail or workpiece). I support the rails with off-cuts at either end too. I've used different guide rails with the same result and using the same technique as explained by mystudio.

I never got to the bottom of why the blade marginally deviates at the end of a 45 cut leaving material beyond the splinter guard so have no helpful suggestions I'm afraid but thought I would share that you're not the only one; it's been an ever-present issue for me.

[member=58714]IADE[/member]

Ah okay fair enough, may I ask if the rear of the saw blade also passes the end of the working panel in these scenarios?
I have not had that same experience with my rails and cuts at 45.

Yes, in my case I run the blade all the way through and then do a few more passes as you have suggested in an earlier post in an attempt to trim closer which I have found helps to an extent (but not always). Might it be an unusual deviation in the blade directly caused at the end of the cut and somehow related to when it runs out of material to cut through?

 
Ian Oracles said:
Ah okay fair enough, may I ask if the rear of the saw blade also passes the end of the working panel in these scenarios?
I have not had that same experience with my rails and cuts at 45.

That would also be my question - because it isn't it would be possible that the blade isn't parallel to the rail (farer away at the front) which would lead to the leading edge of the blade cutting the cutoff edge and the trailing end cutting the edge of the workpiece. This would explain only having the issue on the end, as the back of the blade would have trimmed off what the front didn't get.

You could test this by doing a non-moving plunge into a piece of scrap (ideal a large one so you can clamp the rail and scrap to the table so nothing can move) should my theory be correct then you should see the kerf created from this not being snugly along the splinter guard but tilted away from it at the front of the saw. Or by stopping a cut in the middle, you would see a wider kerf at the beginning and at the end (behind where the back of the blade reached) the on-cut side of the kerf bending inward while the offcut size being straight.
 
IADE said:
Ian Oracles said:
IADE said:
I have also experienced this, no matter how meticulous I am with the setup. For whatever reason I always see the same result as mystudio; that is material left beyond the splinter guard at the end of the cut. I'm not using it on an MFT so it's not the guide rail brackets for me. I'm using parf dogs for alignment (which I screw-down to eliminate any movement on the rail or workpiece). I support the rails with off-cuts at either end too. I've used different guide rails with the same result and using the same technique as explained by mystudio.

I never got to the bottom of why the blade marginally deviates at the end of a 45 cut leaving material beyond the splinter guard so have no helpful suggestions I'm afraid but thought I would share that you're not the only one; it's been an ever-present issue for me.

[member=58714]IADE[/member]

Ah okay fair enough, may I ask if the rear of the saw blade also passes the end of the working panel in these scenarios?
I have not had that same experience with my rails and cuts at 45.

Yes, in my case I run the blade all the way through and then do a few more passes as you have suggested in an earlier post in an attempt to trim closer which I have found helps to an extent (but not always). Might it be an unusual deviation in the blade directly caused at the end of the cut and somehow related to when it runs out of material to cut through?

Well in that case you should set the saw to 45 degrees and make a cut only 1-2mm deep across a sizeable panel, still keeping some scrap material under the rail before and after the cut, and see if the same gap exists at the end of the cut.

If it doesn't then I would say yes, possibly it is blade deflection, maybe make two or three passes gradually deepening the cut in future. Or maybe cut slower?
 
How about the wood moving just slightly? Have you tried clamping the wood in place while cutting? Sorry if this was already suggested. I couldn't find that it was when I reviewed the other posts. I have found that sometimes the wood moves slightly, not much, but your result isn't much off either. If not clamp in place try holding the piece with one hand while cutting with the saw with the other.
 
Have you checked the toe in?
Also if you are clamping make sure you don't clamp too tight or you will get this.
 
When setting the TS55 for an angle cut lock the rear knob first and check the front scale as you tighten the front knob.
If your cuts are perfect at 90° the toe in is correct the weight of the saw body canted over may be altering its alignment, an introduced twist if you will.
Rob.
 
Rob's suggestion makes a lot of sense.  Assuming that is the issue, I would also try giving yourself more run off so the back edge of the blade can finish passing through the tail end of the cut.  If the saw is toed out, it might be the back end is trimming the piece flush with your splinterguard, but since you're stopping and lifting the blade after the leading edge has exited the cut, you never get that final section flush?  If setting the bevel proves too finicky, just give yourself that extra runoff. 

Sorry, I generally only do 90's with the track saw, so I'm just spitballing here. 
 
Just a few cents, and not sure if it was suggested yet or not:

1.) try to let the blade stop before letting it "retract" up into the saw.

2.) Try to play with the adjustments on your base to see you there is any side to side "slop" with the rail that might cause this.  Any issues are exaggerated 10 fold when you begin a bevel. 
 
If the purpose of making these 45 degree cuts is so that they can be joined like a box then you may be okay as the deviation might cancel out at each joint.

Looking at the photo of the two pieces side by side and then imagining that one piece has to be switched around before it mates up with the other you will see that the error will tend to cancel itself.

Try bringing two parts together with some glue and test the finished result. (For a perfectly strong mitred joint like that, glue on its own will be fine. Use masking tape to bring the joint together)

Peter
 
Back
Top