Ts 55 EBQ Fast Fix won't lock

mu

Member
Joined
Jan 18, 2013
Messages
8
Hi,
I have a UK TS 55 EBQ (491 596)

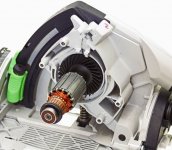
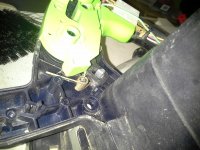
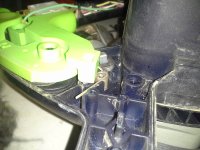
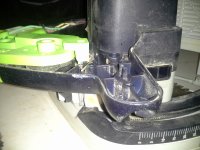
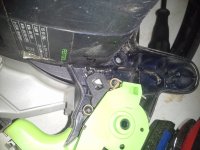
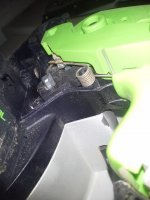
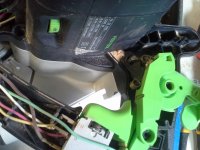
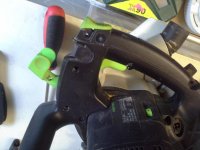
When I pull up the fast fix lever, the blade doesn't lock and still spins almost how it would without the lever pulled, but with just a bit more resistance.
It's quite old and out of warranty.
I've been told it could be dust not allowing the mechanism to work. If so, where would I blow that out from? I've removed the cover plate and vacuumed inside that but there wasn't much dust.

It has also been suggested that some sort of "shaft" may be broken. If so, what exactly would be the name of the spare part?
As it's out of warranty, I'm thinking twice about whether I want to get it repaired or looked at. It works fine and I can change the blade by holding the saw against a piece of wood.
Any help would be appreciated.

Thanks
 
I suspect that you sheered the pin on what I believe is called the "Lock Bolt" from the EKAT system. I know the part, but I am not sure of its EKAT designation. I think this is item 60 from EKAT with part number 459222.

This pin engages the motor rotor just under the cooling fan. It locks the rotor from turning. You could possibly break this pin by applying too much torque to the arbor bolt, or by accidentally raising the fast fix lever before the saw came to a complete stop. (An interlock prevents it from being raised while the trigger is still being pulled).

This part is accessible by just removing the inner portion of the main handle (8 screws), but I would caution you that there are a couple of springs in there that could get misplaced during reassembly if you are not careful.

It is probably a 5 minute repair for the service department, so I don't recommend tackling it on your own. If you do tackle it on your own, make sure to take a lot of photographs as soon as the handle side comes off. If you get those springs in the wrong place, the saw will be disabled. (i.e. the interlocks won't disengage, and you won't be able to plunge or pull the trigger. The saw will be useless.)

I don't have a picture of this part, but in the image below, you can see the channel that it rests in at the 12-o'clock position above the rotor cooling fan.


Attachments

  • Rotor.jpg
    Rotor.jpg
    118.4 KB · Views: 3,121
Thanks a million for that.
If anyone thinks differently, please let me know.
By the way, any idea how much they might charge for repair outside of warranty?
 
Greetings of peace,

I know it’s ben a long time but i have just got round to addressing this issue today. I ordered the part Rick suggested and opened the 8 screws for the handle. After opening, I realised it was actually the dust as was suggested to me by someone else. I tool some pictures in the process and will try post them here for others’ benefit as I couldn’t see how or why this would be a one off. It must be a tiny design weakness or something as, basically the dust gathers between the plastic body of the handle and the internal lever of the fast fix system.
Some note’s from my attempt:

Out of the 8 acres, 5 are T15 and 3 are T20
Ideally, you need dedicated dedicated Torx screwdrivers with at least 3” shafts due to the narrow and long recess that 2 of the screws sit in. If you don’t, you may be able to get them out with the correct size flat head also, but the torn is obviously much ore comfortable.
It will be useful to have a telescopic magnet with a small head (up to 5mm diameter); otherwise, you will be shaking and tapping and holding the saw upside down (which you don’t want to do) as it’s difficult to remove the cover without the screws totally out of the whole. You can do without it though by tapping and shaking.
As you take out the screws MAKE SURE you make a note of which screw goes where as they not all the same size and length.
Once screws are removed, lift the handle grip up and out over the trigger safety switch.
The, lift up the fast fix lever to remove the cover. Remove it gently to avoid disturbing the springs. Make sure all screws are completely removed and not just undone.
You will have to work the cover around the power connector part.

Try to remove all the dust, even from the threads of the screws, etc. A tooth pick and a toothbrush are good for disturbing the compacted dust and a can of compressed air (or possibly a vacuum cleaner and careful hands) for removing it. I just used a toothpick and lung-power. Once the compacted dust is removed, the fast fix lever engages properly.
Be very gentle as you don’t want to disturb the springs.

I took some pictures first in case I accidentally did or if I had to replace the part.
The part was 459222 indeed but I didn’t need to replace it in the end, thank God.

Hope that is of help to somebody and thanks for the pointers and the warnings about the springs, Rick.[attachimg=4][attachimg=5][attachimg=6][attachimg=7][attachimg=8][attachimg=9][attachimg=10]
[attachimg=1][attachimg=2][attachimg=3]


Attachments

  • 20150120_100626.jpg
    20150120_100626.jpg
    533.8 KB · Views: 2,563
  • 20150120_100613.jpg
    20150120_100613.jpg
    1.6 MB · Views: 2,578
  • 20150120_100608.jpg
    20150120_100608.jpg
    1.5 MB · Views: 2,587
  • 20150120_100554.jpg
    20150120_100554.jpg
    1.3 MB · Views: 2,637
  • 20150120_100544.jpg
    20150120_100544.jpg
    449.5 KB · Views: 2,548
  • 20150120_100146.jpg
    20150120_100146.jpg
    448.7 KB · Views: 2,651
  • 20150120_100136.jpg
    20150120_100136.jpg
    1.3 MB · Views: 2,575
  • 20150120_095219.jpg
    20150120_095219.jpg
    315.2 KB · Views: 2,576
  • 20150120_095127.jpg
    20150120_095127.jpg
    1.1 MB · Views: 2,499
  • 20150120_104524.jpg
    20150120_104524.jpg
    1.9 MB · Views: 2,518
This post just saved my TS55 a trip to Festool.  My saw is 10-12 years old and I was having this exact same issue.  The dust was causing the issue. 

Thanks!
 
Back
Top