TS55 + MFT/3 Not cutting Straight.

I'll go out on a thin limb here based upon my experiences.  Technique.  If precision cuts are desired, precision technique must be employed.  I keep a hand plane handy to "dress up" the intersection of cut and joined boards.  I have found that hand position, ever so slight changes in grip angle, grip pressure, direction of push or pull relative to the cut line, all will affect and effect the precision of the finished cut.  This is the difficult part.

We work with wood (which has movement related to stress relief, humidity, temperature, etc), in a basically semi to uncontrolled environment, so our expectations of precision should match the situation.  Repeatability would seem to be more important than precision.
 
Hi All, Thank you for your responses. My problem had been that the cut started closer to the guide rail and then moved away from the rail as the saw was approximately 30mm into the cut, as if the saw was indeed pulling the cut slightly side wards. The only thing I have done (Under advice from someone on FOG I think) was to hold the guide rail down to the work piece with my left hand, while guiding the saw with my right. I know that having to apply pressure to the track is no big deal, but it doesn't help work flow or confidence in the kit. I'm sure once I get over my frustration with the MFT I will be singing it's praises, provided it continues to keep giving my straight and square cuts, as it is while holding the guide rail in place by hand. I also tried to measure the movement of the rail in relation to the peg it sits on. When I say movement, I mean left to right across the work piece. The movement was only 0.04mm so that really doesn't equate to the amount the cut is wandering by, which was 0.5mm. There is clearly something else going on here that I'm not understanding at the moment. Thank you Holmz for your instructions on how to test for the problem. I will give it a go in the near future. Work keeps getting in the way! Antss, I like the way you say " It's just that sometimes the path of least resistance is the best one" it is so true. I am a guy of a certain age, and I'm getting past making a fuss. I just want to get on and do stuff, and If that means I have to fix it myself then so be it. This is all made much easier, knowing I have you good folks to call on for help. Many thanks !!!
 
Kuffs said:
Hi All, Thank you for your responses...
...
Thank you Holmz for your instructions on how to test for the problem...

I spite of my general confidence in trouble shifting, I would suggest that you treat those "instructions" more like "ideas to approach the problem" than actual proven instructions.

If you cut a piece of wood that is starts further back under the rail, then does that taper still manifest itself in the same place on the (which is a different place on the rail)? That is a good clue as to whether it is the rail or the saw/blade.
 
Hi Holmz, Ok thank's for that. I guess that, as holding the guide rail down while making the cut has cured the problem, the issue is one of movement in the rail or the saw pulling the rail some how. All I need to do is find out if the rail moves left to right or is being pulled downwards on the splinter guard side. I have to admit I can't see how the second of those two could be possible.

I see your in Aus' what part, if you don't mind me asking.

Thanks again.
 
Couldn't tell from your post whether you are completely plunging the saw prior to entering the wood or plunging over the wood. I would hope that even plunging directly into the wood would still yield a straight cut, but I would imagine the results of this operation would depend, to some degree on how fast you plunge and whether the saw is completely up to full speed before plunging. This was the only thing I got out of your post that I thought might be a cause. I confess I've never had this problem.

Through Festool classes and experience with the saw, I have learned to make sure I put constant force behind the saw rather than from the side. Sometimes, unknowingly, the cut can be deflected a tiny bit just from slight side pressure at any point along the cut.
 
Hi grbmds, I have not had this problem in the 5 years I've had the TS55 and Tracks. It's its a problem that has come about with that same saw in combination with my brand new MFT. The work piece is such, that the saw is plunged without the blade contacting the material, up to full speed, then fed into the work. I think you could well be right that I may be introducing some lateral movement, as when I hold the track with my other hand and do the cut, the problem goes away. I might try the operation again, only this time, standing to the right of the track/bench and using my left hand to guide the saw down the track. My theory being that this would put an opposite lateral force on the saw and perhaps produce either a good cut or one with and opposite taper than I have been getting.
A bit more experimenting is needed I think!

Thank you for your help grbmds.
 
I've read through the posts again and don't see where you have tried the SlopStop gadget. I may have missed it.
 
Kuffs said:
Hi grbmds, I have not had this problem in the 5 years I've had the TS55 and Tracks. It's its a problem that has come about with that same saw in combination with my brand new MFT. The work piece is such, that the saw is plunged without the blade contacting the material, up to full speed, then fed into the work. I think you could well be right that I may be introducing some lateral movement, as when I hold the track with my other hand and do the cut, the problem goes away. I might try the operation again, only this time, standing to the right of the track/bench and using my left hand to guide the saw down the track. My theory being that this would put an opposite lateral force on the saw and perhaps produce either a good cut or one with and opposite taper than I have been getting.
A bit more experimenting is needed I think!

Thank you for your help grbmds.
[member=64899]Kuffs[/member] Since the reach over the MFT isn't all that long, I try to stand and push as much from behind the saw as possible. I don't know whether there is any slight variation over the whole cut as I've never measured it.  I do think it's important to keep consistent pressure on the saw in exactly the same direction; from behind is preferred for me. Also, what [member=15289]Birdhunter[/member] said . . . The Slop Stop takes away any even slight side to side movement for the guide rail as it meets the tab on the front of the table. Maybe it shouldn't be necessary to buy this (as some have posted in the past), but it works and definitely improved my cuts and accuracy.
 
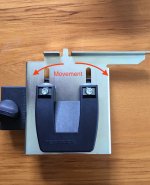
Hi Birdhunter & grbmds, I have not got hold of the slop-stop. I am in the UK and it's not easy to get hold of here. However, I have today discovered what the problem is. I find it hard to believe others don't have this same issue. The front and rear brackets that the guide rail hinges, and at the front of the table sits on, have an enormous amount of play in them when they are unlocked to adjust the rail height. if you can imagine hinging the guide rail out of the way so that it's not on the  front adjustment bracket, then unlocking the front bracket as though you are going to adjust it's height.  Then lift the metal part of the bracket to its highest point and without locking it in place, rock the bracket from side to side. On mine, the bracket moves approximately 4-5mm side to side and is lockable in at any point between these measurements. when I first set the table up, I had the track sitting right down on the MDF top to cut the splinter guard for the first time. This means I also produced a kerf in the MDF which registered perfectly with the splinter guard. Once I lifted the track up to make some test cuts, the movement in the front and rear brackets must have occurred and unknowingly, I locked that movement into position and made the cuts. The higher the adjusters are raised the more pronounced the problem gets. I would definitely be interested in whether or not you have this same movement in your adjustment brackets? Thank you for persisting with this problem, I really appreciate your help.
 
Guess I'm not completely sure I understand the movement/play you describe. I do certainly check squareness of the guide rail to fence before doing final cutting at the height which reflects the approximate thickness of the wood I'm cutting. However, I am not aware of any movement of the tab in the front or the bracket in back.

Just a few things to check. . .
1. Check that all the bolts that hold the guide rail to the fence are tight.
2. Check that all bolts are which hold the brackets in place are tightened.

There is a great video online that Brian Sedgeley from Festool has done concerning squaring up the fence to the rail. If you haven't seen it, it's worth watching. It simplifies the process and, from personal experience, it works.

There are adjustments on the brackets to make them clamp more securely but, from your description, I doubt that this is the problem.

Maybe there is some defect in the brackets, but I don't think I've ever heard of any defects that have shown up.

Again, I'm not sure I totally understand your problem. I have never had any problem resembling yours. If you can't find the Slop Stop in the UK, maybe someone on the FOG has a suggestion for making your own. The Slop Stop is really only a plastic insert for the underside of the guide rail which when adjusted properly wedges the tab that holds the guide rail onto the tab in place without any side movement.

Hope this helps.
 
Saw slop? Why is always one needs to buy more accessorise to make the tools work?

Is it possible that the smaller rail on the MFT has a jog in it?
I would take the rail off the MFT and try a cut with that rail and the other rail and see they differ.
 
The slop you describe in your MFT brackets has been discussed here many times before, and is the most frequent issue for users having problems getting and keeping their setup square. Typically, one will square the rail and fence with the rail sitting flat on the table. Then the problem comes when they try to raise the guide rail brackets to the appropriate height for the material to be cut. The slop in these guide rail brackets makes it all too easy to set the height with the brackets skewed out of plumb, making the rail and fence out of square.

I noticed this problem with my MFTs when I first started using an MFT 11 years ago. I would always try to keep one side of beveled metal portion tight to the black plastic base piece as I would raise or lower the bracket to keep it plumb. This works for me, however, in a somewhat recent thread a member here elected to place a portion of the brackets in a vise and squeeze the flanged portion a little tighter such that when reassembled, the guide rail bracket would raise an lower without much/any slop. In any event, now that you have discovered the issue, you should be able to find a process for raising and lowering your MFT's brackets in a way that keeps them plumb so the rail and fence remain square.
 
Hi Again, Thank you for getting back to me. I have to admit that I missed your replies, as I didn't spot that there was a second page button at the bottom of the first page, Whoops!. Corwin, you have hit the nail right on the head. The problem is exactly as you describe. I have today, tightened the bolts that tighten the guide rail height adjusters and although this won't fix the problem, it will stop the brackets tipping once the weight of the saw is on the rail. I have already started to bias the brackets against one side of the plastic block to keep them plumb, as Corwin described. I am going to work on an idea I have thought of, to overcome this issue. If it works, I will come back on this post with some photos and a description of whats needed to make it. I really appreciate the help of all that have taken time to come on here with advice and suggestions. 
 
My front lock down has a stop that rides in the extrusion channel. It is locked into place with a set screw. I trued up the rail using a Woodpecker framing square and tightened the back hinge unit. The SlopStop virtually eliminates any side to side movement of the rail.
 
Hi Birdhunter, I have the same stop on mine as well. The problemed area is the metal part (Height adjuster) that slides up under the guide rail. The part with the peg that locates in the channel of the rail. This part, when unlocked to make the height adjustment, moves in relation to the plastic block that it slides up and down on. I have just added a photo to make this clear, as I'm making a total mess of trying to explain this, and I think I might me making it more confusing than it needs to be  [big grin]View attachment 1
 

Attachments

  • IMG_5672.JPG
    IMG_5672.JPG
    1.6 MB · Views: 497
Another thing you can do is to take a scrap (the same thickness material as your workpiece) and place it under the guide rail to support the guide rail where it spans between the front bracket and the leading edge of your workpiece.
 
Hi Corwin, I was actually doing that as it happens. I think what has been going on, is that I was lifting the rail higher to accommodate thicker material, unaware that the adjusters had this problem and locking them out of plumb. this would tip the splinter guard side of the rail and the opposite side up. That explains why the start of the cut was bowed inwards and then straightened up once the saw was further down the track, as the track is able to settle down on the work piece towards the center as it flexes. I hope that makes sense. You seem to have a good handle on this problem, so I guess you know where I'm coming from? I have ordered a couple of bearings and I'm going to try and do a modification that uses them to bias the adjuster towards one side, so that adjusting the rail height doesn't require any more user input than is necessary. I will let you know how it goes. If it doesn't work then it's not a big deal, as the bearings are cheap enough. Thank you again for your input. 
 
The picture of the height adjuster with the rocking movement arrows explained well the issue you are having. When unlocked, mine rocks also.

I don't know why I have never had a cut that wasn't perfectly square. I always check the rail before a cut with my Woodpecker framing square with the rail down and resting on the tab after adjusting for material thickness. I use Qwas dogs to butt the top edge of the framing square against when I check for rail squareness. I use the same Qwas dogs to butt the material against for the actual cut.

After reading this thread, I will double check for squareness in the future.
 
Hi Birdhunter, Sorry if my explanation wasn't that good. I'm pleased the image helped. On my table it is possible to lock the position anywhere during that rocking motion, especially when the adjuster is at it's highest point. The higher the the adjuster goes, the more the problem is exaggerated at the saw blade. As I mentioned in my earlier replies, I manually bias the adjuster to on side to keep it in the right position. I should also mention that I use Parf dogs (The UK equivalent to Qwas) to set everything square, but before I discovered what was wrong, as soon as I raised the height of the rail all the squareness went out of the window. I would be interested to know if you too, can lock your adjuster in an out of plum position?   
 
Back
Top