TS55-REQ and MFT-3 Not Cutting Square

crookedcutter

Member
Joined
Apr 7, 2014
Messages
14
Hello.  I’m writing to see if someone can help me with my TS55-REQ and my MFT-3.  Before I begin, please let me say that I’ve searched the forum, but couldn’t find the answer to this, so I’m sorry if this has been answered before.  Also, I’m sorry that this is so long – I just want to make sure that no one wastes their time explaining something for me to try that I’ve already tried.

In short, my problem is that I’m not getting square cuts from my TS55-REQ and MFT-3.  I’ve owned the system for about 2 months, but just realized this issue when I was cutting some longer stock, rather than short cross-cuts.  If I cut an 18” board, it will be off by about 1/8”.

Before I realized my problem, I was making cuts after just checking the squareness of the fence vs. the track on the left side of the track.  I wasn’t using a fancy square, so when I realized my cuts were off, I bought a Woodpecker’s machined aluminum 12” square.

I went back and tried again, using the nicer square to check the angle between the fence and the track.  My cuts were still off by about the same amount, which is about 1/8” over 18”.

So, I went back to the store where I bought the saw and talked to them.  We went through everything, and the only thing they suggested was that the stock may be moving under the track when the saw makes contact.  Since that was their only suggestion, they got Festool support on the phone for me.  I spoke with the rep, and he walked me through everything, start to finish, that I should be doing to ensure square cuts.  He even told me the proper order to tighten things on the table.  So, I went back, and tried again.  My process was as follows:

1 – I took everything off the table
2 – I put the track supports back on the table, entering the rails from the left side of the table, pushed them as hard as I could against the factory-installed stops, and tightened them down very tight.
3 Per the Festool support rep’s instruction, I slid the track on the back support, only snugged down the front screw, lowered the track, and tightened the back screw very tight.  (Prior to speaking to him, I was making both screws tight.)
4 – I slid the angle unit on the table, and slid it all the way over until it was about 2 or 3 millimeters from the left side of the track – just barely enough space so the track could clear it when raised and lowered.  At this point, the only thing I tightened was the angle unit onto the table rail.
5 – I slid the fence into the angle unit until the right end of the fence was about 1/8” from the cutting enge of the track, and per Festool’s instructions, tightened it to the face of the angle unit.  At this point, the angle unit could still rotate right-to-left freely.
6 – I loosened the two screws on the top of the angle unit, positioned the angle unit to zero degrees, and dropped down the pin.  The angle unit could then move slightly.
7 – I lowered the track to be flat on top of the fence, locked in the back fence support, and raised the front support to make contact with the groove under the track, and locked down the front support.
8 – I placed the machined aluminum square on the left side of the track, and made contact with the track and the fence.  I put pressure in the corner of the square, which brought the fence into square alignment with the track.  I tightened down the two screws on top of the angle unit.
9 – I again put the square in the corner and pushed on both sides to work out any slight adjustment needed and tightened down the angle unit top knob.
10 – I again checked for square and it was.
11 – I then slid the angle stop into place, tightened it to the track and then tightened the top knob to tighten it onto the fence.
12 – I checked with the square again, and it was showing perfectly square – no wiggle at all.
13 – I put stock under the track, adjusted the height of the track in the same way as before and placed the saw on top of the track and made sure there was no wiggle – there was not.
14 – I measured the width of the fence in about 5 places.  It was perfect all the way down.  Additionally, it sits flat on surfaced stock, so I do not believe it to we warped.
15 – I vacuumed the table, the bottom of the saw and the track, and verified square one last time.
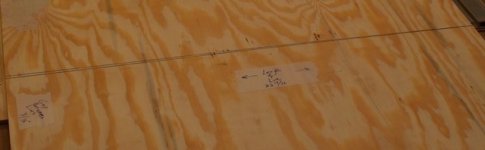
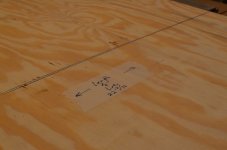
16– I began cutting a board that had been surfaced on both faces.  I cut approximately 2” off the north end of a board.  I vacuumed the table.  Then, I placed the north end of the board against the fence and cut about 2” off the east side of the board.  I vacuumed the table.  I then flipped the board over, keeping the north end of the board against the fence and cut about 2” off the west side.  I vacuumed the table.  I then placed the west side against the fence and cut the south end.
17 – During these cuts, I also measured the board’s placement on the table before and after cuts – there was no movement.
18 – After my final cut I checked the left side of the track and the fence for square, and it was – no wiggle at all on the square.

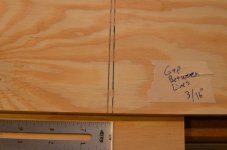
The end result was a board that was cut to about 12” x 8” and was off-square by about 3/32” along the 12” side.

I honestly don’t know what else I could do, or what I am doing wrong.  If there is anyone who can help me, I would really appreciate it.  I have no more ideas.
 
Other than the parts that came with the MFT, do you have any dogs (Precision, Qwas, Parf, etc) you could use?

My suspicion is that the fence and/or the rail unit are out of wack by a fraction. If you don't have any, there are a few YouTube videos about setup. I liked the on by Paul Marcel (half inch shy) when I got started. I would also invest in a slopstop that fits in the underside of the rail that meets the pin, it takes the play out of that component.
 
Thanks!  I had never heard of the slopstop, but have one ordered now.  Other than that, I don't have any other aftermarket parts, such as QWAS dogs.  I'm not opposed to using them, but the angle unit was a big reason I purchased the Festool system - my hope is that I can get it to work as intended.  I'll let you know how the slopstop works - thanks so much!
 
Hi,

 Welcome to the FOG!  [smile]

We have lots of MFT experts on here. I am sure they will help get it sorted out.

Seth
 
Sorry to hear that you're having trouble with getting good results from your MFT.

Could you take the widest material that you have and place it under the rail? Scribe a line with a pencil along the splinterguard side of the rail. Then flip the board 180° and repeat. The lines should be on top of each other. If they aren't then the problem is with the MFT and/or guide rail. If they are, then there's lateral movement being introduced during the cut.

Let's start with that and see what it yields.

Based on your measurements, which were compounded since you cut all four sides, you're off by 0.45° overall, or half that if cutting a single side.

Thanks,
Shane
 
crookedcutter, do a 5 cut test and post the results.

My MFT 3 is out of square 0.000" in 22.5".

Explain how you cut or a short video of you making cuts will help also.

Tom

I have to go get the explanation from another forum I posted the process and solutions on.
 
How to perform a 5 cut test;

Use a piece of plywood about 2' square, number the 4 sides, place edge #4 against the fence with edge #1 under the rail, cut off about 1/8", rotate #1 to the fence, cut 1/8" off edge #2, rotate 2 to fence, cut 1/8" off edge #3, rotate #3 to fence, cut 1/8" off edge #4, rotate edge #4 to fence, this time cut off about 3/4" off edge #1, mark the fence end of the cut prior to picking the piece up. Measure each end of the piece with a caliper or micrometer.

The difference from end to end is 4 times how out of square the MFT or saw is.
 
You need to have the fence free end holder in place to stabilize the fence. A tip on placing the holder, take the thumb nut off and move the block to the outer hole, don't loose the spring and washer. Place the holder in the vee groove, slide it into the slot on the fence clearing the tap on the holder tongue. Tighten the thumb nut, then gently tighten the lever, the fence aligns better this way.

Due a 5 cut test, measure the error. You have to calculate the adjustment using the distance from fence to the square track where the feather key is. The farther the fence is back the better, for this set up.

Slide the second feather key in the square track from the right. Depending on which way the rail is off, you will either place it tight to the existing key (moves fence to the left) or leave it short with the feeler gauge for the calculated adjustment between the two (moves fence to the right).

If you need to move the rail left, once the additional key is tight to the existing key loosen the existing key, insert the feeler gauge between the two keys, slide the existing back to the gauge and tighten it.

Moving the rail to the right, insert the gauge between the existing and new feather key as you insert it. Remove the feeler gauge, loosen the existing key slide it to the new key and tighten.

The biggest reasons for the fence coming out of square once set, is not using the free end support and pushing the pieces to hard against the fence at the free end.

Due to the amount of pieces I am currently cutting I have my fence bolted to the MFT. I set the fence long to the right side of the rail by about 6" and installed 2 bolts to the right of the rail and 4 bolts to the left of the rail. I had to machine part of the lip off the fence to do this. Once it was bolted down I cut through the fence. This gives me some backstop to the right of the rail. The UG wings are also installed on the MFT.

There is some slop between the rail and the rail support tab. I have my own method for dealing with this. I recommend you get a "Slop Stop", I believe they are available through E-Bay. If you can't find them let me know, I'll hunt them down for you.

I can set both of my MFT fences to square faster than I can type this.

Tom
 
Shane Holland said:
Sorry to hear that you're having trouble with getting good results from your MFT.

Could you take the widest material that you have and place it under the rail? Scribe a line with a pencil along the splinterguard side of the rail. Then flip the board 180° and repeat. The lines should be on top of each other. If they aren't then the problem is with the MFT and/or guide rail. If they are, then there's lateral movement being introduced during the cut.

Let's start with that and see what it yields.

Based on your measurements, which were compounded since you cut all four sides, you're off by 0.45° overall, or half that if cutting a single side.

Thanks,
Shane

Hi Shane,

I did what you said.  My process was as follows:

I squared up the fence to the track and locked everything in place.  I took a piece of plywood that was 22-13/16" long and placed it under the track.  I clamped it using a Festool clamp to make sure it didn't move and Scribbed a line down the splinterguard edge.  I then flipped it around and scribbed the same line making sure that my piece was against the fence, and clamping it down again.  I matched the first line up with the top end of the splinter guard when I flipped it.  At all times I made sure the track was positively engaged with the track supports, etc.  The result was a line that diverged about 3/16".  I repeated this process three or four times on different pieces of stock, and got the same result each time.

I've attached pictures of the results.  Thanks so much for your help.

[attachimg=#]

[attachimg=#]

[attachimg=#]
 

Attachments

  • 1.JPG
    1.JPG
    27.7 KB · Views: 2,120
  • 2.JPG
    2.JPG
    42.5 KB · Views: 2,094
  • 3.JPG
    3.JPG
    53 KB · Views: 2,247
tjbnwi said:
You need to have the fence free end holder in place to stabilize the fence. A tip on placing the holder, take the thumb nut off and move the block to the outer hole, don't loose the spring and washer. Place the holder in the vee groove, slide it into the slot on the fence clearing the tap on the holder tongue. Tighten the thumb nut, then gently tighten the lever, the fence aligns better this way.

Due a 5 cut test, measure the error. You have to calculate the adjustment using the distance from fence to the square track where the feather key is. The farther the fence is back the better, for this set up.

Slide the second feather key in the square track from the right. Depending on which way the rail is off, you will either place it tight to the existing key (moves fence to the left) or leave it short with the feeler gauge for the calculated adjustment between the two (moves fence to the right).

If you need to move the rail left, once the additional key is tight to the existing key loosen the existing key, insert the feeler gauge between the two keys, slide the existing back to the gauge and tighten it.

Moving the rail to the right, insert the gauge between the existing and new feather key as you insert it. Remove the feeler gauge, loosen the existing key slide it to the new key and tighten.

The biggest reasons for the fence coming out of square once set, is not using the free end support and pushing the pieces to hard against the fence at the free end.

Due to the amount of pieces I am currently cutting I have my fence bolted to the MFT. I set the fence long to the right side of the rail by about 6" and installed 2 bolts to the right of the rail and 4 bolts to the left of the rail. I had to machine part of the lip off the fence to do this. Once it was bolted down I cut through the fence. This gives me some backstop to the right of the rail. The UG wings are also installed on the MFT.

There is some slop between the rail and the rail support tab. I have my own method for dealing with this. I recommend you get a "Slop Stop", I believe they are available through E-Bay. If you can't find them let me know, I'll hunt them down for you.

I can set both of my MFT fences to square faster than I can type this.

Tom

Thanks, Tom.  That's one of my worries...that it will take me a day-and-a-half of set-up each time I change my angle...  I appreciate the input.  I've already got a slopstop on order!
 
That means that the saw and your technique is not introducing the error. Just wanted to narrow down the potential causes.

What this tells me is that the rail and fence are simply not square.

For kicks, can you check your square? Do the same thing as before. On your plywood, strike a line with your square. Flip the square and strike another line. They should be right on top of each other.

EDIT: You would only need to be off by less than 3/32" at 12" to have the margin of error shown over 22".

Shane
 
crookedcutter said:
tjbnwi said:
You need to have the fence free end holder in place to stabilize the fence. A tip on placing the holder, take the thumb nut off and move the block to the outer hole, don't loose the spring and washer. Place the holder in the vee groove, slide it into the slot on the fence clearing the tap on the holder tongue. Tighten the thumb nut, then gently tighten the lever, the fence aligns better this way.

Due a 5 cut test, measure the error. You have to calculate the adjustment using the distance from fence to the square track where the feather key is. The farther the fence is back the better, for this set up.

Slide the second feather key in the square track from the right. Depending on which way the rail is off, you will either place it tight to the existing key (moves fence to the left) or leave it short with the feeler gauge for the calculated adjustment between the two (moves fence to the right).

If you need to move the rail left, once the additional key is tight to the existing key loosen the existing key, insert the feeler gauge between the two keys, slide the existing back to the gauge and tighten it.

Moving the rail to the right, insert the gauge between the existing and new feather key as you insert it. Remove the feeler gauge, loosen the existing key slide it to the new key and tighten.

The biggest reasons for the fence coming out of square once set, is not using the free end support and pushing the pieces to hard against the fence at the free end.

Due to the amount of pieces I am currently cutting I have my fence bolted to the MFT. I set the fence long to the right side of the rail by about 6" and installed 2 bolts to the right of the rail and 4 bolts to the left of the rail. I had to machine part of the lip off the fence to do this. Once it was bolted down I cut through the fence. This gives me some backstop to the right of the rail. The UG wings are also installed on the MFT.

There is some slop between the rail and the rail support tab. I have my own method for dealing with this. I recommend you get a "Slop Stop", I believe they are available through E-Bay. If you can't find them let me know, I'll hunt them down for you.

I can set both of my MFT fences to square faster than I can type this.

Tom

Thanks, Tom.  That's one of my worries...that it will take me a day-and-a-half of set-up each time I change my angle...  I appreciate the input.  I've already got a slopstop on order!

Once you get the stops set it will alway return to zero. Make sure you use the free end support and tighten it in the proper order.

Make sure you push down on the angle gauge indexing stud before you tighten the thumb screw that locks the angle gauge. There is a slight tapper to the gauge and pushing down assure you are centered.

You need to do a 5 cut test. That way you know the fence reference face is correct and will be cut by the saw on the rail at each step.

Tom

 
My older MFT and TS55 also have the problem of not cutting square when the rail is square to the fence.  I always end up having to adjust the rail just slightly out of square to the fence to get a square cut.  I've never figured out why the cut isn't square when the rail/fence is square.  I use the Woodpeckers 2616 precision square to square the rail and the fence.  That's been one of my biggest complaints with the MFT along with the fact that it goes out of square so easily.

I've finally adjusted to the fact that I have to resquare the thing before each project, but I don't like it.

Fred
 
bruegf said:
My older MFT and TS55 also have the problem of not cutting square when the rail is square to the fence.  I always end up having to adjust the rail just slightly out of square to the fence to get a square cut.  I've never figured out why the cut isn't square when the rail/fence is square.   I use the Woodpeckers 2616 precision square to square the rail and the fence.  That's been one of my biggest complaints with the MFT along with the fact that it goes out of square so easily.

I've finally adjusted to the fact that I have to resquare the thing before each project, but I don't like it.

Fred

For this, the "slop stop" (think that is what is called and mentioned earlier in this thread) might be the answer. It's possible, based on other posts I've read, that there is some wear on the slot in the track into which the tab on the position stop fits. Seems like a lot to be out of square just for that though. I used this after market accessory and found that the track fits much more firmly without any movement and seems to stay where you set everything square. Don't know if that is it but it might be worht a try.
 
grbmds said:
bruegf said:
My older MFT and TS55 also have the problem of not cutting square when the rail is square to the fence.  I always end up having to adjust the rail just slightly out of square to the fence to get a square cut.  I've never figured out why the cut isn't square when the rail/fence is square.   I use the Woodpeckers 2616 precision square to square the rail and the fence.  That's been one of my biggest complaints with the MFT along with the fact that it goes out of square so easily.

I've finally adjusted to the fact that I have to resquare the thing before each project, but I don't like it.

Fred

For this, the "slop stop" (think that is what is called and mentioned earlier in this thread) might be the answer. It's possible, based on other posts I've read, that there is some wear on the slot in the track into which the tab on the position stop fits. Seems like a lot to be out of square just for that though. I used this after market accessory and found that the track fits much more firmly without any movement and seems to stay where you set everything square. Don't know if that is it but it might be worht a try.

I mentioned it above and use it everyday.  It was one of the best investments I made for my MFT kit.  I have been contemplating a "better way" to use the drop down rail and I think the part I would ditch would be the bin and index along the bottom of the rail.  I think there should be some sort of "over clamp" that grabs the back of the rail (square portion with open area up top) and holds it.  I have actually used one of my fast clamps in there before to hold it steady when cutting high dollar lumber.

I might have to mock up this idea and post around... see what kind of response comes back.

but by all means, buy the SlopStop
 
I think Fred is referring to the MFT 800 or 1080, the predecessors to the MFT/3. Those were more prone to not maintaining square as well.
 
Right Shane, I have the MFT 1080.  Have considered buying an MFT/3 since its fence seems much beefier and easier to realign when you've moved it, but don't have enough room for it at the moment.

Fred
 
I had the same problem, so did others here.

All boiled down to the question,

Is your square square?

Like my self, a lot thought it was but much like myself and others, It wasnt.

I suggest getting the woodpeckers square. Its about 90- 100 bucks.

That ay ya got a square square
 
Even though your using a Woodpeckers' square, I'd still verify it. It's unlikely that it's off but you still have to start there.
 
Back
Top