TS60 question

Toolpig

Member
Joined
Jan 25, 2007
Messages
399
Is there a trick to twisting the 36mm hose onto the TS60 port? I’m able to push it on, but I can’t twist lock it because the port wants to spin and there’s nothing for me to hold onto and prevent it from spinning.

Sent from my iPhone using Tapatalk
 
Maybe unscrew the nut from the saw, attach the fitting to the hose, then screw it back on?
I have had an aftermarket 3D printed one on mine since day one, so I'm not much help.
This one is different from the one I got for the TS55. It is internal fit only, so no 36mm hose.
It has never given me a problem though, since only use the 36mm hose with the OF1400 anyway.
The 27mm has always been enough for the other tools.
 

Attachments

  • TS55.jpg
    TS55.jpg
    322.6 KB · Views: 65
Jason White said:
Is there a trick to twisting the 36mm hose onto the TS60 port? I’m able to push it on, but I can’t twist lock it because the port wants to spin and there’s nothing for me to hold onto and prevent it from spinning.

Sent from my iPhone using Tapatalk
You just hold it in your hand.

Also, the middle part, the one which rotates, can be removed by hand as well, that is done when one needs to attach the dust bag like the TSC 55 uses.

When attaching the bigger hose, one just need to use a bit of force to hold the rotating part. The trick is to push the hose at the right place - it need to go in easily, not by excessive force. If it does not want to go in, likely the grooves/protrusions are not aligned. Also, it needs to go full way - if the grooves are not pushed in sufficienctly, they will prevent the rotation. Give give it some playing with when not stressed for the next cut ..

That said, agree on the CRG comments as well.
 
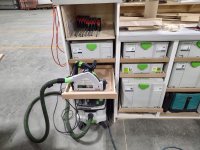
There are alignment arrows and alignment lines molded into the new bayonet connector, but in a dimly lit room, it's impossible to see them at a normal reading distance.

[attachimg=1]

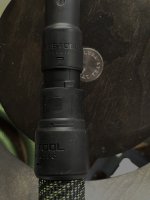
There needs to be some light and you have to look closely.

[attachimg=2]

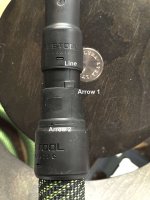
In this case, you align Arrow 1 with the line and push forward until both pieces are fully engaged, then you twist the connection about 1/4 turn (similar to Plug-it cord) until Arrow 2 is in alignment with the line.

In theory, it's a simple practice but I struggle with it every time whether it's with the 27mm or 36 mm hose. Also, it's easier to remove the fitting from the saw, install the hose and then reinstall the fitting on the saw.

Festool really should consider over-molding the arrows & lines on the bayonet connector in a contrasting color to make them more visible.
 

Attachments

  • 14123.jpg
    14123.jpg
    449.4 KB · Views: 208
  • 14123 marked.jpg
    14123 marked.jpg
    595.1 KB · Views: 207
I take a white permanent marker and accentuate them from time to time.
 
Crazyraceguy said:
I liked the old ridges that they had before this improvement
Agree that on the D22/27 ends the ribs worked well/better, not so much with the D36 smooth ends. At least those versions I came along.

Was just replacing an end with the new Festool one to a 10yrs old D36 hose from my Protool AC vac. The old "big" hoses had no ridges as far as I can tell .. so the old hose was unusable with hand tools as kept falling off. Worked fine with the mitter saw.

What I hate even more is the Makita ends from Nilfisk, those are just horribly convoluted in my view.
 
Back
Top