I'm making some waterfall joints with the TS75, and the 45 degree stop is out by between 1 and 2 degrees. I emailed customer service, and they just told me to send it in. I bought the tool used and believe it is out of warranty. Is there a way to recalibrate the bevel gauge without tearing the tool apart?
You are using an out of date browser. It may not display this or other websites correctly.
You should upgrade or use an alternative browser.
You should upgrade or use an alternative browser.
TS75 Bevel Issue
- Thread starter TomInNC
- Start date
Birdhunter
Member
- Joined
- Jun 16, 2012
- Messages
- 4,108
I have never tried to do furniture grade bevels either my TS55. I never considered that tool to be within 1 to 2 degrees of accuracy. If I had to rely on it for that cut, I’d probably just do test cuts until I got what I needed.
woodbutcherbower
Member
I do a large number of waterfalls on kitchen countertops (see 'TS60K' thread). Rule #1 = don't ever trust the numbers on the gauge. Make a bunch of scrap cuts on offcuts first and see how your own saw is set up. I just bought a brand-new TS60, and out of the box, my perfect 45-degree bevel cuts are made with the scale set at 43.5 degrees. My TS55 makes perfect cuts set at 46 degrees.
woodbutcherbower said:Snip. Make a bunch of scrap cuts on offcuts first and see how your own saw is set up. Snip.
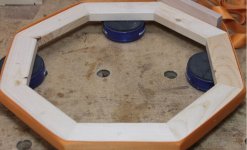
That is the way to go regardless of what saw you use - be it a track saw, SawStop or RAS. I cut 22.5* on my Kapex, and verified the cuts on scraps with a protractor. The verified setting produced a CNC-like result (picture taken during dry-fitting):
[attachimg=1]
When I cut long miters (bevels at 45*) on the SawStop, the inclinometer gives me a setting that's close to perfection, but it's not perfect until it gets verified by some test cuts.
Attachments
- Joined
- Oct 16, 2015
- Messages
- 5,789
I do this with a fair amount of frequency and have never had an issue with the angle being off. The main thing I had to learn was the sawing technique itself. You have to be very aware of the saw as it runs off of the end of the cut. It naturally tends to tip or maybe bow the end of the rail slightly, resulting in a miter that is not exactly straight. This may also be a side-effect of left-handed cutting and body position. It can be overcome.
woodbutcherbower
Member
[member=78714]TomInNC[/member] - the input from [member=57948]ChuckS[/member] and [member=58857]Crazyraceguy[/member] is right on the money. Check out the 'Member Projects' section of the forum and gaze in awe at the stuff these guys turn out ......
bobtskutter
Member
[member=78714]TomInNC[/member]
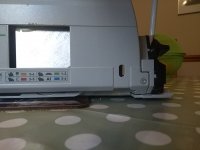
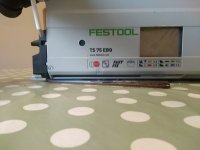
You can adjust the 45degree bevel stop.
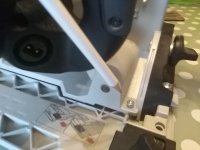
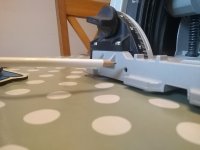
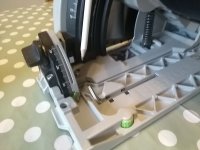
If you look at the flat side of the saw, the one with the window to loosen the arbor bolt, there are two very small Allan key screws (2mm) next to the thumb wheels.
You can adjust those screws to set the 45degree stop.
There are also two torx screws on inside the saw, one behind the handle and one next to the front bevel gauge. These screws set the 90degree stop.
You can adjust the green angle marker with a 2mm allan key in the small hole on the front of the saw.
Please be aware of what others have said, make plenty of text cuts when trying to set the stops.
Very slight changes in how to clamp the rail and hold the saw can throw off bevel cuts.
Good luck,
Bob
Edit, added some (very bad) pictures.
You can adjust the 45degree bevel stop.
If you look at the flat side of the saw, the one with the window to loosen the arbor bolt, there are two very small Allan key screws (2mm) next to the thumb wheels.
You can adjust those screws to set the 45degree stop.
There are also two torx screws on inside the saw, one behind the handle and one next to the front bevel gauge. These screws set the 90degree stop.
You can adjust the green angle marker with a 2mm allan key in the small hole on the front of the saw.
Please be aware of what others have said, make plenty of text cuts when trying to set the stops.
Very slight changes in how to clamp the rail and hold the saw can throw off bevel cuts.
Good luck,
Bob
Edit, added some (very bad) pictures.
Attachments
woodbutcherbower said:I do a large number of waterfalls on kitchen countertops (see 'TS60K' thread). Rule #1 = don't ever trust the numbers on the gauge. Make a bunch of scrap cuts on offcuts first and see how your own saw is set up. I just bought a brand-new TS60, and out of the box, my perfect 45-degree bevel cuts are made with the scale set at 43.5 degrees. My TS55 makes perfect cuts set at 46 degrees.
Thanks for the feedback. I will definitely be making test cuts. I was just hoping to be able to change the 45 degree stop to indicate the correct angle once I have that determined so that I don't have to repeat the calibration. On Dewalt miter saw, for example, after you have the saw calibrated, you can loosen a few screws to align the scale correctly. Is there such an option on the festool track saws?
Disregard my previous post. Apparently I was writing that as Bob was putting together his detailed response. Thanks for that.
Is there a reason why Festool wouldn't include this calibration information in the manual? I swear every other tool I have has some line in the manual that states "it is adjusted correctly at the factory, but if it's now out of square, here's how to adjust the scale."
Is there a reason why Festool wouldn't include this calibration information in the manual? I swear every other tool I have has some line in the manual that states "it is adjusted correctly at the factory, but if it's now out of square, here's how to adjust the scale."
Birdhunter
Member
- Joined
- Jun 16, 2012
- Messages
- 4,108
Some times I think Festool manuals are written by a competitor.
- Joined
- Oct 16, 2015
- Messages
- 5,789
Birdhunter said:Some times I think Festool manuals are written by a competitor.
It's like getting driving directions from someone who knows where you need to go, then they tell you kind of like you have done it before, but need a little reminder. You get some of the directions and they assume that you know the rest.
bobtskutter
Member
If Festool wrote detailed manuals we wouldn't need the FOG! [laughing]
It is weird, considering how much the tools cost there is very little explanation of how to use them. But there is a vast quantity of information out there on the internet.
When was the last time anyone got a manual for a new piece of computer software?
Bob
It is weird, considering how much the tools cost there is very little explanation of how to use them. But there is a vast quantity of information out there on the internet.
When was the last time anyone got a manual for a new piece of computer software?
Bob
Packard
Member
My dedicated 45 degree angle picture framers’ miter saw is more accurate than any adjustable saw can aspire to.
That is partly because the angle is not adjustable and is difficult to knock out of adjustment.
But the bigger part is that the adjacent cuts are made on the opposite side of the blade.
Assuming the 90 degree angle fence is truly 90 degrees, (it is), the left and right sides of the miter will always add up to 90 degrees, even if one side is 44 degrees, the opposite side is going to be 46 degrees and always adding up to a perfect 90 degree angle.
I will step out on the limb and assume that most of the cuts are going to be to sheet goods of some sort.
You could use cuts on the opposite side of the blades, but that would mean keeping track of all the pieces. A headache I would not like to deal with.
But a router bit is factory fixed. And like the dedicated miter saw, it cannot easily be knocked out of adjustment.
In that case, Whiteside (and others) make precise 45 degree angle router bits. These are guided bits (with a bearing) but mounted on a table with a fence will be a better choice. They make one (#2306) for cutting 3/4” thick materials and one for thicker materials (#2310).
It is probably best to first cut the miters with the saw and then just dress the edges with the router bit.
The bit for 3/4” is about $50.00 and the one for thicker materials (#2310) is about $100.00. The #2310 has a cutting length of 1-1/2”. I am no good at square roots, but that should handle just over 1” thickness.
mino
Member
To be fair, yours is a sample of 1 (or a few at most).Crazyraceguy said:I do this with a fair amount of frequency and have never had an issue with the angle being off.
...
The TS55/60/75 series angle marks themselves are accurate indeed. But that is not enough as you rightly point out. For some they may be spot on, for some they may not. This will come from technique, rails used (Makita versus FS/2 flexes differently), clamping force applied etc. etc.
@ OP
Ref calibration:
Only the 90-degree position can be reliably calibrated. The scale is fixed, so the 45° value "matching" will inevitably be hit/miss.
As mentioned, the best (universal) way is to test, measure and note the angle value that gives you 45° when 90° gives you square cuts.
I should have mentioned it before, but I will primarily be using the TS75 on slabs, not on sheet goods.
For those of you that have used track saws for waterfall joints, what's your process for running through your test cuts? Do you do a 4-cut test? If so, how do you set the angle the first time when you are making a test cut?
I am new to the track saw world, but on the table saw or miter saw I would typically align the blade with a combo square blade to get the first cut, then adjust as needed. I tried doing this with the TS75, but when I used the FastFix lever to lock the blade at a plunge around the 45 degree bevel, I was having issues referencing the blade against the square because of the limited plunge depth. Is there a way to lock the TS75 blade at full plunge depth? Just trying to limit the number of adjustments during the setup.
- Joined
- Nov 18, 2010
- Messages
- 1,023
[member=78714]TomInNC[/member] I would make a test cut at full depth in a thick piece of wood and check the resultant angle. It's really that angle that matters.
There is no way to lock the saw at full depth short of a zip tie or something.
There is no way to lock the saw at full depth short of a zip tie or something.
bobtskutter
Member
I can get an iGaging angle cube on the back of the blade with the saw in the non-plunged position. It's difficult to read the scale but it can be done.
regards
Bob
regards
Bob
Similar threads
- Replies
- 30
- Views
- 2K
- Replies
- 2
- Views
- 133
- Replies
- 0
- Views
- 833