Two Quick Questions About Table I'm Building

DavidCBaker

Member
Joined
May 31, 2010
Messages
537
Folks, I could use your help. My son had a massive 160' tree come down. He hired a portable sawmill guy to come and slab it, and we're using that to build a dining room table for their new home. Between you and me, pecan is a total PITA to work with. The only reason I'm doing it is for memory purposes and to make him happy.

We're all done except sanding, some edging treatment, and attaching the legs. I have two questions:

First, can I just use some high grade lag bolts (4 per leg) to attach them? Should I put a larger flat piece between the legs and the slab? Should I use threaded inserts (I've never used them)? The table is large (4 x 8') and heavy, heavy.

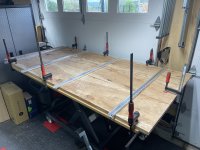
Second, it seems to naturally warp. The wood moisture level is good and it's been drying for two years, so I don't think we didn't wait long enough. The wood has incredible embedded forces. As you can see, I've kept it straight by clamping it to my Felder Assembly Table. The attached legs will strengthen it a bit, but I'm wondering if I should mount two or three extruded aluminum pieces underneath? (I've laid a few on it to show you what I mean.)

Thanks, folks.


Attachments

  • table.slab.jpeg
    table.slab.jpeg
    504.6 KB · Views: 374
  • table.leg.jpeg
    table.leg.jpeg
    482.4 KB · Views: 364
Nice looking table legs! What is the thickness of the top? In my limited experience making slab tables, I have attached the legs with heavy screws (eg #10) only and it worked well. What is the moisture content of the wood now?
 
Have you put a moisture meter on the wood? Even 2 years of air drying in Nashville might not get the MC down a lot.

As for attaching the legs, I'd use threaded inserts. I'm also a bit concerned about the lack of slots in the legs to attach with. The wood is likely to seasonally expand some and you would want to allow for that.

I'm also not a big fan of the channel under the top. In the thickness available, I don't think it actually does anything to prevent warping . With what you have and even steel channel it doesn't take a lot force to deflect those pieces.

Ron
 
binettea said:
Nice looking table legs! What is the thickness of the top? In my limited experience making slab tables, I have attached the legs with heavy screws (eg #10) only and it worked well. What is the moisture content of the wood now?

Once we're done with the hand sanding, it'll be 1 ¼" thick. I'll check on the moisture content. Gotta walk over to the shop.
 
rvieceli said:
Have you put a moisture meter on the wood? Even 2 years of air drying in Nashville might not get the MC down a lot.

As for attaching the legs, I'd use threaded inserts. I'm also a bit concerned about the lack of slots in the legs to attach with. The wood is likely to seasonally expand some and you would want to allow for that.

I'm also not a big fan of the channel under the top. In the thickness available, I don't think it actually does anything to prevent warping . With what you have and even steel channel it doesn't take a lot force to deflect those pieces.

Ron

Thank you, Ron. I'll go measure the content. I'm starting to think I need threaded inserts, too, but I'm not sure. The nearest store that has them is a 45 minute drive, but seems a trip is in my future. Pecan is like concrete. Geez, this stuff is heavy and hard. It's also a tad brittle. Mentally I'm prepared for this whole project to fall apart and build it with some sensible wood. :)
 
I share the same concerns. Two years of air drying may not be enough. I would have started with the moisture meter. The internal stress that you mentioned is still there, moisture may be part of it, but since it is already glued up? I just don't know how it will react.
The lack of slots to accommodate the wood movement that will surely happen will cause it to split as it shrinks.
I think the same about the aluminum too. The wood will likely overcome it. Use steel, if you feel the need for support, definitely with slots. The vertical height of the bends is where the stiffness lies, flat is useless.
Threaded inserts are fine, I have used hundreds of them. The more hard or dense the wood, the more important the size of hole you put them into. If they are too small, you will strip the insert while threading it in.
 
Thanks. I don't remember what it read, but I checked the moisture before we started building and it was well under what was recommended. I'll go check it again.

Crazyraceguy said:
I share the same concerns. Two years of air drying may not be enough. I would have started with the moisture meter. The internal stress that you mentioned is still there, moisture may be part of it, but since it is already glued up? I just don't know how it will react.
The lack of slots to accommodate the wood movement that will surely happen will cause it to split as it shrinks.
I think the same about the aluminum too. The wood will likely overcome it. Use steel, if you feel the need for support, definitely with slots. The vertical height of the bends is where the stiffness lies, flat is useless.
Threaded inserts are fine, I have used hundreds of them. The more hard or dense the wood, the more important the size of hole you put them into. If they are too small, you will strip the insert while threading it in.
 
Moisture content is good, indicates that the wood is dry enough now but as far as bolting on a steel bracket it depends on what climate the table will live in. In this season at that 7.7% m.c. it’s likely to expand going forward but if it stays in a climate controlled environment it is likely to shrink, eventually.

There are charts giving the expansion/contraction coefficients for various species but good luck finding one for pecan. In addition to the initial m.c. the charts (the good ones) give different coefficients for whether the wood is quarter sawn or flat sawn. In this case, since you have nice wide boards that include both flat and rift grain you’d split the difference, if you found a coefficient for pecan.

So, I think you can expect to get both expansion and contraction over the years and you just have to plan for that by modifying the existing holes and making holes/slots in the mounting hardware. The legs in the photo are not designed for use on natural wood.

First you need to drill pair of holes bracketing the existing holes (inline with the length of the bracket) then cut out the steel in between holes to make slots a good three times longer than the diameter of the existing round holes. With about three feet of exp/contr between screws you need long slots.

Then drill a round hole in the middle of the bracket (5/16”, to fit #14 pan head sheet metal screws). In between the new round hole and the slots at the end you need one or two more slotted holes, progressively longer moving out from center. Modify the sheet metal screws by cutting/grinding the tips off of slightly too long screws to make them more effective and there won’t be any need for threaded inserts, not that there is anything wrong with them. In your 1-1/4” thickness try to get 1 full inch of purchase with the screws by using 1-1/2” screws (with tips removed) and use the washers to fine tune depth. Put the screws in the middle of the slots.

The aluminum channels won’t do much but they will be a little stronger if you put the open side towards the wood. Thinks truss. Steel is much better but it would look better if you used strong cauls made of pecan.

I was hired to flatten a similarly constructed table made of walnut. It was just under an inch thick so an individual screw couldn’t do a lot. I made a bunch of cauls from hard maple (about 1-1/2” square) and stained them to suit the walnut. The ends were tapered to minimize the profile seen from across the room and the holes for screws were counterbored to both conceal the screws and optimize how deep the screw went into the walnut. I think they were spaced about 14” apart. I used several sets of straight cauls and clamps to force the table flat while the permanent cauls were installed. It’s held up for a decade. The only problem  with that project was that it had heavy molding breadboard ends which capped matching sides and the table had shrunk so much that the ends overlapped the sides and they had to be cut back and profiled to once again match the sides, by hand.

 
Thanks for the thorough reply, Michael. Really appreciate it. I was thinking of turning those individual holes into a slot, and you've given me the recommended length. I have a drill press, so (if it fits under there), I could just drill out the length of the slot.

Michael Kellough said:
Moisture content is good, indicates that the wood is dry enough now but as far as bolting on a steel bracket it depends on what climate the table will live in. In this season at that 7.7% m.c. it’s likely to expand going forward but if it stays in a climate controlled environment it is likely to shrink, eventually.

There are charts giving the expansion/contraction coefficients for various species but good luck finding one for pecan. In addition to the initial m.c. the charts (the good ones) give different coefficients for whether the wood is quarter sawn or flat sawn. In this case, since you have nice wide boards that include both flat and rift grain you’d split the difference, if you found a coefficient for pecan.

So, I think you can expect to get both expansion and contraction over the years and you just have to plan for that by modifying the existing holes and making holes/slots in the mounting hardware. The legs in the photo are not designed for use on natural wood.

First you need to drill pair of holes bracketing the existing holes (inline with the length of the bracket) then cut out the steel in between holes to make slots a good three times longer than the diameter of the existing round holes. With about three feet of exp/contr between screws you need long slots.

Then drill a round hole in the middle of the bracket (5/16”, to fit #14 pan head sheet metal screws). In between the new round hole and the slots at the end you need one or two more slotted holes, progressively longer moving out from center. Modify the sheet metal screws by cutting/grinding the tips off of slightly too long screws to make them more effective and there won’t be any need for threaded inserts, not that there is anything wrong with them. In your 1-1/4” thickness try to get 1 full inch of purchase with the screws by using 1-1/2” screws (with tips removed) and use the washers to fine tune depth. Put the screws in the middle of the slots.

The aluminum channels won’t do much but they will be a little stronger if you put the open side towards the wood. Thinks truss. Steel is much better but it would look better if you used strong cauls made of pecan.

I was hired to flatten a similarly constructed table made of walnut. It was just under an inch thick so an individual screw couldn’t do a lot. I made a bunch of cauls from hard maple (about 1-1/2” square) and stained them to suit the walnut. The ends were tapered to minimize the profile seen from across the room and the holes for screws were counterbored to both conceal the screws and optimize how deep the screw went into the walnut. I think they were spaced about 14” apart. I used several sets of straight cauls and clamps to force the table flat while the permanent cauls were installed. It’s held up for a decade. The only problem  with that project was that it had heavy molding breadboard ends which capped matching sides and the table had shrunk so much that the ends overlapped the sides and they had to be cut back and profiled to once again match the sides, by hand.
 
Thanks, Bob. It's hard to imagine that the holding power matches a traditional lag-style bolt? Not sure.

rmhinden said:
Instead of inserts, you might consider taping the wood itself.  I have used these:

MLCS Woodworking Tread Taps

Worked well for me.    They can be purchased individually and in sets. 

Bob
 
Another option for fasteners is hanger bolts. Put them in the wood first then place the legs/bracket and finish with washers and nylok nuts. If you want a fastener midway between the middle and the ends they’re probably the only option with that unfriendly leg/bracket design.
 
Sounds like a cool project you're doing for him. Blacktail Studio's process is similar to what I'd do. I would definitely not tap the wood. An insert provides for reliable disassembly and reassembly down the road. I use the Rampa inserts and low profile bolts regularly. They are the best I've found.
 
Back
Top