UJK Parf Guide dog holes too tight

Bernmc

Member
Joined
Nov 21, 2018
Messages
100
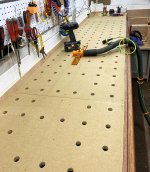
I've made a couple of worktops out of 15mm MDF with the parf guide mkII, and am using UJK parf dogs - combo of pups, super dogs etc. I'm finding the dog holes incredibly tight - bordering on un-useable now. I've tried going back over the holes and re-drilling with the parf guide, but it's still tight.

Anyone have any ideas to open the holes out slightly while maintaining accuracy? tried running a 20mm Festool spiral bit through with the router, but it's very difficult to make sure the cut is exactly central to the original hole.

And is anyone else experiencing similar issues? I'm wondering if the bit has worn slightly, although I've only done the equivalent of 2 full sheets of MDF over the time I've had the parf guide.
 
I'm in the same boat having recently finished my first 18mm MRMDF top using a brand new MkII system and UJK drill bit. The UJK Parf Dogs (the newer types with the chamfer rings) are extremely tight - to the point of having to tap them out from underneath with a dowel and a hammer.

I ended up wrapping some 80 grit round a 12mm dowel and gently sanding them to accept (and release!) the dogs in a less strenuous manner. I chamfered all the holes so they seat very well and I'm not concerned I'll have impacted the accuracy to any degree. It's just a bit annoying that using the entire "system" resulted in such a tight fit.
 
Hi Everyone

This can happen for a number of reasons. The main cause is that holes drilled in MDF and some plywoods will have a very slight furry layer on the inside of the hole. This is often caused by drilling the 20 mm holes too rapidly and can be overcome by using a pecking motion (drill in a bit, come out a dash, in a bit more about 3 times in all) which helps to leave a cleaner hole.

The furry effect can be exacerbated by moisture changes and I have had the odd problem with tops that I only use once in a while. If particular dog holes are used more than others then the furry effect tends to stay away.

One other reason can be that due to the designed close fit of dogs to holes that one needs to take care to insert a dog at 90 degrees to the surface.

I have covered all of this in a recent video about building a tracksaw cutting station:


Note that you can go back and ream out an existing 20 mm hole using the 20 mm guide and cutter. I have done this a number of times and it works well.

If, like me, you tend to only use dogs in 6 to 10 holes on a top then the issue is easy to sort out.

I hope that this helps.

Peter
 
For me, the holes has a series of micro-ridges (less than 1mm apart and goig all the way down the hole) rather than being fluffy. I've watched probably all of you many, very helpful videos Peter and so I was very much pecking my way. It's likely the no-name MRMDF I've used as we're sadly not spoiled for choice up her in Shetland.

Edit to add: I did try putting the drill bit (via the bushing thing) back through a few holes but that made no odds.
 
Roachmill said:
For me, the holes has a series of micro-ridges (less than 1mm apart and goig all the way down the hole) rather than being fluffy. I've watched probably all of you many, very helpful videos Peter and so I was very much pecking my way. It's likely the no-name MRMDF I've used as we're sadly not spoiled for choice up her in Shetland.

Edit to add: I did try putting the drill bit (via the bushing thing) back through a few holes but that made no odds.

When I first started playing with the idea of dogs and eventually some form of Parf Guide System I was using very cheap and cheerful MDF and it was a nightmare. Luckily I was told about Medite Moisture Resistant an d the difference was astonishing. With the lower quality MDF the spoil from drilling was very fluffy and also quite dusty. The Medite spoil was pure shavings that retained their form and there was very little dust.

Please send me a PM and I will ask you some more questions and try and help a bit more.

I am filming most of the day and may not be able to respond to you until this evening.

Cheers.

Peter
 
Peter Parfitt said:
Please send me a PM and I will ask you some more questions and try and help a bit more.

PM sent Peter. Best of luck with the filming!
 
I make 20mm tops with the MK1 Park Guide Jig.  I recently had a fellow buy one and he had these new tall dogs and they were very tight.  The Lee valley Dogs are 19.90mm and fit perfect.  These new Parf dogs with the o-ring are apparently 20mm.
 
I have quite a few holes to deal with...

View attachment 1

Only one MDF option locally. I've made a top out of recycled pallet pine, and have a similar issue, although not quite as tight as the MDF. We're subtropical, so moisture may play a role, but the super-tight problem is there when I'm using the guide and the locator dogs to position it too. ie it's not expanding at a later date and then making the dogs tight.

I watched all of Peter's videos on using the system, so I don't think technique is the issue.

Question now is, do I do the dowel sanding thing on every parf top I make, or stick all of my UJK dogs in the lathe (I only have a wood lathe), and try to take 0.1-0.2mm off each with some waterpaper - that would take them down to Lee Valley dimensions.
 

Attachments

  • bech parf guide small.jpg
    bech parf guide small.jpg
    250.6 KB · Views: 388
If anyone is experiencing problems like this then they must contact Axminster as soon as they can.

I am sorry [member=69245]Bernmc[/member]  that you have discovered this issue and would like Axminster to get involved to sort it out for you.

Peter
 
^Them's a lotta holes to sand down you have there. I did my MFT3 sized top one row a day... it was that much fun.

After some closer examination of holes drilled I'm thinking the drill bit may be worthy of closer examination.

Here's two close-ups of holes drilled with a squeaky clean new 20mm bit.

06501797763039ce25f02883ac5bb568.jpg

3e36b5a2fd70d433964a4a56b9a7b097.jpg


There's a hole drilled in green MRMDF and in a Festool brown MW1000 top - both as tight as each other and both displaying the same ridges down the sides of the holes. So I don't think it's down to inferior materials in my case.

Could others comment on whether their holes exhibit similar ridges? I'm wondering if the leading spurs on the bit protrude just a hair too far causing extra friction from the ridges.

Peter, top chap that he is, has been most helpful and it's now in the lap of Axminster to see what they think.
 
Peter's always a gentleman when dealing with these things.

I had a look at my holes - same ridging in the MDF.

And I took a quick picture of the holes in the pine top - this is from the back, which is unfinished. Again, same ridging.

I'll contact Axminster too.

[attachimg=1]
 

Attachments

  • parf hole ridged.jpg
    parf hole ridged.jpg
    131.5 KB · Views: 2,313
Bernmc said:
Peter's always a gentleman when dealing with these things.

I had a look at my holes - same ridging in the MDF.

And I took a quick picture of the holes in the pine top - this is from the back, which is unfinished. Again, same ridging.

I'll contact Axminster too.

[attachimg=1]

The "MDF" in the photo you posted looks very odd - it looks more like chipboard.

Peter
 
That's Axminster been in touch and a new bit getting sent out along with a reamer to tweak existing holes. So do contact them as they have excelled themselves once again. They even tested the replacement bit for a good fit [big grin]
 
Roachmill said:
That's Axminster been in touch and a new bit getting sent out along with a reamer to tweak existing holes.

Now that reamer sounds like it could be interesting. It'd be nice to see photos of that when it arrives and get your feedback on how well it works.  [big grin]

All those ridges in the hole leads me to believe there is an issue with the cutter.
 
What drill are you using? Festool? Makita? Also are you using a vacuum shoe 👠 while drilling? Peter mentioned taking three stabs at it - so you back out the bit to clear the cutting edge and then plung down further, back out. Seems that their is residual chips in the path that’s causing the bit to pulse as you apply pressure? Does your drill have a clutch or are you using an impact driver? I wasn’t there during your session so forgive me if I sound patronizing....
 
Roachmill said:
That's Axminster been in touch and a new bit getting sent out along with a reamer to tweak existing holes.

Please post an image of the reamer when you receive it.  I checked the Axminster site and didn't find a 20mm reamer.  I found a set of eight adjustable reamers that includes one that appears to be suitable for the dog holes.  Is it possible that they are sending the chamfer tool?
 
MikeGE said:
Please post an image of the reamer when you receive it.  I checked the Axminster site and didn't find a 20mm reamer.  I found a set of eight adjustable reamers that includes one that appears to be suitable for the dog holes.  Is it possible that they are sending the chamfer tool?
I'll be sure and fire up a pic of the reamer. In their email the guy did say he'd get a colleague to "make one up", so it's not an off-the-shelf item. I'm not getting my expectations up as it sounds like an awful lot of work to go to and I'm slightly dubious as to whether it'd do more harm than good i.e. removing slightly different amounts from holes and keeping it exactly perpendicular sounds tricky. I'm always happy to be surprised though so we'll see.
 
[member=53696]Roachmill[/member]

I am surprised that Axminster are sending a reamer as they are expensive to make. I think in future they should send out a replacement 20 mm cutter and ask for the original to be returned for examination. That way the fault can be traced to either the cutter or the way it may have been used.

If the cutter is at fault then the reaming process can be done with a new cutter using the 20 mm drill guide and a pair of Parf Locator Dogs (both of which are in the kit).

Peter
 
I quite agree Peter. They are sending a replacement cutter having tested it first. That's what I'd really think to use too to sort holes as you have the guide bush to keep you right.

They didn't ask for the old cutter back but I'm aiming to offer it to them... but only once I've had a chance to compare the results of both side-by-side.
 
MikeGE said:
Please post an image of the reamer when you receive it.

It, and the replacement bit, arrived very promptly this morning:

36c389cede4713240fcfa26339739e61.jpg


b067bbc28f8f6dffaf3d56790b98252a.jpg


8c0b0017cf7c249aa127179cdc4fbdbd.jpg


There's 2 flutes and a very slight leading taper as shown in the second photo. This is a solid product waiting to happen IMHO. It worked perfectly and I couldn't fault it at all.

I'll not comment on the replacement bit as I need to get back to Axminster about it and it came from their workshop kit as they're out of stock I believe.

That reamer though... such a great wee thing. I can see me using it to standardise holes in other tops made with the Festool router bit - and picking up more Parf dogs. And keeping it handy for touching up any holes that may need gentle correction in the future.

@Peter Parfitt I'd ask Axminster to send you one and definitely look at bringing it to market.
 
Back
Top