UJK Parf Guide Mark II and loose fitting dogs

wriv said:
How snugly do everyone else's dogs fit in their PGS produced dog holes? Are my expectations the problem or is there some other factor I'm failing to account for?

Thanks in advance for any ideas or suggestions!

Will

Hello all,

I realize this is an old thread but stumbled upon it because I'm having the exact problem.  I would like to see your videos to compare but they appear to be dead links.  Below is a link to a short Youtube video which I hope illustrates my issue...


- I'm using a "pecking" motion.
- Also tried different materials with same results.
- I didn't think to do it in the video, but I also inserted the dog upside down
    all the way through the hole, so it's more than fully seated.  It still wobbles.
- I flooded the holes with a very thin sealer (Flood Penetrol) hoping to swell them tighter.  No difference.

I sent that video to Axminster a few days a go but haven't heard back.  TSO is sending me a new cutter free
of charge.  Very nice of them! 

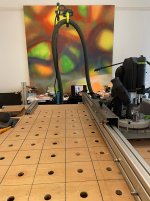
I've just completed my first MFT style top and feel very disappointed.  Dogs which I need to guide my rail lean
over at the top at least a mm in either direction.  I could purchase star knobs to screw them in from the bottom
but reaching under the table to set up and un-do operations fumbling with knobs shouldn't be necessary.

Has anyone confirmed the source of the problem... an out of spec cutter diameter, or a non-concentric spike?

Any thoughts would be appreciated.

 
[member=80358]String[/member] first, [welcome] to the FOG. You came to the right place.

Second, I have made multiple tops in MDF & MDO, and I have dogs for 4-5 different sources. Mine always fit too tight and I need to run the UJK reamer their them to open them up a few thou.

Question: (I didn't watch the video) are you chamfering the holes? EDIT: I skipped thru the video, first you need to chamfer the holes, then the dogs should sit more securely, however I still think you'll need to secure them from below or use expanding dogs. Your holes are looser than mine however. /End EDIT

In my case I've switched exclusively to the "neckless" dogs with the little chamfer, this causes the dog to sit more securely in the holes and, when secured from below, self-centers them. IMO this is the only way to ensure they will remain aligned for precise cutting. I also now use the Benchdogs Quad Dogs, which have the expanding feature to secure them in the holes. They are similar to UJK's expanding dogs.

See you around.

RMW
 
Hi Richard... thankyou for that WELCOME and for replying!

Yes, I agree.  I went with the Benchdogs 'neckless' dogs with the little chamfer.  And I will definitely chamfer the holes. 

This is my first MFT top (sort of a "practice" project) and I have plans for a more elaborate one.  I will get the star knobs and secure the dogs from underneath.  But with two (or four) fence dogs, and two dogs for the rail... that's a lot of futzing around underneath the top for every setup.  It shouldn't be necessary.

I've never tried the expanding dogs, but I'd be concerned they could tighten up crooked or straight.

In short, TSO is sending me a new cutter and if that solves it, I'm a happy camper.  If not, I will find a better method of creating my second top.  (Sorry Mr. Parfitt.  This is just not acceptable)

If your dogs always fit tight and you need the reemer, are you using the Parfitt system?  That would point to an out of spec cutter... or maybe the spike is non-concentric.

Thanks much,
String.
 
So the chamfering of the holes helps the dogs sit more securely?  I am asking because I have been interested in the system but haven't pulled the trigger yet.

Peter
 
Don't you need to use UJK dogs if you want your dogs to fit snuggly in holes drilled with a UJK bit?
Dogs are made to a variety of nearly 20mm diameters so they won't all fit the way you want.
 
A few years ago several actually, I worked with a friend who was an engineer and he complained about the fit of his dogs in his MFT. I was not aware of the Parf system (it may not have even come out at the point we were investigating his issues) but I agreed to make a replacement top  for him using hand tools ( router, flush trim bit and a drill to rough out the hole.)  using part of an existing top that had never seen a dog inserted in it, so kind of like the WP jig. The first thing we learned was that the flush trim bit ( a Whiteside up cut spiral) was actually too big in diameter compared to the bearings, leaving an oversized hole. To compensate I sent the bit to a sharpening service I trusted and had them grind it down .010" (.25 mm) and tried again. This was the minimum he could remove, and sure enough it left the holes too tight. Well, at least for some of his dogs, which after we started measuring them with a micrometer proved that there was a +.005" to -.018" variation in diameters on about half of the dozen and a half dogs he had purchased over time. Some of them varied within a single manufacturer  [eek]  which certainly made for some spirited emails with my friend and manufacturers.
  In the end I made his top with the addition of an adjustable reamer to bring consistency in the dog holes and we accomplished his goal of nicely tight holes and by thinning out his dogs  of the under/oversized ones.

FF to 2021  when my friend made me aware of the Parf II guide system and asked if I would be willing to try it if he purchased it. (easy decision BTW)  And after watching Peter use it and reading the instructions I made two tops this time one out of MDF and one from BB  and both of them turned out perfect. I wish it had been around when we were doing the original replacement top if only for how consistent and fast I cranked the two tops out.
As for the OP's issues I can only speculate but I am inclined to think maybe you should measure your dogs as a start. I imagine you could have a out of true oilite bushing as suggested but I imagine that too could be measured with a runout micrometer much the same as one would check a drill press chuck for runout.
 
Peter Halle said:
So the chamfering of the holes helps the dogs sit more securely?  I am asking because I have been interested in the system but haven't pulled the trigger yet.

Peter
  and Michael Kellough

Just happened to see your posts on the subject of Chamfered Dogs. Looks like you were not aware of the TSO's Chamfer Dogs - shame on us for not keeping you all informed.

Between our growing bi-lateral cooperation with AXMINSTER UJK and our own grown family of Dogs we have had Chamfer Dogs for quite some time including Chamfering Reamers.

Our Close Fitting CF-Dog series are designed to snugly fit a properly made Parf Guide System  benchtop.
https://tsoproducts.com/bench-dogs/tso-dogs/dog-pack-ultimate-bundle/
https://tsoproducts.com/bench-dogs/

email to info@tsoproductscom
and ask for the specific Chamfer Dog configuration you are interested in.

Tell'em Hans sent you [smile]
 
String said:
If your dogs always fit tight and you need the reemer, are you using the Parfitt system?

Yes, I use the Parf guide to make the tops, I have an early Mark 2 version. Early on UJK/Axminster had some problems maintaining tolerances on some of the components, they replaced the rules, pins, 3mm drill and cutter on my set before we had a system where everything worked as intended. Great customer service, and I think they ironed out the QC issues.

In my experience the only way to ensure repeatable precision is to either secure the dogs from below or use the expanding type. TSO'S close fit dogs may also do this, I've never used them.

The Quad dogs can't install crooked due to the chamfer and how the o-rings expand the tighten in the hole. They are the best solution I've found for cutting with a guide rail.

Both TSO and UJK will do whatever it takes to make it right. Best of luck.

RMW
 
Peter Halle said:
So the chamfering of the holes helps the dogs sit more securely?  I am asking because I have been interested in the system but haven't pulled the trigger yet.

Peter

Peter, yes. To my uneducated eye, the chamfer centers the dog while also acting to kind of wedge it in place. It's subtle but important. 

RMW
 
Cheese said:
Packard said:
So, is this as accurate as the PARF system?  It seems less challenging to use.  Why is it taking back-seat to the PARF system?

The bottom line is the WP product is extremely accurate for dog placement. Its downfall is hole concentricity because it's using a 1/2" diameter router bit to machine a 20 mm diameter hole. That may be fine if you're using MDF or a CNC but I used 18 mm ply and the holes were slow to machine and erratic in size when routed by hand.

My work-around was to fabricate a special bushing that allowed me to use the WP template fitted to an OF 1400 using a 20 mm Festool router bit which resulted in a straight plunge cut.

Search the forum as there are several threads on the WP product.

Here's the thread.
https://www.festoolownersgroup.com/other-tools-accessories/mft-hole-jigs/msg586456/#msg586456

I had my friend machine same bushing and it worked great.  I only did small sizes though, never did a full size mft
 
I had my Parf system before there was a MK11 version. I kind of assumed that the changes would "theoretically" do the same task, while solving any potential wear problem that you could have from drilling without the bushing? Maybe there was some QC issues, when the volume of sales went up?
My assembly table is a full 4' x 8' sheet of MDF over 325 holes (13 x 25)
Point being that it is dead-on. I have tested it with the triangle from the TSO MTR-X. That's 4 dogs in a very specific pattern.
If you expand the first pic, the pointer appears to be off, but it's a parallax thing. The close-up shows it correct.
My crosscutting station is made of melamine coated particle board and I can say that was not the best choice. I didn't have any MDF at the time. It works, and I do like the white, but the particle board core is not so great. 
If the spur of the bit is off-center, the holes will always be too big. It's impossible for it to drill small from that.
Holes that are not perpendicular to the top are suffering from a technique problem. The drilling guide basically locks you in on one axis, but it is possible to tilt the whole thing in the other direction. Care and attention are required, it's not automatic.
 

Attachments

  • TSO square.jpg
    TSO square.jpg
    382.3 KB · Views: 153
  • TSO .jpg
    TSO .jpg
    329 KB · Views: 125
Have used Parf1 and Parf ll with variable results … these days my bench makes its own work tops! Have added Lead Screws to the X and Y axis of my router sled, this gives me CNC accuracy, thats as long as my analogue brain doesn't screw up the settings!
 

Attachments

  • IMG_2024-04-25-150431.jpeg
    IMG_2024-04-25-150431.jpeg
    308.3 KB · Views: 103
Back
Top