Upgrading from 3x MFTs to 2x Dashboard PWS

mattbyington

Member
Joined
Mar 11, 2018
Messages
797
Team,

I have been working with Rob at Dashboard PWS for a few months. We've been designing 2 of his tables to replace my 3 MFTs.

I plan to write more about what I believe to be the benefits, but let me say that so far I am loving it.

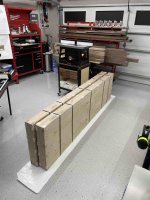
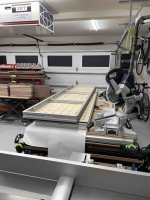
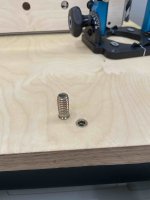
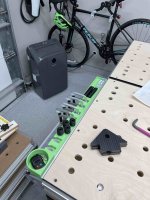
Some pictures below - I'll try to answer questions. They're bolted together, and bolted to the workbench at the 4 corners with threaded inserts.

Rob has been nothing short of fantastic. I would highly recommend checking him out.

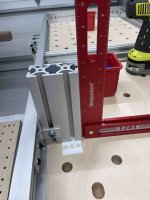
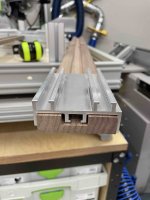
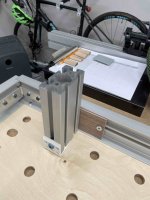
The feet are all custom, we worked together and I order stuff from 80/20 and he fabricated some brackets for me, etc.

Normally his benches have legs on them but of course I was putting these on my existing workbench.

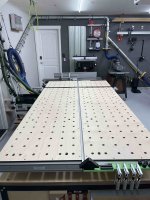
I like how continuous it is compared to the 3 MFTs and I am excited to use the hole pattern to square things up which I could never do with 3 MFTs since it's next to impossible to get it all aligned.

Matt

[attachimg=1]

[attachimg=2]

[attachimg=3]

[attachimg=4]
 

Attachments

  • 8A49097F-7749-44A0-B48C-052F38399222.jpeg
    8A49097F-7749-44A0-B48C-052F38399222.jpeg
    581 KB · Views: 5,131
  • 8A49097F-7749-44A0-B48C-052F38399222.jpg
    8A49097F-7749-44A0-B48C-052F38399222.jpg
    581 KB · Views: 4,423
  • 66232358276__C53879B2-F8CA-490E-BF27-B0B5883C376B.jpeg
    66232358276__C53879B2-F8CA-490E-BF27-B0B5883C376B.jpeg
    497.9 KB · Views: 4,447
  • IMG_8830.jpeg
    IMG_8830.jpeg
    371.4 KB · Views: 4,396
[attachimg=1]

[attachimg=2]

[attachimg=3]

[attachimg=4]
 

Attachments

  • IMG_8859.jpeg
    IMG_8859.jpeg
    515.5 KB · Views: 4,410
  • IMG_8848.jpeg
    IMG_8848.jpeg
    444.6 KB · Views: 4,438
  • IMG_8843.jpeg
    IMG_8843.jpeg
    327.5 KB · Views: 4,277
  • IMG_8836.jpeg
    IMG_8836.jpeg
    460 KB · Views: 4,363
[attachimg=1]

[attachimg=2]

[attachimg=3]

[attachimg=4]
 

Attachments

  • IMG_8862.jpeg
    IMG_8862.jpeg
    350.3 KB · Views: 4,363
  • IMG_8867.jpeg
    IMG_8867.jpeg
    359.3 KB · Views: 4,345
  • IMG_8882.jpeg
    IMG_8882.jpeg
    285.2 KB · Views: 4,312
  • IMG_8888.jpeg
    IMG_8888.jpeg
    475.1 KB · Views: 4,305
[attachimg=1]

[attachimg=2]

[attachimg=3]
 

Attachments

  • IMG_8891.jpeg
    IMG_8891.jpeg
    422.9 KB · Views: 4,288
  • IMG_8909.jpeg
    IMG_8909.jpeg
    550.8 KB · Views: 4,295
  • IMG_8917.jpeg
    IMG_8917.jpeg
    422.1 KB · Views: 4,412
I wonder what is the advantage of using custom Dashboard frame over same thing made of 8020 or Bosch-Rexroth, etc.? It's probably lighter, but less rigid and fewer stock hardware and accessories.
 
That is a good looking set-up. I especially like the end trays for the clamping elements.
 
Great job, Matt!  I can't tell from the photos, but does the 96mm dog hole spacing continue across the joined tables, with a 192mm center to center gap at the joint? 
 
Svar said:
I wonder what is the advantage of using custom Dashboard frame over same thing made of 8020 or Bosch-Rexroth, etc.? It's probably lighter, but less rigid and fewer stock hardware and accessories.

Less guesswork, likely.

In some ways, it's the same, just with the engineering expertise of Rob and Dashboard PWS doing the heavy lifting of figuring out the design.

Plus he got to work directly with Rob and help out a small business owner, which seems like a pretty decent way to spend one's time.

Very cool, Matt! You should have gotten him to screen print some sawdust onto the top so we could stop giving you a hard time about the cleanliness of your shop!  [big grin]
 
squall_line said:
Matt, You should have gotten him to screen print some sawdust onto the top so we could stop giving you a hard time about the cleanliness of your shop!  [big grin]

Now that's funny... [poke]

It looks good Matt, a very nice upgrade for how you use the table. I like the clamp trays on the ends and the black cutting strip. What's the hose on the end of the table that's attached to the brush used for...it seems like it has a very defined purpose?
 
Very nice job Matt.  Well executed.  Will have to stop by one of these days when this pandemic abates and admire your work.

Vijay

p.s if you want to sell one  or more of your MFTs please let me know.
 
[member=167]neilc[/member] thanks!

[member=15585]Svar[/member] you could totally make your own, too. I think the benefits are:

1) It's a well thought-out design with accessories that Rob sells that work extremely well with it
2) It supports a small business who really cares about woodworkers
3) Rob is a great guy and worked with me on making custom components to fit my existing bench
4) You'd benefit from future accessories or innovations that Rob does

All of the standard Festool clamps, dogs etc etc work perfectly in it.

[member=6605]MrToolJunkie[/member] yeah!

[member=58857]Crazyraceguy[/member] thanks!!

[member=70363]MikeGE[/member] that's a great questions. I'm not sure. I'll try to measure it when I get down to the shop for you. I suspect that the distance between the dogs from bench to bench isn't the same as it is within one bench.

[member=75217]squall_line[/member] yeah I think you're spot on with your answer there. Hahahah. thanks. I swear I do have sawdust like everyone else, I just clean it up! :)

[member=44099]Cheese[/member] thanks man! Sort of yes and no. It's honestly just a walnut dowel that I have screwed onto a 90 degree bracket from 8020. It literally just holds the 1 ft. section of 27mm hose for me so it isn't sitting on the bench. I use that short piece with my sander and domino, and the 36mm on the boom arm for the track saw and router.

[member=163]vkumar[/member] thanks man! I gave the 3 MFTs to a great for free. Sorry!

Matt
 
Matt - what’s the green tray holding the clamps and other items.  Do you have a source?
 
mattbyington said:
[member=70363]MikeGE[/member] that's a great questions. I'm not sure. I'll try to measure it when I get down to the shop for you. I suspect that the distance between the dogs from bench to bench isn't the same as it is within one bench.

Matt

Unless that was a specific goal, it's not likely. You would even have to be pretty careful to line them up  the other direction, when attaching the tables together.
 
Hey Matt- What am I seeing on the vacuum brush underneath?  Is that a vacuum wand with the green sleeve on it, or an optical illusion?

Either way, I was already jealous of your triple setup- now I'm jealous of THIS thing.  [big grin]  Let's see if Bent upgrades his, now!
 
mattbyington said:
[member=167]neilc[/member] check out RabTools on Etsy!
https://www.etsy.com/search?q=rabtools&ref=auto-1

[member=58857]Crazyraceguy[/member] I also don't think it matters, right? IMHO it doesn't need to be 96... basically as long as the grid is still square, I can still square off of it.

Matt

No, I don't think it matters at all. The grid you have in each side is plenty long enough to register from.
 
[member=51752]tsmi243[/member] hey there! It's just the standard Festool vacuum brush attached to a 1 foot section of 27mm hose.

Thanks! I did text Jason and let him know already, in case he had questions or wanted to replicate it!

[member=58857]Crazyraceguy[/member] yeah exactly my thought!

Matt
 
Impressively large table that looks as if it has versatility. Rob has made a well thought out system that is impressive. I'm hoping he makes a different size table in the future since I work more with lumber than sheet goods. I'm curious about the metal base that the tops rest on. Can you share your sourcing for that metal base for those of us thinking of making a table?
 
Back
Top