Using a template to rout a hole in OSB sheathing?

Joined
Apr 2, 2019
Messages
140
Hi,
I am considering the unfortunate prospect of routing some access holes into existing and emplaced OSB sheathing on a cargo trailer with 1" steel studs and a thin aluminum outer skin.

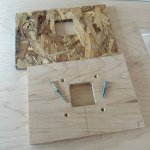
The goal is to make access holes approximately 3"x3" that I will then cover with a plate.

I am considering using a router so that I may precisely control the depth of the cutting tool.

I know there is wiring right behind the location.

I would consider a hole saw, but if the tool grabs and jerks inward, there is only an inch of clearance before it will punch through the outer aluminum skin. I could load a hole saw with deadwood to limit the depth, but I am still worried about the final "jerk."

I have never routed OSB, generally despise the material, and primarily associate it with splinters in my fingers and pullouts with my screws.

Nevertheless, it is what I have to work with.

Is template routing a clean hole in 3/8" OSB a possibility?

Would a typical two-cutter template bit work?

Any tips?

Thank you!
 
Ordinarily, the donuts left behind in a hole saw are a nuisance to remove.

But in your case you can fill the center of the hole saw so that you cannot drill too deep.

Make some very thin pieces so you can precisely adjust the depth of cut.

Would a 3” circular hole do the trick?  Or will you have to open it to a rectangle?

This video shows the scrap as a nuisance, but for your project it will be a friend.
 
Packard said:
Ordinarily, the donuts left behind in a hole saw...

This is what I referred to when I wrote "I could load a hole saw with deadwood to limit the depth, but I am still worried about the final "jerk.""

I am asking about insights regarding the routing of OSB sheet wood.
 
It's done all the time using panel bits. You're more likely to get a quicker response from a quick google search than waiting on here, owing to the combination of: 1) the forum software being flaky and keeping people away, and 2) most users here focused on furniture and cabinetmaking rather than home building.  Journal of Light Construction is a pretty good resource when it comes to home building resources, I've found.
 
Woody Knotsensplintahs said:
Packard said:
Ordinarily, the donuts left behind in a hole saw...

This is what I referred to when I wrote "I could load a hole saw with deadwood to limit the depth, but I am still worried about the final "jerk.""

I am asking about insights regarding the routing of OSB sheet wood.

I did not understand.  I thought you wanted the easiest way. 

My reply is in two parts.  The first part explains why my original suggestion was flawed.

The second part explains how I would use a router.

Hole Saw Correction:

I could not get back on FOG because the site was so slow that it constantly “timed out”.

1.  My approach was flawed.  The pilot hole will extend past the saw.  So if you set the saw depth correctly, the pilot hole will be too deep.

2.  I did not realize we were speaking of the same thing.  You would need to do this in two steps.  First with the pilot drill until the circular groove was deep enough to guide the blade.  And then finish the hole without the pilot drill.

3.  I’m not sure what you are referring to regarding the final “jerk”.

4.  A smaller hole that is drilled inside the hole saw groove, will allow the dust to escape and make for a smoother operation.

5.  A bar of Ivory soap is an excellent lubricant for hole saws.  Just run the saw against the soap to build up some film on the metal. 

I still can’t picture what that final “jerk” might be.  Are you allowing the saw to end its cut by stopping the drill?  I find it better to remove the saw with the drill still running. 

Sorry that I cannot be of much more help.

Template method:

You can make a template from 1/2” thick MDF.  Then screw it to the OSB and use a guided bit.  I think you will have to use a bushing to guide the bit.  You won’t be able to adjust the depth of cut with a ball bearing router bit.

You should be able to mount the template to the OSB securely.

NOTE:  The glue in plywood and OSB will destroy a high carbon bit.  You will have to use a carbide bit.
 
I understand "the final jerk" to be when the hole saw breaks through the last remaining fibers on the backside of the OSB and jerks itself through the material.
 
squall_line said:
I understand "the final jerk" to be when the hole saw breaks through the last remaining fibers on the backside of the OSB and jerks itself through the material.

I haven’t had that problem. I’ve seen videos where the operator changes the angle while drilling.  I don’t do that.  Perhaps that’s where the binding occurs.

As an aside, sawdust accumulating in the holesaw’s kerf adds a good deal of friction.  To avoid that, first start the hole saw so you can see where it’s kerf is, then, with a smaller drill (3/8” works well) drill a second hole mainly inside the circle, but overlapping the kerf.  That will allow the sawdust from accumulating.  On deep holes this is a game changer.
 
The final "jerk" is less of a problem when using a holesaw on wood substrates as compared to metal substrates. With wood substrates, you can usually just "muscle it" through without a jerk but on metal substrates, that last little bit of uncut material, can catch one or more of the teeth of the holesaw and that produces the "jerk". Sometimes it's ok...sometimes it's not.

To avoid that situation, keep the holesaw as perpendicular to the cutting surface as possible. Drill presses are a savior as are drill guides such as the Woodpeckers Auto-Line drill guide.
https://www.woodpeck.com/auto-line-drill-guide.html
 
Cheese said:
The final "jerk" is less of a problem when using a holesaw on wood substrates as compared to metal substrates. With wood substrates, you can usually just "muscle it" through without a jerk but on metal substrates, that last little bit of uncut material, can catch one or more of the teeth of the holesaw and that produces the "jerk". Sometimes it's ok...sometimes it's not.

In most of the instances I am using a hole saw, there is little room to muscle through as the area behind the sheeting has mystery meat in it. So, I usually try to finesse the final portion of the cut, and often times the saw jerks inward a bit.

It's not so bad when you have 3-1/2" clearance behind the wall, and I am usually lucky to not cut or nick any wires I discover, because I am pretty good at stopping the saw as soon as I feel it tug inward.

With this new project, which is dressing the interior of a cargo trailer, I don't have any extra space to gamble with, and I can't risk poking through the brand-new aluminum exterior sheeting.

I am going to test a scrap piece of OSB with the router and template and hope it is satisfactory.

Thank you.

 
squall_line said:
It's done all the time using panel bits. You're more likely to get a quicker response from a quick google search than waiting on here, owing to the combination of: 1) the forum software being flaky and keeping people away, and 2) most users here focused on furniture and cabinetmaking rather than home building.  Journal of Light Construction is a pretty good resource when it comes to home building resources, I've found.

Thank you for the helpful info and the suggestions. I mainly come here for info about Festools.

I asked the question here because I am familiar with the posts of many of this forum's members. Evaluating the merits of suggestions is easier when I can relate the content to the respondent's modus operandi.

I do occasionally look at trade forums, but without familiarity with the participants, I do not feel like the information shared at those sites makes for a good reference. The answers often seem to be casual, light-hearted posturing amongst the fellows. Without familiarity, it is hard to figure out who thinks like I do and who is suggesting something I would be satisfied with.

I hope that makes sense.

Thank you.
 
Hi,
I made a template out of a scrap of plywood and used it to run a test on a scrap of OSB. It worked well. Thanks for the advice.

I will screw the template to the wall where I want to make the access ports. Then I will align the screw holes with the cover plates that I will make.

View attachment 1

Thank you for the helpful info.


Attachments

  • Template.jpg
    Template.jpg
    450.3 KB · Views: 54
If the access plate will be installed and removed regularly, then machine screw threaded inserts are a good choice.

The style we mostly see are T-nuts and those would be difficult to install in this situation.

Simpler are the ones that install from the exterior.  They all install the same way. 

1. Drill a specified hole in the OSB
2. Screw in the insert using an Allen wrench

There are multiple styles. 

There are solid brass ones that look like conventional screw threads on the outside.  Those are mostly for soft woods.

For hardwoods, they have die cast versions.  These are usually specified for plywood and OSB also.

As an aside, the technology was originally created to solve the problem of cross-threaded spark plug holes in alloy heads on cars. 

The other designs for other materials came later. 

This video goes into far more detail than required, but if you are interested, it is not difficult to watch.


And this is the type I usually use.  It will work in MDF, hardwood, soft wood, (and I presume, OSB). I have not tried it on particle board, but I am fairly positive it will work there too. 

Get one sized to fit the thickness of material and the screw size.  The ones I get install with an Allen wrench.

threaded_1024x1024.jpg


Many vendors for these.

See: https://www.google.com/search?clien...8f78&sxsrf=ADLYWILrdyz5wLz2wv0XrH76uDyObvlC7g:1732113297418&q=thread+inserts+for+wood&udm=2&fbs=AEQNm0A-TSThzBStWy2iQzbzvM8E5ytGZgQarMcVdjSRMHEykcJD9grKaAt6lsozr0RMsdPHhxQXtcEAVeJDa6I6dkofU52z7Mip8qJfU5kGUYvfscmR9BN5Bd8Dm6kW7y7xum69G6_chHqeUT4fWuMYYzuVKoTwCnLNpnv61a---26G8jo9_tk4y7Du53V2lTrkduhRfmErh6HkTNS5Ct2ljVx55X0hmQ&sa=X&ved=2ahUKEwiuobbukOuJAxU3hYkEHTbfAXQQtKgLegQIFBAB&biw=1151&bih=725&dpr=2#vhid=ycm7d6N_7A88zM&vssid=mosaic

I would work this in this sequence.

1.  Make the template
2.  Screw the template to the wall using wood screws
3.  Use the router to make the opening.
4.  Remove the template
5.  Drill the appropriate size hole for the threaded inserts
6.  Insert the threaded inserts with an Allen wrench
7.  Attach the access plate.

If you have a CNC or laser, it would look cool if you write “Access plate for […].  It will give the appearance that the holes are intentional and not an after thought.
 
squall_line said:
I understand "the final jerk" to be when the hole saw breaks through the last remaining fibers on the backside of the OSB and jerks itself through the material.

I never tried to use a hole saw in metal.  I could see how with only one spot have material left, it would twist the drill in your hand.  Wherever possible, I use the drill press and remove the pilot drill.  Removing the pilot drill makes removing the donut scrap much easier.

A couple of days ago I ordered a 2” carbide tipped hole saw from Amazon.  The Freud version was extra deep and only a few dollars more than the Chinese competition.

It arrived promptly.

It did not fit any of my hole saw arbors.

I ordered a Freud arbor.  It was lost in the shipping.  It originally said “shipped”, but now says “Ordered, not yet shipped”.

This is apparently a much improved arbor.  It features a quick release hex shaft pilot drill, and the saw itself does a similar quick release. 

It also includes two extra adapters that allows me to use my old hole saws with the new Freud arbor.

The only down-side is:  It has not arrived.
 
I've made quite a bit of furniture out of OSB, I quite like working with the material.

I use carbide "straight blade" router bits to cut grooves / dado's / round overs etc.  I've tried using spiral upcut bits and that leaves a very messy surface finish, the conventional carbide bits work best.

Regards
Bob
 
bobtskutter said:
I've made quite a bit of furniture out of OSB, I quite like working with the material.

I use carbide "straight blade" router bits to cut grooves / dado's / round overs etc.  I've tried using spiral upcut bits and that leaves a very messy surface finish, the conventional carbide bits work best.

Regards
Bob

Hi Bob,
Thank you very much for sharing the results of your experience.

As it happens I am using a 2 flute straight blade, but had considered using a spiral bit. It's helpful to have learned that the straight bit is the better tool for the job.

I made my first cut in the wall yesterday, and everything worked great. A piece of Reflectix foil-lined bubble wrap insulation was lying right against the back of the OSB wall. I ended up with a clean hole in the wood and no scars on the foil. The depth control of the routing process made it possible.

Thank you.

 
Packard said:
If the access plate will be installed and removed regularly, then machine screw threaded inserts are a good choice.

Hi,
Thanks for the suggestion. I often use hurricane nuts or T-nuts and had considered using them. I have never used insert nuts on wood; this might be a great application to try them in. I have experience repairing or reinforcing machine threads in metal with Helicoil inserts.

Nevertheless, I am probably starting with #6 wood screws, as the ports are for access to wiring connections that may or may not need very infrequent servicing.

I wanted to locate and place the access ports in the trailer before I built out the amenities so that additional woodwork could be placed to avoid port locations. I am trying to plan for a minimum disassembly should a wire connection need service.

The trailer was delivered with numerous connections hidden behind floor-to-ceiling wall panels that would need to be removed for maintenance, and the wall panels can't be removed until the trim is removed. etc.

Thank you.
 
“I am probably starting with #6 wood screws”

Good idea to start with small wood screws. If a hole strips out later you can just use a larger diameter screw.
 
Woody Knotsensplintahs said:
The trailer was delivered with numerous connections hidden behind floor-to-ceiling wall panels that would need to be removed for maintenance, and the wall panels can't be removed until the trim is removed. etc.

There ought to be a law against that... [blink] ...they obviously aren't familiar with any local residential electrical codes.  [sad]

If you need to install threaded inserts in thin gauge metal, I'd recommend using Marson riv-nuts. Here the Marson nuts are installed in aluminum to accept threaded fasteners to retain a cover.

[attachimg=1]

[attachimg=2]
 

Attachments

  • 8814 marked.JPG
    8814 marked.JPG
    894.2 KB · Views: 109
  • 8815 marked.JPG
    8815 marked.JPG
    970.7 KB · Views: 115
Well, this is a cargo trailer, the kind people drag lawn care equipment in. It's not a residential manufactured home.

We ordered a cargo trailer with a pair of factory-installed windows, an exhaust fan, thin vinyl covering on the OSB walls, and thick vinyl covering on the OSB floor.

We are converting it into a mobile metal tent I can drag out into the desert. We will bring a home furnishing queen-size mattress along with us. It's a variation on the "van life" theme. We have a van that we also call a metal tent, but it does not fare well off-road. We have a Jeep for camping in the backcountry but have become too old to say we enjoy sleeping on the ground in a tent.

I could have welded my own trailer from scratch, but the factory version's low cost made it seem like a good headstart.

Now, I am simply trying to undo all the stuff the factory did that I would have done right without doing more than I have to undo.

I do have blind rivets, Rivnut®s and Plusnut®s on hand.

Thank you.
 
Back
Top