You are using an out of date browser. It may not display this or other websites correctly.
You should upgrade or use an alternative browser.
You should upgrade or use an alternative browser.
Using domino in curved joint
- Thread starter sybildelg
- Start date
Birdhunter
Member
- Joined
- Jun 16, 2012
- Messages
- 4,108
Pictures?
Michael Kellough
Member
Use narrow width and normal depth on convex side, deeper depth and wide enough width to accommodate misalignment on the concave side.
On second thought you should tape a pair is shims equidistant from the mortise location on the convex side to keep machine from swinging during the plunge. Use very thin tape or use double stick.
On second thought you should tape a pair is shims equidistant from the mortise location on the convex side to keep machine from swinging during the plunge. Use very thin tape or use double stick.
Imemiter
Member
- Joined
- Sep 17, 2019
- Messages
- 435
Using the centering attachment I mortised the pickets before sanding the curve. The rail had to be radiused first so to reference the face of the cutter I clamped 3/4" plyd to the face of the rail approximating square to the cut. I made the guide plyd long enough that I could set it for two mortises in one pass working from the outside in. Then I carefully reset the fence depth of the domino, made the plunge depth extra deep, and set it to the wider waggle to provide a little leeway in the glue up. It only worked because I was wearing my lucky socks.
Attachments

Cheese
Member
I’d do the Domino operation first and then modify the joint to the curvature you want.
Michael Kellough
Member
[member=71322]Imemiter[/member] said, “It only worked because I was wearing my lucky socks.”
Lucky socks, on backorder.
Lucky socks, on backorder.
Cheese said:I’d do the Domino operation first and then modify the joint to the curvature you want.
This is the textbook approach, and the simplest way.
If you've already cut out the curved parts. please share a picture or two before some suggestions can be made.
Imemiter
Member
- Joined
- Sep 17, 2019
- Messages
- 435
Cheese said:I’d do the Domino operation first and then modify the joint to the curvature you want.
This works well on convex(ed) parts. However, with concave curves the depth (or height above chord) can exceed the depth of the Domino's cutter. I've seen people suggest cutting the curve into a ziggurat of sorts, but that'd be troublesome when pickets are close together.
My floating fence hack seemed sketchy what with flying the cutter into thin air before the cut starts, but in practice it did the trick nicely and didn't seem bad at all. It just took a steady hand, a smooth plunge, and lucky socks.
Cheese
Member
Imemiter said:This works well on convex(ed) parts. However, with concave curves the depth (or height above chord) can exceed the depth of the Domino's cutter. I've seen people suggest cutting the curve into a ziggurat of sorts, but that'd be troublesome when pickets are close together.
My floating fence hack seemed sketchy what with flying the cutter into thin air before the cut starts, but in practice it did the trick nicely and didn't seem bad at all. It just took a steady hand, a smooth plunge, and lucky socks.
Well one of the things I left off on my original answer is to Domino the depths deeper than necessary to compensate for the amount of curvature. I own both a 500 and a 700 so if I need extra depth I'll just grab the 700. If I need extra depth for the smaller Domino's then I'll just bore the additional depth with brad point drills.
At any rate, the proper outcome is the only thing that's important and if lucky socks works for you...I'll place an order for mine tonight. [big grin]
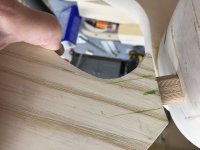
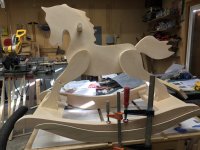
Thanks for the suggestions. The problem is on a rocking horse I'm making out of bass wood. The tail broke off, so I decided to add a replacement tail of harder wood (ash) and secure it to the horse's backside with a domino. Since both the tail and the horse's backside are slightly curved (photos 2 and 3), I thought it might be a problem to use a domino on those curved surfaces. I cut the domino in the tail first and I think that it's probably going to work OK but cutting the domino in the horse itself will undoubtedly be a problem, since it will be difficult to situate the horse properly for receiving the domino.
Attachments
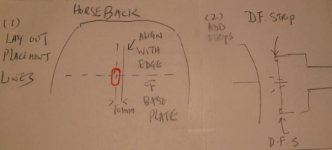
Assuming you want a precise way of mortising the horse butt ( [big grin]), this is my suggestion:
1) Mark the center intersecting placement lines for the domino on the horse (dotted lines)
2) Draw another line 10mm from the vertical placement line (solid line) which will be used to position the machine
3) Attach two strips with double-faced tape to the fence of the machine so the machine will sit on the butt perpendicularly
4) Stand up the horse so the butt is in a horizontal position
5) Position the machine on the butt using the horizontal dotted line and vertical solid line
6) This can be done freehand with little difficulty if one has done enough delicate vertical plunging before. But if desired, you can double-face strips around the machine to keep it from shifting when you plunge.
Attachments
Similar threads
- Replies
- 16
- Views
- 760
- Replies
- 4
- Views
- 725
- Replies
- 32
- Views
- 2K