You are using an out of date browser. It may not display this or other websites correctly.
You should upgrade or use an alternative browser.
You should upgrade or use an alternative browser.
VAC-SYS (vacuum clamping system) question
- Thread starter Nanod
- Start date
nclemmons
Member
That's a great idea. And the finish on that material is amazing! Heck, it's a mirror and a VacSys holder!
I cover my MFT with a 1/4" piece of hard masonite when I'm using it for things other than sawing or clamping. The masonite has a couple of coats of poly on it. I sand it down from time to time and recoat and it's worked really well for me. I have two holes drilled in the back corners for the battery lights from Lee Valley that fit a 20mm dog hole. I can also use two dogs.
That lets me place the VacSys anywhere on the table with great holding power.
But your idea is also a fast and simple idea when dealing with a table where you want the full 20mm holes exposed.
Thanks for sharing -
neil
When I'm using the Vac on my table, I have a piece of acrylic that has holes for threaded dogs that come up under the table, then I use the vacs vac base to clamp on the acrylic. I really wanted to have the head at table height so I made uprights using 8020 15 series extrusions that attach to the MFT rails and out-riggers to place the vac height even with the table. I also bought push/pull air fittings so that I can detach my hoses from the unit. This makes tear down and storage so much simpler. I don't understand why Festool did not do this. Actually the hose that actually goes to the head is push/pull, so they did go half way. [blink]
GarryMartin
Member
- Joined
- Jun 11, 2011
- Messages
- 1,939
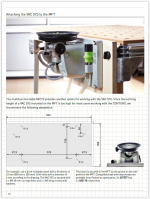
There's an adaptation for working with the MFT/3 in the Conturo on page 72 of "The perfect edge; user manual for the CONTURO system" linked below;
[attachimg=1]
http://www.festool.com.au/WebRoot/S...res/edge-bander/manual/FESTOOL_EN_CONTURO.pdf
[attachimg=1]
http://www.festool.com.au/WebRoot/S...res/edge-bander/manual/FESTOOL_EN_CONTURO.pdf
Attachments
Kev
Member
- Joined
- Nov 7, 2011
- Messages
- 7,370
GarryMartin said:There's an adaptation for working with the MFT/3 in the Conturo on page 72 of "The perfect edge; user manual for the CONTURO system" linked below;
[attachimg=1]
http://www.festool.com.au/WebRoot/S...res/edge-bander/manual/FESTOOL_EN_CONTURO.pdf
You are on fire today !! [wink] Nice thing about that approach is the height.
erock
Member
- Joined
- Apr 29, 2010
- Messages
- 1,226
[member=8352]erock[/member] I actually made it yesterday also. It was easy, but maybe took me a bit longer than 15 minutes. I used some extra t-bolts and knobs from a Gripper kit instead of the Festool keys and knobs because I didn't have those just sitting around. I was a little concerned that the t-bolts seemed to be a bit narrower than the slot on the MFT (still held well though) and was a little concerned that maybe the keys would give better, long-term support. What did you use? The Festool classroom in Indianapolis currently has the VacSys mounted this way and it does work well and is a much better height. Another nice thing about it is that it is easily removed and clamped to a more solid workbench to provide more stability for light chiseling or small planing jobs (which I've used it for).
erock
Member
- Joined
- Apr 29, 2010
- Messages
- 1,226
grbmds said:[member=8352]erock[/member] I actually made it yesterday also. It was easy, but maybe took me a bit longer than 15 minutes. I used some extra t-bolts and knobs from a Gripper kit instead of the Festool keys and knobs because I didn't have those just sitting around. I was a little concerned that the t-bolts seemed to be a bit narrower than the slot on the MFT (still held well though) and was a little concerned that maybe the keys would give better, long-term support. What did you use? The Festool classroom in Indianapolis currently has the VacSys mounted this way and it does work well and is a much better height. Another nice thing about it is that it is easily removed and clamped to a more solid workbench to provide more stability for light chiseling or small planing jobs (which I've used it for).
[member=19734]grbmds[/member] I used two 5/16" T-bolts and knobs to hold the board onto the MFT. I have two 12mm (1/2") pieces of pre finished plywood stapled together. Since the Festool plans called for a 23mm thick board. I'm not familiar with the size of the Gripper T-bolts, but the 5/16" T-bolts are solid and I have no worries about using them. I was a little leery about the 5mm bolts. But it's solid. [cool]
Eric
erock said:grbmds said:[member=8352]erock[/member] I actually made it yesterday also. It was easy, but maybe took me a bit longer than 15 minutes. I used some extra t-bolts and knobs from a Gripper kit instead of the Festool keys and knobs because I didn't have those just sitting around. I was a little concerned that the t-bolts seemed to be a bit narrower than the slot on the MFT (still held well though) and was a little concerned that maybe the keys would give better, long-term support. What did you use? The Festool classroom in Indianapolis currently has the VacSys mounted this way and it does work well and is a much better height. Another nice thing about it is that it is easily removed and clamped to a more solid workbench to provide more stability for light chiseling or small planing jobs (which I've used it for).
[member=19734]grbmds[/member] I used two 5/16" T-bolts and knobs to hold the board onto the MFT. I have two 12mm (1/2") pieces of pre finished plywood stapled together. Since the Festool plans called for a 23mm thick board. I'm not familiar with the size of the Gripper T-bolts, but the 5/16" T-bolts are solid and I have no worries about using them. I was a little leery about the 5mm bolts. But it's solid. [cool]
Eric
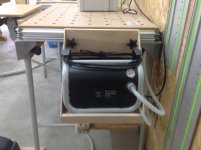
[member=8352]erock[/member] The T-bolts I used were 1/4" diameter and the T-heads are 1/2" wide. They hold well. As for the base, the holes are only 5mm so there really isn't a choice I guess. The weight is spread over 4 of them so probably there isn't much strain on each. The whole setup is much more convenient and easier to use, especially for sanding and making mortises with the Domino.
erock
Member
- Joined
- Apr 29, 2010
- Messages
- 1,226
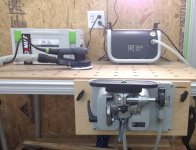
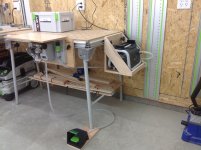
Okay guys, 2 more pictures for you. Maybe this will get some of your creative juices flowing.
A friend of mine said that it would be great if I got the vac-sys pump off my mft/3.
So I came up with this.
[attachimg=1]
[attachimg=2]
It's nice having the pump out of the way.
Hope this helps someone.
Eric
A friend of mine said that it would be great if I got the vac-sys pump off my mft/3.
So I came up with this.
[attachimg=1]
[attachimg=2]
It's nice having the pump out of the way.
Hope this helps someone.
Eric
Attachments
Hello all
This looks like a neat system to have at a later time but my question is does the pump run all the time? Or does it build up Vacuum pressure then shut off like a air compressor? Also why a classic systainer? That seems a little strange. Thanks
This looks like a neat system to have at a later time but my question is does the pump run all the time? Or does it build up Vacuum pressure then shut off like a air compressor? Also why a classic systainer? That seems a little strange. Thanks
The answer to your question about the classic systainers is that everywhere else in the world the pump is different and is mounted in a classic systainer. As such the other stuff was also put in a classic systainer to maximize the stacking possibilities. Festool probably didn't feel the need to have an additional sku just for the other stuff in a T-Loc.
Peter
Peter
erock
Member
- Joined
- Apr 29, 2010
- Messages
- 1,226
Drich said:Hello all
This looks like a neat system to have at a later time but my question is does the pump run all the time? Or does it build up Vacuum pressure then shut off like a air compressor? Also why a classic systainer? That seems a little strange. Thanks
[member=42176]Drich[/member]
Hey big D......the pump runs until you shut it off. It's quiet. I can't hear it when the CT and tool is running. I've had it running continuously for an hour or more, no problem. The pump gets warm, all normal, nothing big.
I didn't like the classic systainer.....but I've never put it back in the systainer since I took it out the first time. [cool]
Eric
GarryMartin
Member
- Joined
- Jun 11, 2011
- Messages
- 1,939
erock said:Okay guys, 2 more pictures for you. Maybe this will get some of your creative juices flowing.
A friend of mine said that it would be great if I got the vac-sys pump off my mft/3.
So I came up with this.
If you extended the back a little and braced from underneath, you could remove the top brace from one side and use it as a shelf to drop your TS on to when you weren't using the VAC SYS...
jonathan-m
Member
- Joined
- Apr 4, 2012
- Messages
- 326
The single most annoying thing about the vac-sys is the air hoses.
I like how you managed to get them as much out of the way as possible erock.
I like how you managed to get them as much out of the way as possible erock.
Cheese
Member
[member=8352]erock[/member]
I really like the way you mounted the foot valve to the ply and used a clearance hole so that you can push the foot valve out of the way when you're not using the VAC SYS...very clever.
I really like the way you mounted the foot valve to the ply and used a clearance hole so that you can push the foot valve out of the way when you're not using the VAC SYS...very clever.
erock
Member
- Joined
- Apr 29, 2010
- Messages
- 1,226
Cheese said:[member=8352]erock[/member]
I really like the way you mounted the foot valve to the ply and used a clearance hole so that you can push the foot valve out of the way when you're not using the VAC SYS...very clever.
[member=44099]Cheese[/member], I wish I could take credit, but I remember seeing this in a photo a while back in a VAC-SYS google search I did. I don't remember the pic or the person I stole the idea from......but it's a slick solution. [wink]
Eric
erock
Member
- Joined
- Apr 29, 2010
- Messages
- 1,226
GarryMartin said:erock said:Okay guys, 2 more pictures for you. Maybe this will get some of your creative juices flowing.
A friend of mine said that it would be great if I got the vac-sys pump off my mft/3.
So I came up with this.
If you extended the back a little and braced from underneath, you could remove the top brace from one side and use it as a shelf to drop your TS on to when you weren't using the VAC SYS...
Good idea ! [thumbs up]
Similar threads
- Replies
- 52
- Views
- 3K