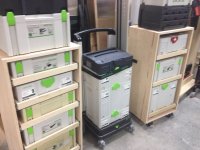
Video: Making SYS Ports.

erock said:
Yeah, the Mag Shims are handy! 

I figured this one today - stack em up on the side of planer outfeed bed, you can eyeball the material coming out right next to them.

I just ordered another festoy, I'm going to need to build a sysport myself soon here.  Great stuff.  If only you had a few more systainers to justify all these sysports...
 
Real men don't read manuals...

[not worthy]
 
erock said:
HEY Mike !  The guy with the beard was someone walking down the street, I asked him if he would make a special appearance in the video and he only wanted to be paid in M&M's !  Good thing it took him just one take to get it done.    LOL !

I don't want to talk about the concrete.  It's not going to happen this year.  The weather is not cooperating with me.  I'm a little upset about it, but, it's only concrete.  It will have to happen next year. 

It was great to chat with you buddy!  My shop is always open to Festool junkies !  If you're ever in the neighborhood stop by!

Did you get a chance to talk to Larry about the polishing steps?

Eric

Hey Eric, Sorry to hear about the concrete.  It's probably better anyway to do it in the Spring when you'll be able to get it all sealed and enclosed right away.

I really enjoyed talking with you.  I get over to your neck of the woods now and then so don't be surprised if I contact you about a visit one of these days.  Still being a newbie, I can always use some advice!

Larry was very helpful.  I stayed around until late in the day when the crowd thinned out and Larry actually went through the steps for me and another Cleveland person who is interested in getting some Festool sanders.  He actually made the grain pop on some cheap veneer plywood that he had on hand for the demo.  After taking it to 2000 grit, he put a coat of wax on the ply and polished it out.

Mike A.
 
They are great. I watched the video with the wife and she even was impressed. I just picked up my first festoons here a few weeks ago and will be wanting to build one also. Would it be to much to ask for a cut sheet for it. It would make life much easier for me. Also where is the best place to buy those slides and screws you used on them? Thanks so much

I watched the video again and have the sides and bottom sizes but a little unsure on the drawers. Was the sizes with the trim or just the drawer bottom. Sorry I'm just wanting to get this right. Also was the back just flush on the sides or did it set in?
 
Thanks for the video Eric, was just getting ready to build some for myself and was trying to figure out all the measurements and was about ready to order 12" drawer slides, so glad I didn't. Now if you would be kind enough to pass along a cut list [wink]
 
I am going going to build some of these so needed to write the measurements down and might as well do it here in case it helps someone.

Measurements as stated by Eric in the video from the 7:37 mark:

Side piece: 18mm plywood - 400mm (d) x 1000mm (h) with edgebanding on front and top
Tops and bottoms: 18mm plywood - 460mm (w) x 400mm (d) with edgebanding on front
Backstretchers: 18mm plywood - 82mm (h) x 460mm (w)
Backpiece: 5mm plywood 500mm (w) x 1003mm (h), which allows for 1mm edgebanding

Drawer pieces:
Side to Side (inclusive of edgebanding) = 412mm
Front to Back (inclusive of edgebanding on front) = 332mm
Sides: 12mm ply
Front: solid poplar 437mm (w) x 40mm (h)
Base: 18mm plywood
Stop Block: 40mm in from rear

Drawer Glides: 14 inch full extension

If there are any errors in this, please let me know and I will edit and correct this post.
 
eddomak said:
I am going going to build some of these so needed to write the measurements down and might as well do it here in case it helps someone.

Measurements as stated by Eric in the video from the 7:37 mark:

Side piece: 18mm plywood - 400mm (d) x 1000mm (h) with edgebanding on front and top
Tops and bottoms: 18mm plywood - 460mm (w) x 400mm (d) with edgebanding on front
Backstretchers: 18mm plywood - 82mm (h) x 460mm (w)
Backpiece: 5mm plywood 500mm (w) x 1003mm (h), which allows for 1mm edgebanding

Drawer pieces:
Side to Side (inclusive of edgebanding) = 412mm
Front to Back (inclusive of edgebanding on front) = 332mm
Sides: 12mm ply
Front: solid poplar 437mm (w) x 40mm (h)
Base: 18mm plywood
Stop Block: 40mm in from rear

Drawer Glides: 14 inch full extension

If there are any errors in this, please let me know and I will edit and correct this post.

Thanks guys for all the kind words on the video.  Much appreciated ! 

I'll have to check my spam folder, I'm not getting notified about post being made......or maybe I forgot to click the notify button  [scratch chin] [scratch chin] [scratch chin]

At any rate..... THANK YOU  eddomak  [thumbs up] for suppling the cut list. 

Please keep in mind guys that you're measurements may differ +/- a millimeter or so.    We're not sharing tape measures or tools.  [wink]

For my sys ports.  The inside box dimension was 460mm.  The drawer slides required me to subtract 24mm (12mm per side).
I had to subtract 24mm for the 12mm plywood I used for the sides of the drawer.  So that gave me a 412mm drawer bottom.
You may be using a different style of drawer slide.  Or, different sized materials.  I have some room on the left and right of the systainers when sitting on the drawer.  So you could make yours a little narrower.  I used a 2009 Festool catalog that had the overall dimensions of the Festool SYS Port.  That's where I came up with my measurements.  I wanted to mimic the Festool version the best I could.

But eddomak supplied you with a very good cut list.   

As for the drawer slides I used.  I bought them off eBay.    The eBay seller ships quickly.  I've purchased from them a number of times. I have no affiliation with them.  And here is a link for the drawer slides......

http://www.ebay.com/itm/261189468299?_trksid=p2060778.m2749.l2649&var=560189456444&ssPageName=STRK%3AMEBIDX%3AIT

At $55 for a 10 pack of 14" full extension drawer slides.....you can't beat the price.  I haven't done much shopping around for them, but with the amount of shopping I've done, this was the best price I've found today. 

The Euro screws are 6.3 x 13mm euro screws that I buy from a local woodworking store.  I know Mcfeely's carries them online.
A box of 1000 was around $24.

The 95mm (3") casters came from Harbor Freight.  They run around $3.50 per caster. 

What's next guys????  you want me to cut the wood for you?  LOL      come on guys.  it's just a joke.  don't take it serious !  [tongue]

Hope this helps you out.    Have fun building them!    Please post pictures of you sys port here in this thread if you make them !!!

Take care,

Eric
 
Eric,

First off another great video, as always..

I'm a newbie trying to build these, so please let the bashing be easy... the question I have is setting the lr32 up for the front row of hole at 37mm wasn't bad but with the panels being 1000mm vice tru32.  How do you get the second row at 196mm easily on a 400mm width panel.  I drew a line and tried to get it that way, we'll see if that worked when I put them together.  Any help would be appreciated, with the width of the rail I couldn't see an easy way to align it with the lr32 stops..

I gotta say I'm envious of your  [eek] festool collection, Are you a carpenter/furniture maker by trade?

Thank for all your great in depth videos, I've watched them all.
 
Devildawg91 said:
Eric,

First off another great video, as always..

I'm a newbie trying to build these, so please let the bashing be easy... the question I have is setting the lr32 up for the front row of hole at 37mm wasn't bad but with the panels being 1000mm vice tru32.  How do you get the second row at 196mm easily on a 400mm width panel.  I drew a line and tried to get it that way, we'll see if that worked when I put them together.  Any help would be appreciated, with the width of the rail I couldn't see an easy way to align it with the lr32 stops..

I gotta say I'm envious of your  [eek] festool collection, Are you a carpenter/furniture maker by trade?

Thank for all your great in depth videos, I've watched them all.

Jason,

I'm going to assume that you are using the Pro 100 Series 350mm  (14") full extension drawer slides, the same slides I used in the video, because depending on the slide you're using, the measurements could be different.

With the panel being 1000mm, a NON True32 number, you must pick the top or bottom edge to reference your end stops/guide rail stops.  16 up and out.  To keep things easy for me, I always reference off the bottom of the cabinet when my side panels are not a True32 number.  I like to use a piece of blue tape on the side panels to represent the TOP of the cabinet.  This is a good visual aid for me, and helps remind me which end needs the end stop/guide rail stop to make contact with.  This will ensure the holes will line up from side to side of the cabinet.

The first row of holes is aways centered 37mm from the front edge of the cabinet.  Finding the back row of holes is easy.
Take the drawer slide you will be using.  For this project the Pro 100 350mm slide.    And you're going to use a 6.3 X 13mm Euro screw.  So you need to find the center of the rear hole location that takes the Euro screw on the drawer slide.  Measure from the center of the front hole location that takes a Euro screw to the center rear hole location that takes a Euro screw.  That measurement is 224mm. 
Remember, you're always finding the center of the hole locations.
So adding 224mm and 37mm gives us 261mm.  261mm is the center of the rear hole.  Pull your tape off the front edge of the cabinet and make a pencil mark, use a good square and make a line about 100mm long or so.  This line is going to help you center the router and set the edge stops/stop rods.

Set up the LR32 guide rail with the splinter guard facing towards the back of the cabinet.  Have the end stop/guide rail stop up against the bottom of the side panel.  Place the OF1010/OF1400 on to the rail,
plunge the router down and using the tip of the 5mm bit, line up the center of the bit with the pencil line you made at 261mm.
Then take a edge stop/stop rods  and place it on the guide rail, that solid part of the rail, NOT  the slotted part.  And slide the pin over until it hits the front edge of the cabinet.  Lock the knob down.  Repeat this for the other edge stop/stop rod.  You may want to make a mark at 261mm on the top of the cabinet.  Once you set the edge stops/stop rods, having a 261mm line on the top and bottom of the panel you can slide the router up to the top and plunge the router down and check to make sure the bit is centered on the pencil line.  This will tell you that your row of holes will run parallel with the front of the cabinets.

I can't give you a number to set the edge stop at because the pin is set beyond the scale on the edge stop/stop rods.

Whenever I'm using the LR32, I set the guide rail up so that the splinter guard is always facing the direction of the holes I want to drill out.  So when I'm drilling the front row of holes at 37mm, the splinter guard faces the front.  And when I'm drilling the holes for the back row of holes, the splinter guard faces the back of the cabinet.  Since I pulled my center measurement off the front of the cabinet, I set the edge stops/ stop rods pins off the front of the cabinet.

Hope this helps you out. 

Take care,
Eric

P.s.  I'm just a hobbyist.  [wink]
 
Eric,

Thank you for the very detailed explanation.  I did something similar, I aligned off the top.  My holes were at 37 and 197 for the two rows of holes.  The slides I used were the Pro200 Slides I got from Wurth Wood Group.  My holes were at 37 and 197mm, used the parallel guides to lock in the dimensions on the rail, once I had it tight on the line I drew at 197 that hit with the point of the lr32 5mm bit.  I had 16 up and out tight at the top and then locked in the right/bottom depth parallel guide, and then I took the 16 up and out off and slid on the other parallel guide so that all the holes would be the same.  I used the screw for plunge depth. 

I think I have the rails parallel and just need to work clearance between the drawer and guiderails because it seems super tight trying to put the systainer drawer in.

I think I'm getting there, I think that just need to trim ~2-3mm off the sides of a drawer.  I will try that tonight.

Thanks again,
Jason
 
Well after a little frustration with my measuring and trying to fit drawers to the pro200 slides I had to increase the width of each top and bottom from 460mm to 464mm to have the slides operate without binding.  On the second set I cut each top and bottom to 470 and sized it down by dry fitting with clamps.  It was easier than redoing all my drawers that I had already assembled.

I'm thinking that my 1/2 ply on the drawer sides is why i needed wider tops an bottoms be cause i remember erock said his was 12mm ply where my mine were 12.45mm

My lessons learned were:

when using the LR32 don't make 4 left sides, remember 2 have holes on the opposite side. [eek], so Had to make 2 more right sides..

The back holes for the slides were challenging as I haven't used the LR32 much.  Thank you Eric for your detailed explanation.

Here are my two sysports I built, thanks to Eric's awesome tutorial.

[attachimg=1]
 

Attachments

  • image.jpg
    image.jpg
    818.5 KB · Views: 3,364
Nice Jason ! [thumbs up] [thumbs up]

Looks like you need to build another one    [tongue]  [poke]

Eric
 
As usual, I find your videos informative and entertaining!  I see  DIY Sysports in my future as I'm getting more "Festoys".  (Love the Carvex!! The LR 32 may be my next purchase.). 

After watching this video on the Sysports, I noticed the air line and and vac hoses mounted above your work surfaces.  Would you please comment on the length of the vac hose and if it is 27, 36, or 50 mm?  It looks like a 27mm to me and you have joined two or more together.  Festool has several connectors and it would be helpful to know what you used or prefer in your setup.  Going to run air drops in my garage soon instead of dragging the hose(s) from the compressor.  A search on the FOG shows many DIY boom arms for supporting the vac hose and I have thoughts on that subject also.  Also considering a six foot version, Paulk style, work bench to double as an out feed table for my table saw and as an assembly table.

My grandfather was a professional carpenter.  I'm a professional sawdust maker.
 
Devildawg91 said:
Well after a little frustration with my measuring and trying to fit drawers to the pro200 slides I had to increase the width of each top and bottom from 460mm to 464mm to have the slides operate without binding.  On the second set I cut each top and bottom to 470 and sized it down by dry fitting with clamps.  It was easier than redoing all my drawers that I had already assembled.

I'm thinking that my 1/2 ply on the drawer sides is why i needed wider tops an bottoms be cause i remember erock said his was 12mm ply where my mine were 12.45mm

My lessons learned were:

when using the LR32 don't make 4 left sides, remember 2 have holes on the opposite side. [eek], so Had to make 2 more right sides..

The back holes for the slides were challenging as I haven't used the LR32 much.  Thank you Eric for your detailed explanation.

Here are my two sysports I built, thanks to Eric's awesome tutorial.

[attachimg=1]

Nice job on the SysPorts - they look great!

BTW, what's that funny looking systainer with the white 'Plus' sign on it?

[wink]
 
It is this AMAZING First Aid Kit that was put together by an awesome user on this Forum by the name of WoW..

It needed a special location..

 
Eric,

Love your video. In fact, I have enjoyed all of them. Very informative and entertaining. You have a way of keeping you audience engaged. Awesome Festool collection. You're the reason I'm drinking the koolaid.
 
Hi Eric,

I finally got the material for building some (3) sys-ports, just waiting drawer sliders any day now. Was just curious since you have so many, do you have away of interlocking them together to stay that way or do you just leave free in one place. Just curious. Keep up the good videos.

Cheers
 
Back
Top