Walnut Bar front update Installed pics

Crazyraceguy

Member
Joined
Oct 16, 2015
Messages
5,001
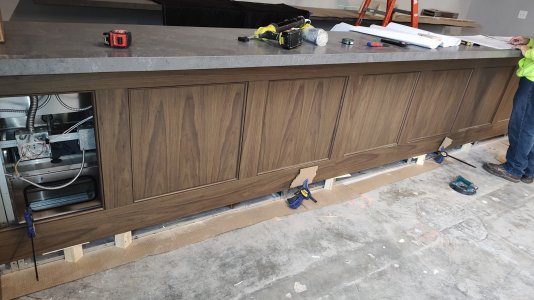
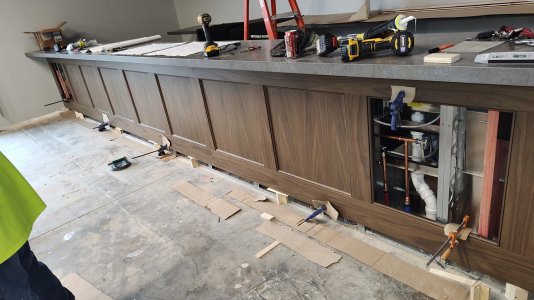
I didn't really get much for pics during assembly, but I have a few near the end. All 3 sections together are just over 22 feet long, but there really isn't any structure to it, since it really is just a skin, to cover existing. The 9 panels are identical size, with the 2 outers as removable access panels (with locks, rather than the usual screws)
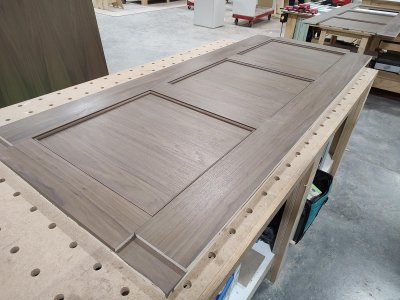
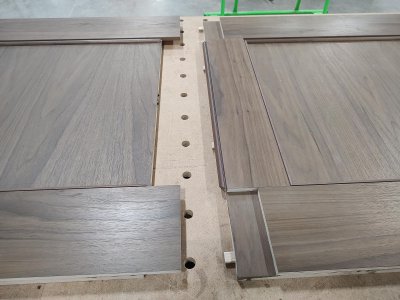
It has a rather odd detail of a reveal/spacer between the rails and the quarter-round.
 

Attachments

  • Bar front.jpg
    Bar front.jpg
    384.9 KB · Views: 78
  • Bar front parts.jpg
    Bar front parts.jpg
    396.4 KB · Views: 65
  • Bar front access.jpg
    Bar front access.jpg
    205.7 KB · Views: 71
  • Bar front lock.jpg
    Bar front lock.jpg
    371.6 KB · Views: 77
Last edited:
Very nice CRG!

I love walnut, absolutely beautiful timber, I use it a lot in conjunction with white oak and jarrah.
 
I also love walnut... :love:

That appears to be a walnut ply which I assume is different than most of the folks on the FOG use. I've never used walnut ply, the closest run up I've had with a laminated material is maple play.
 
Looks great CRG! I like the reveal/spacer before the quarter round. Gives the panels a unique look.
 
Yes, @Cheese it is plywood. We have a veneer supplier that will lay-up full sheets like this, on most substrates. These happen to be a Baltic Birch substitute, but it could have been MDF too. Three of those sheets came to me as 8' x 4' (cross grain) That made this quite a bit quicker to assemble. The rails and styles are only 1/2" and simply applied to the front of the underlying 3/4" back. The sections will be attached buy Lamello Clamex connectors and a few Dominos.
 
I got a couple of partially installed pics. This was before the end panel was installed. On the right side, it turns and has one more square.
 

Attachments

  • Zink bar access.jpg
    Zink bar access.jpg
    395.4 KB · Views: 27
  • Zink bar.jpg
    Zink bar.jpg
    397.6 KB · Views: 26
Can you explain how the removable panels "lock" in place? The molding is already in place so I assume the panels are slid in at an angle and then brought forward, but don't see how they attach.

Since the rails and stiles are veneered plywood, I assume the slight reveal at the edges with the shoe molding is also veneered, right?

Thanks, looks good.
 
They are exactly the same as I do the vast majority of access panels. The lower rail has a rabbet that is 3/8" wide and 3/8" deep. Then at panel itself has a reversed rabbet that is slightly more than 3/8" wide and 1/2" deep. This allows the panel to sit on that tongue and leaves a 1/8" gap. The panels tip into the bottom and push back against some stops. Most of the time, simple screws hold them back. Occasionally, someone wants total stealth, those get magnets. (But whoever needs to get into them has to know how it works) Then there are the ones that get locks, like in this situation. They are dull black, to hide them some, but they will show.

Radius walls do not get this method though. You can't tip in a radius, so those get screws in all four corners.

If you go back to my first post, you can see the lock, in the 4th pic.
(In case I didn't explain it, most of the panels are fixed in place, only the ends are accessible)
 
Ah, so the panels are not wider than the opening, but a close fit, width-wise?
There is a 1/8" gap around the edge, that's the point of the intentional reveal at the bottom. The light you can see above the panel, in the right hand pic, is because the stop strip is not there yet. It needed to be done in the field, because I don't know where the studs might be. This is just a skin, covering a frame that was built by someone else, on site.
It is usually more of a pain, dealing with adapting/covering existing, than building the entire thing myself.
 
Back
Top