Please forgive what looks like total disarray in my shop. I recently moved my shop out of a wonderful ~30x~30 rented space into my 1950s era barely-two-car garage because my landlord at the shop space couldn't get or couldn't renew or lost her insurance. I'm not sure I'm getting the whole story, but here we are, cramming way too much stuff into my tiny garage. I'm still working through layout and storage options.
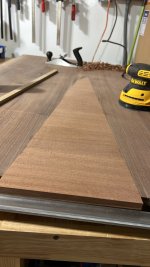
Step 1 - the slab. We live in Northern Delaware. The slab was bought online from Alderfer Lumber in central Pennsylvania. So we hiked up there in my truck to grab the slab. My step son bought it all on his own, and I have to say, for the price (~$275), I wasn't expecting much. I was prepared to reject it and buy up a little bit if we needed to. Turns out, the slab was rather lovely, so now Alderfer Lumber is on my go-to list of places to get this kind of stuff.
[attachimg=1]
Step 2 - debarking and prep work. After chipping away some bark and digging out soft bits from various voids and checked areas, I used the combination of a track saw and some chisel work to clear out the crotch void and turn it into straight lines. I'd already decided - with step son's blessing - that I wasn't going to do a full epoxy pour on this thing (re: my aforementioned disdain for that weird trend). I had a single board of sapele left from a previous project, and it had a lovely tone and chatoyance to it once oiled. I know it would look good standing out against the walnut. The board wasn't wide enough to fill the void, and I couldn't find a grain match that I liked, so I decided to cut pieces to match the rough widths of the void, glue them up into a panel going the other way, and shape it and drop it into place perpendicular to how most might do it. I told my step son that if wood movement becomes an issue, we can cut it out and deal with it, but honestly, now that it's assembled and it sat in my non-AC'd, unheated shop for about 6 weeks in total and hasn't moved an iota, I'm not worried about movement in a more climate static environment in our house or in his college dorm, where ever it ends up.
[attachimg=2]
Dilbert DeWalt looking quite determined after a big round of sanding, and ready for more.
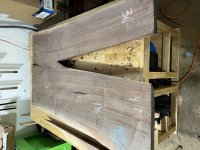
[attachimg=3]
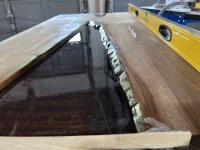
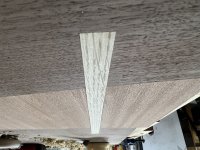
Step 3 - the inlay. We conferred on the look, and decided to add a white oak key to the top mostly for visual interest, but also to add some strength to the cross grain party going on between the walnut and the sapele. I laid-in a 1/2 x 1/2" section with a simple router trough and some chisel work on the ends. Not gonna lie - that was nerve wracking as I was doing it free hand because my 1/2" wide white oak was a hair over 1/2". I was able to get it very close with the router, then chisel in to a nice tight fit. But yikes... sllllooooomow and steady. That took about 20 minutes to just do the routing with all the slow moving and frequent stops to check fit and make sure I could still see my lines. Once in, some hand plane work to level it all out and Bob, as they say, is your proverbial uncle.
[attachimg=4]
[attachimg=5]
At this point, the filler is held in only with glue, and we were about 72 hours into the filler and inlay glue drying and curing. It's not getting any drier or more cured, so it was time to move on.
(not pictured)
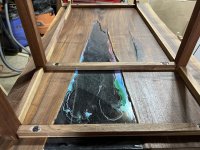
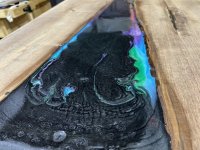
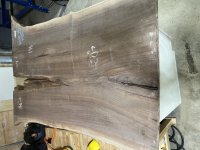
I flipped the top over and hand chiseled in pockets to glue and hammer in some dominos, three per side, between the walnut and sapele, then planed them down to the level of the sapele. This added more mechanical binding. The slab is ~1.5 inches and the sapele is about .8 inches, so there's still a thickness difference. This is where I decided to break out the epoxy rather than piece more wood in. Did all the typical prep for that; some spray shellac to inhibit color wicking, chiseled in a few divots for the resin to adhere to in the walnut slab's bottom where it rises above the sapele, etc. Across about a week and a half I did 3(?) thin-enough pours. I didn't want to do a big deep pour (I mean, is ~.75? really all that deep?) because I wasn't sure what would come through, and I was using a non-brand-name epoxy that got good reviews, but I'd never heard of. Thin pours could be cleaned out or ignored if there were issues.
There were no issues, and toward the end I mixed in a little color just for some fun.
(quick note: didn't at this time have my own Domino machine, but I had a pack of dominos from when I borrowed one to practice and figure out if I wanted to buy one. I have, since. [big grin] )
In this image, at the left of the pour, near the bottom, you can see two areas that look like bubbles. They're the end of the domino that didn't lay down quite as flat, and I didn't plane it down quite far enough that this layer fully covered it. That's the extend of the domino usage in this project.
[attachimg=6]
[attachimg=7]
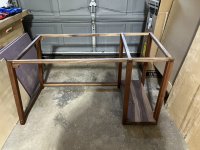
Step 4 - the frame and gaming PC shelf
(no real mid-build pictures here)
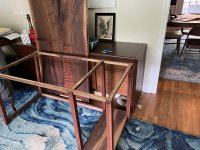
Decided to design this thing so that the right column, where a drawer stack might normally be, would include a floor-level(-ish) shelf to hold step son's gaming PC. It's a full sized tower with water cooling and all the goodies. The deck/shelf is a pile of glued-up walnut off cuts (I don't like "scrap wood" as a term for usable wood) all nicely jointed and planed into a 12" wide, 2" thick, 24" long shelf that gets rabbeted into the four legs on the right. Since the top is so heavy, I wanted something weighty and solid toward the bottom and between this shelf and the PC that will be sitting on it, you know the old dad saying... "that ain't going nowhere!"
It's beefy.
The left two legs are canted out at 10*. We were going to go with a bigger angle, but decided to keep it shallow for strength and to minimize the footprint to roughly the same as the slab, while still providing ample room for his gaming chair and gangly-ass legs on his ~6' frame. The 6 legs used the remaining bits of my sapele that wasn't set aside for an upcoming curio box I'm commissioned to make. The runners/stretchers in the frame and connecting the frame to the slab are made of 1" runs of walnut, castle-cut into the tops of the legs, then pinned with oak dowels, through-drilled here and there. The left two legs are also bolstered with white oak floating tenons (visible in the picture of the frame standing alone). Before putting the slab on it, I put a piece of plywood on it and sat on it.
"That ain't going nowhere!"
Drilled in some threaded inserts into the slab, and slotted the frame to allow for movement, oiled and rubbed everything, then final-assembled it all.
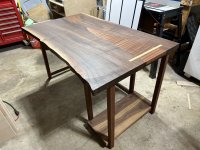
[attachimg=8]
The mounting bolt recesses have since been chiseled, cleaned up, and oiled as well. This was at the initial test fit.
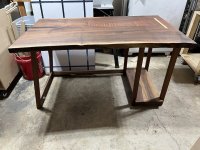
[attachimg=9]
[attachimg=10]
And that's that. Thank you for the interest, and hanging in to the end of this write up.
I've dubbed it The Nathaniel as that's my step son's name. I have SketchUp drawings for it, and I may make a short run of them for sale at some point. Locally. I'm not shipping this behemoth, though I could be talked into a road trip for delivery
")