Water cooled CNC spindles / Shaper

WillB

Member
Joined
Sep 2, 2019
Messages
84
Cheese, did u ever go with the Shaper Origin?  Thoughts?  I always appreciate your insightful contributions on this forum through the years.  Thx for being such a great contributor.  A few questions, u or anyone....

I have considered a Shaper too, but from my research it uses the small 1010 motor from Festool... why not use a much quieter and more powerful air cooled CNC motor which offers better collet sizes?  It's a relatively higher end product and has great value, even offering an option for such would think would expand their user base.  any thoughts? 

I would think offering a CNC air cooled spindle would offer additional accuracy with the collets as well, which is significant if you use the Shaper for detailed joinery work such as dovetails.  Shaper has never really expressed how accurate their system is..at least that I have seen.  For most applications, extreme accuracy not that critical, but for very fine detailed joinery or inlays, accuracy matters.

I have the WP router lift with the Milwaukee 3.25hp... my only issue with the WP lift is the Lift mechanism to change bits, a bit cumbersome with the push rod and spring system as it gets very sticky through the years.  Glad to see others have come up with a cleaner system for moving the spindle up n down.  I would like to replace my Milw with a quiet air cooled or water cooled spindle, I have 240v avail.  Does anyone have a recommendation that would fit in my WP lift? 

BTW, does anyone make a router table system with the air / water cooled spindle w lift?  This would surely elevate router tables for the lite commercial user. 

For handheld routers, is there any CNC air cooled spindles that fit in existing bases, such as Milw, Bosch, DW, Festool, etc?  This again is primarily for sound reduction and better collet size options.  thx in advance.

 
[member=71257]WillB[/member], I certainly can't speak for Shaper, but I'm not sure how a bigger/more powerful router would be beneficial. You are doing the cutting effectively free-hand. Yes, the computer is adjusting for you, but it is not like working with a router table and against a fence. In that case, all you are responsible for is pushing the piece against the fence and moving forward. It is easy to push against a static fence, the only feedback you feel is the cut itself.
Cutting shapes out in the middle of nowhere is a different feeling operation. A big router motor and corresponding bigger bit might make that a bit dicey. Kind of like flush-trim cut on a router table without a starting pin
 
agreed with your comments. crzyguy...

I addressed this in my post...

>  For handheld routers, is there any CNC air cooled spindles that fit in existing bases, such as Milw, Bosch, DW, Festool, etc?  This again is primarily for sound reduction and better collet size options.  thx in advance.
For the Shaper, it would be mostly for noise reduction.  But at times when u are hogging out a lot of area with the Shaper, a more powerful motor could be helpful. 

BTW, it seems we are moving into a new phase with routers as small scale CNC has become commonplace.  Some of these CNC adapt existing routers, others move to spindles, so I am guessing its just a question of time till some of those air cooled quiet spindle motors with more collet options make their way to handheld routers...
Of course, not knocking the existing routers, which I have just about every makers version ;).  But when I experience the quietness of CNC smaller spindles, I make the connection ;)  I realize noise is not an issue with everyone.
maybe this is many years away
 
I haven't heard an air cooled spindle in operation but the water cooled spindles are so quite they are nearly dangerous if you didn't notice the bit was spinning with a bit of background noise. I am rebuilding my router table at the moment and I can't understand why more people are not going towards a lead screw type lift and a WC spindle as it is way cheaper and more robust and as I have now found the dust control is for all intents and purposes 100% effective.

I have built a manual lift table using a WC spindle  rails, a DRO and a lead screw adjustable from the top and it is in commercial use and has been for quite a few years with zero issues. My build has full digital control using a touch screen and we wrote the code (about 26,000 lines), it does not use a computer only a single processor. 
 
@ Mini Me, you talked about this before but we still haven’t seen any photos. What is a “lead screw lift”? How does it differ from the many commercial lifts?
 
MMe, u seem to be ahead of the technology curve here.
I have seen a digital lift by one of the makers in USA, I think MLSC...
If someone made a working packaged system of what you built, it prob. will catch on for a small segment of the market. 
 
WillB said:
Cheese, did u ever go with the Shaper Origin?  Thoughts?  I always appreciate your insightful contributions on this forum through the years.  Thx for being such a great contributor.  A few questions, u or anyone....

I have considered a Shaper too, but from my research it uses the small 1010 motor from Festool... why not use a much quieter and more powerful air cooled CNC motor which offers better collet sizes?  It's a relatively higher end product and has great value, even offering an option for such would think would expand their user base.  any thoughts? 

I would think offering a CNC air cooled spindle would offer additional accuracy with the collets as well, which is significant if you use the Shaper for detailed joinery work such as dovetails.  Shaper has never really expressed how accurate their system is..at least that I have seen.  For most applications, extreme accuracy not that critical, but for very fine detailed joinery or inlays, accuracy matters.

I have the WP router lift with the Milwaukee 3.25hp... my only issue with the WP lift is the Lift mechanism to change bits, a bit cumbersome with the push rod and spring system as it gets very sticky through the years.  Glad to see others have come up with a cleaner system for moving the spindle up n down.  I would like to replace my Milw with a quiet air cooled or water cooled spindle, I have 240v avail.  Does anyone have a recommendation that would fit in my WP lift? 

BTW, does anyone make a router table system with the air / water cooled spindle w lift?  This would surely elevate router tables for the lite commercial user. 

For handheld routers, is there any CNC air cooled spindles that fit in existing bases, such as Milw, Bosch, DW, Festool, etc?  This again is primarily for sound reduction and better collet size options.  thx in advance.
Ya I pulled the pin on a Shaper, have not yet gotten serious with it. Not in the least bit sorry about the purchase, just trying to work it into the schedule of the other things to do list.

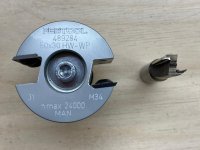
The 1010 motor is tough as nails, I'd not worry about that item. Festool recommends that the 1010 can be used with the 50 mm rebating bit. Power its not an issue with the 1010.

[attachimg=1]

I agree with the CRG analysis that these smaller routers are perfect for hand held CNC routing. A 1/2" router bit just becomes a site-line problem when looking down the tool path.

And then there's the weight thing added to the equation. I think Shaper & Festool nailed it when they suggested the 1010 router spindle format.

As far as collet size goes, for routing the outline of objects, which is really what the Shaper excels at, I think there is a sweet spot when it comes to collet size. 1/2" bits are way too large, you're removing a lot of extra material that doesn't need to be removed for the application. I liken it to the use of hole saws versus forstner bits.

The other consideration is router bit availability. If you can't purchase the tooling you want, collet size really doesn't matter. With Shaper/Festool now offering collet sizes of 3mm, 6mm, 8mm, 1/8" & 1/4" that's a pretty complete product line. It's only been within the last couple of years that 3mm and 1/8" tooling has been available.

Personally, I think the 8mm & 3mm router bit sizes are golden for using with the Shaper. The 8mm shaft provides a nice combination of strength & stiffness to provide aggressive cutting with minimal router bit breakage.


Attachments

  • 10412.jpg
    10412.jpg
    278.4 KB · Views: 720
A spindle would be superior but it would also weigh more which would greatly affect the dynamics of the Shaper, and then you also have the issue of being tethered to a VFD.
 
Michael Kellough said:
@ Mini Me, you talked about this before but we still haven’t seen any photos. What is a “lead screw lift”? How does it differ from the many commercial lifts?

Michael, this is all very new and we are building (hopefully) about version 5 of this table because every time we get into it we see better ways of doing stuff or build something that is in reality a dead end for lots of reasons.

This link shows a manual version of a lead screw lifthttps://www.woodworkforums.com/f20/router-table-using-linear-rails-lift-227354 and it has been in use in a woodworking school for some years so it gets a hammering.

The digital control version started with an extremely well built conventional table follow the thread right through and about 3/4 of the way it changes to a digital conversion.https://www.woodworkforums.com/f20/router-table-build-212190

This link is the continuation of the buildhttps://www.woodworkforums.com/f20/automated-router-table-226646

This link is a search of the Aussie forum router forumhttps://www.woodworkforums.com/search.php?searchid=56507005 that I am using to post the above links from. There is a fair bit of discussion regarding spindles etc in it.

There are some very short YT videos of the first build, this is one of them=2s&ab_channel=MichaelZing

This is the table we are usinghttps://www.makerstore.com.au/modular-table-sale/

Lead screw AKA ball screwhttps://www.ebay.com.au/itm/303570642880?hash=item46ae3867c0:g:2nQAAOSwd~Fewd-O&amdata=enc%3AAQAHAAAA4HjpchgJmZlkYzcZS3XpOlQy9iGunXR4bs26LOxB1EiC0%2B7NFX7KzOc5p%2FLC5Rl9EKibP6bpNMekne7O9P5JYVevme62kU4Ff1Zd4TZvrCJ3HwSiqp0PnPXHM6dWapaDeg06%2Fdd%2BuSbfO8gk0UjDJs6tDRAisd2bQu6crY0qm0rJiakwpt3tRculNr3mnGArOtzzrL0rQblIQLlnAo8GG1n4mTCNytTESibhPJAWtbGKcXjUrRt4lkzINpUPnM%2F1qV2q%2B1K3xw8Hmv0sUBQLEVcQ0Lsrj8ti0JUwiy7QnTGx%7Ctkp%3ABk9SR8i25pyBYQ

WEe started with this style of bearing railhttps://www.ebay.com.au/itm/393264910237?hash=item5b906a4f9d:g:XrAAAOSwCp5i4NzZ&amdata=enc%3AAQAHAAAA4EHY9E58RkC2i8QFhWu%2Fw86R7RzDj73SqzRKz5c0tdLvavU2xdAR8wxEBiCtDXO3iES9ADimRDY3mNpYOpfELZ6mqudOTx0kkfOFBHgiwxaaRZzFiCj23hDTrkZYIxZw0SgEr8rKX0mpYR0NCRM600qQ1AYpSOUbzdwd4I8fQkSRioJdYW6FjooPNyDaU35xWhOlk8Ek%2B6eI3ltN7BoNRE9e86TchUfX57LwIMiNCVkJg%2FsUfgf%2BaZiBc69%2BD2nO92p%2FrZYExyHsqveicSqhPxRfuU%2B0zC4fWEC3zJdGgn1t%7Ctkp%3ABFBM8rPwnIFh

And now we are using this style which is far superiorhttps://www.ebay.com.au/itm/354227100852?hash=item5279949cb4:g:DI4AAOSwj29i-wk4&amdata=enc%3AAQAHAAAA4H1dAsCR%2BvxpfqTexT1ZzeOJ%2FalwQge5X0Cj%2BTreYJN3n%2B0wm6jz%2BAANeIedRBEQizAtIwoGhlJ28XrGdY4R%2Fc24MHOwae8Ch9Z6U7On6bcFtOD9b78rLmpLwxuHcAjAJXdX%2FtecVYFv3AFy%2Bsyj5RSGKg5i9SogQbzweIggyhKsfgUIJaAsqASJdX1ksGOnxuGsdFnXt2JXXfl3QyIYJzZUAgWGJ44f%2BwwWpUAuRnAlI9JKLEbZLUeFMWpHg5Z5d1xO4fh%2Be3BS2Mf93FveDc3IzbvybilpvKR%2Bz1xYbEOA%7Ctkp%3ABk9SR_Sz8JyBYQ

What we are doing as I write is building another table this time using 20xx series extrusion as we found every other version we built was simply a lash up of stuff and nowhere accurate enough. I built the first one out of MDF then hit it all with a big hammer and started all over not with the table itself but with the side drives for the fence and the centre lift and I guess we have built about four versions of the drives all up. When we thought we had sorted that out we built what was to be the final table out of 20mm RHS all jigged and welded but when the centre spindle was installed it was not spot on perpendicular to the top in either axis and it was obvious the frame was not quite square despite all our efforts. Taking a deep breath and wishing we had thought of it earlier we are now using extrusion for the table and that is the single best thing we have done. Mind you over a few years things have changed and extrusion never even got a thought.

Moving on to the electronics, because we have used a spindle, VFD & metal frame the original electronics needed a lot of trouble shooting and luckily my son has done a ton of low voltage DC trouble shooting in cars and over many hours we have made it all work. I will upload some photos, some of the journey and some of the present table and you will see how things changed over several years but have a look at the links in this post and I will post more in a short while.

Where we are now at is having debugged the whole build others could now go and build one though I would like to see that done locally first. Mike the chap who built the first version using the router has published all the electronics information and the documentation is now out there free of charge.
 
Michael Kellough said:
The Shaper Origin uses the MFK 700 motor. Both draw 720 watts. The OF 1100 draws 1010 watts.

Thanks for that Michael, good to refresh my brain.  [smile] 
 
Michael Kellough said:
Mini, this is a very interesting project and deserves it’s own thread. I hope you find time to start one but anywhere you drop more info will be noticed.

Thanks Michael, the manual rails and screw for a lift are literally many hundreds of dollars cheaper than a commercial lift and the spindle has many advantages over a dedicated router to the point that I for one would never go back to a conventional router table. Because nothing is hanging from the top it allows the top to be easily removed, custom tops made for particular jobs and the top can be made from different materials not normally used. It also allows a different approach to dust extraction as can be seen in the auto table prototype build where nearly all the air enters from the top. The commercial idea of insertable rings in fact kills the idea of extracting through the top and leaves a lot of debris trapped with nowhere to go. In short the whole concept of using a spindle with the lift attached to the cabinet changes the whole concept of how a table is designed and used and removes all or most of the short comings of RT's. The fact that it is a cheaper alternative is a bonus most would welcome.

If the mods think it has any interest to others A new thread might be a good idea. There is still a lot that I haven't included in these two posts. I don't think the digital table is for anyone except the most brave amongst us but the manual version will save a lot of money for anyone who wants to build one and then adds features conventional tables can't offer.
 
Thx for the updated info on why the Festool router is an ideal fit for the SO, very valid points.  The SO is not like a CNC which can complete "any" big job on its own...with the SO if you wanted to hog out a big area, I would think its best to simply cut the perimeter with the SO, then grab a heavy duty router and hog out the area with the perimeter already established...  as with most things in ww, common sense still applies.

Mini, great innovative work!  I would love an established maker to offer a system as you have presented here.  A router table on steroids, with potential massive power, incredible precision with ease of use, and an incredible array of bits (vs. a Shaper, not SO).  Sure hope the marriage of these CNC parts to router tables soon is a common product offering.  It does deserve its own thread so others can find it.  Great job!
 
A bit more of the router table saga. I am experimenting with uploading pictures because it seems a slightly different procedure to what I am used to doing in other fora

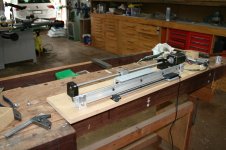
This is an early version of the side fence drive of which there are two, one each end of the fence. Only one of those drives has to have a digital read out which is used for setting the fence position. Some people advocate using the stepper count of the motor instead of a DRO but that can lead to errors if any steps are missed. Stepper motors can be configured for speed and driving them fast can lead to missed counts. In the last 24 hours we have worked out how to speed up the fence drives mechanically by mounting the motor away from the drive screw and connecting them by a small belt and pulleys to give us a gearing of choice as we work out how fast we want to fence to move.


Shown here is the spindle lift of which there has been at least four versions and the one shown here has also bit the dust as well. It also has a DRO for height control and both drives can be controlled from the screen or if needed manually via a jogging control for small incremental moves.

The control side of the table has a 200 job memory and for stuff like mitre lock bits and often used settings they can be stored in memory. The fence and lift have zero settings so all stored settings are reset each time a cutter is changed.
 

Attachments

  • Fence Drive Board 2.JPG
    Fence Drive Board 2.JPG
    538.4 KB · Views: 157
  • Extrusion Lift.JPG
    Extrusion Lift.JPG
    480.6 KB · Views: 157
Mini Me said:
A bit more of the router table saga. I am experimenting with uploading pictures because it seems a slightly different procedure to what I am used to doing in other fora.


I can see this being difficult, is there any way to see the photos in a message before I upload? I really need to add text and I have a lot of photos. Looking at the quote in this post shows brackets for images so that annotating them is difficult at least it is for me. Is there any way of annotating each individual pic? I uploaded two pics and tried to annotate each one and the pics appeared at the bottom of the posted text instead of tied to each one.
 
You can't see the actual images in the post before posting unfortunately.  You only see a file path when you hit the Preview button.

Change the image drop down from "End-of-post expendable thumbnail" to "Inline full-size image" if you want the photos to appear inline with your attachments.

I write up my posts in another text editor and then copy and paste into the FOG when making a post. I'd suggest not trying to upload too many pictures in a single post. I've had several posts with a lot of pictures fail to post and basically just disappear, which was frustrating.
 
GoingMyWay said:
You can't see the actual images in the post before posting unfortunately.  You only see a file path when you hit the Preview button.

Change the image drop down from "End-of-post expendable thumbnail" to "Inline full-size image" if you want the photos to appear inline with your attachments.

I write up my posts in another text editor and then copy and paste into the FOG when making a post. I'd suggest not trying to upload too many pictures in a single post. I've had several posts with a lot of pictures fail to post and basically just disappear, which was frustrating.

Thanks for your help, I had two images disappear yesterday.
 
WillB said:
Thx for the updated info on why the Festool router is an ideal fit for the SO, very valid points.  The SO is not like a CNC which can complete "any" big job on its own...with the SO if you wanted to hog out a big area, I would think its best to simply cut the perimeter with the SO, then grab a heavy duty router and hog out the area with the perimeter already established...  as with most things in ww, common sense still applies.

8mm shank 16mm spiral flute plunge bit they sell is pretty much the standard for epic hogging anything the size of shaper's base plate.  It's probably also on the limit of controllability since anyone having the fun of accidentally doing a climb cut during pocket operations can attest to the force that thing imparts.
 
Mini Me said:
I can see this being difficult, is there any way to see the photos in a message before I upload? I really need to add text and I have a lot of photos. Looking at the quote in this post shows brackets for images so that annotating them is difficult at least it is for me. Is there any way of annotating each individual pic? I uploaded two pics and tried to annotate each one and the pics appeared at the bottom of the posted text instead of tied to each one.

I'll just add to what GoingMyWay said, the photos really need to be reduced to 2000 x 1500 or smaller. I've standardized on the 2000 x 1500 pixel or the 1500 x 1000 pixel size.

When posting the 2000 x 1500 size photos, limit the number to 8 or fewer photos.

Writing up the post and then pasting it is a good way to prevent anything from becoming lost. Even if you don't post photos, spending too much time in the composition stage times out your on-line ability to send the information. When you hit the send button the info can just get lost or there are a number of other screens that come up, none of which will help you post. 
 
Back
Top