What is your method/equipment to install door butt hinges?

kifi

Member
Joined
Jun 10, 2022
Messages
46
Hey all

What is your method to install butt hinges on internal doors? I was thinking of using the OF1010 or the MFK700 with a jig like something from Trend (UK). Trend Door Hardware Jig and getting my hands on some copy rings and suitable bit.

Softwood doors.

Cheers
K
 
I use Porter Cable's time honored jig with 1010 and Milwaukee M18v trimmer.
 
I'll chop out one or two doors. If there's a stick around, it becomes a storypole. More than that and I'll make a template. I did twelve of these carriage doors this summer using this style. I like that the wings do both the doors and jamb, right and/or left-handed. I make templates the way Frank shows here. I made all four hinge wings as one long strip cutting the individual templates apart after applying the door skin with 3M90.
 
I typically use a 1010, a guide bushing and the MFS.

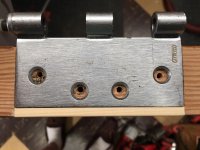
However if I'm feeling old-school parochial, I'll use a Lie Nielsen butt mortise plane...and that usually has a very calming effect.  [big grin]

[attachimg=1]

These are the kinds of fits you can get with that 1010/MFS combo when you dial it in.

[attachimg=2]
 

Attachments

  • 7331.JPG
    7331.JPG
    307.8 KB · Views: 614
  • 7366.JPG
    7366.JPG
    402 KB · Views: 616
Thanks guys that is very helpful, particularly the Festool walkthrough link. Wasn't aware of that!
 
Method depends more on quantity, hand chopping and making jigs is fine for a couple residential jobs, if you’re doing commercial installs it’s not feasible
 
I will not have to deal with internal doors much. In the Festool walkthrough article, I am trying to work out how they have held the door, and then the MFS to the door. I do not have an MFT, but do have a worktable with perforated top.

Did they just clamp a block of wood to the table top, and then use the right angle attachments that come with the MFS to clamp to the block of wood? Not sure how I would do this in the field.

EDIT: If I secure the door with those special door stands/floor standing clamps, will the MFS 400 clamp on the door edge with enough stability?
 
Cheese said:
I typically use a 1010, a guide bushing and the MFS.

However if I'm feeling old-school parochial, I'll use a Lie Nielsen butt mortise plane...and that usually has a very calming effect.  [big grin]

[attachimg=1]

These are the kinds of fits you can get with that 1010/MFS combo when you dial it in.

[attachimg=2]

Cheese, do you just clamp the MFS to the door as shown and then route? This is stable enough?
 
kifi said:
In the Festool walkthrough article, I am trying to work out how they have held the door, and then the MFS to the door. I do not have an MFT, but do have a worktable with perforated top.

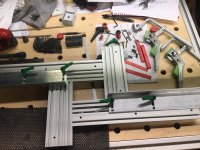
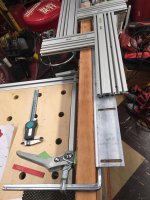
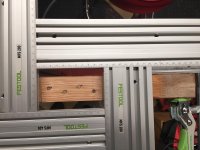
I machined up some longer aluminum angle brackets that allow you to place them further away from where you're routing. That gives you a lot of options for clamp placement.

[attachimg=1]

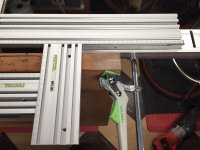
Here are a couple of photos of the clamping options available with the longer angle brackets.

[attachimg=2]

[attachimg=3]


Attachments

  • 7327.jpg
    7327.jpg
    398.2 KB · Views: 579
  • 7329.JPG
    7329.JPG
    356.3 KB · Views: 573
  • 7330.jpg
    7330.jpg
    234.7 KB · Views: 562
I've also used my MFS system re: Cheese for routing commercial aluminum doors as a commercial locksmith.  Very fast and efficient for one offs.  I too made aluminum angles to make the jig more stable and posted pics some years ago.
 
Kifi, not as hard as you may think.  I used 1" x 2" 1/8" aluminum angle, ripped down the 1" side on table saw, drilled holes to correspond to MFS slots and bought MFS fasteners from from FestoolUSA.
 
kifi said:
Cheese, do you just clamp the MFS to the door as shown and then route? This is stable enough?

Yup...the combination of the 2 angle brackets clamped from opposite sides of the door and the 2 wide MFS rails placed across the edge of the door provide a very stable platform. The compact size of the 1010 also contributes to the stability and remember, your router mass is only moving about 1" off center so nothing is being severely leveraged.
 
It just depends on the circumstances. I use a Porter-Cable jig most of the time, but I don't really do doors that often. For smaller or odd sized ones, I just make a jig from scraps. Or like that time at home when I needed the nice PC jig, but wasn't willing to drive 20 miles to the shop to get it.  [unsure]
 
No disrespect intended to anyone, but some of these methods are ludicrously overcomplicated for what is the most basic, fundamental, day #1 lesson #1 task imaginable. If you only have one door to do - a wooden mallet and a 25mm razor-sharp firmer chisel. Less than two minutes per hinge, and a tight, flawless result after a little practise.

If you have multiple doors to do - a quarter-inch router, a parallel guide and a 19mm hinge cutter, plus either your firmer chisel or a corner chisel to square the corners. Once the guide and plunge depth are set up - each one takes seconds. I can regularly hang 7-8 doors per day on site work, including locks and hardware. There is really no need whatsoever for complex and costly jigs and other gadgets.
 
I agree that a sharp set of chisels is a great way to knock out squared-off hinge mortises, but you'll need to break out a router for hinges with 1/4" and 5/8" radius corners. Most of my work is remodel, so I'm frequently subject to existing hinge configurations, and most older homes I work on have 5/8" radius hinges.

The Templaco guides are great, one template will handle the door, as well as the jamb. For bigger jobs, I'll measure existing hinge spacing and order a custom template to match the existing layout.

The Templaco templates are based on the assumption that you're using a 1/2" bit and 5/8" bushing. I have a OF1010 set aside specifically for mortising work, makes hinge mortising a breeze.

The advantage of the Templaco is that, rather than being clamped, it is nailed to the edge of the door, thus allowing for accommodating a beveled door edge, frequently needed if you're allowing for a tweaked, existing jamb where a square edge would leave you hinge-bound. The two nail holes are easily filled.

For larger jobs with non-standard door heights or hinge layouts I'll order a custom template from Templaco, far cheaper than doing it by hand or making my own template.
https://www.templaco.com/html/dspFullLengthTemplates.asp?ManufacturerChoice=Templaco
 
Tom Gensmer said:
but you'll need to break out a router for hinges with 1/4" and 5/8" radius corners.

A radius corner cutter would be a must-buy-immediately tool for me. 
 
woodbutcherbower said:
No disrespect intended to anyone, but some of these methods are ludicrously overcomplicated for what is the most basic, fundamental, day #1 lesson #1 task imaginable. Snip.

This is how many hobbyists and woodworkers doing woodworking for a living differ. The former has a lot of time on their hands that the latter don't, and hence they're more prone to using a sledgehammer to crack a nut, so to speak. That is not to say the hobbyists don't enjoy what they do, as in fact they do, and don't mind about over-complicating things. Just look at the many YouTube creations that try to do (half of) what a Domino Machine can do. All is good; their time/money. their call.
 
Back
Top