Which domino size to use?

smorgasbord

Member
Joined
Jan 7, 2022
Messages
1,066
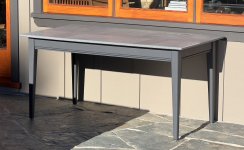
I've got a Q&D project (Quick & Dirty) to do this weekend - extend the legs on an outdoor coffee table that has a granite top.

Normally, I'd rebuild a whole new leg set, but to get this done more quickly, and since it's going to get painted anyway, I decided to extend the legs by 275mm (just under 11").

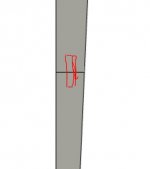
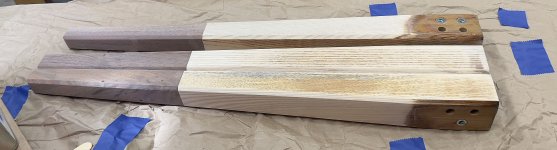
The existing legs are 60mm square with 5mm chamfered corners, so pretty hefty. I have some 46mm square stock salvaged from an old table to use. My idea is to line up the two outside edges, then taper the inside at an angle such that there won't be a step at the joint.

Here's a rough Fusion360 view:
[attachimg=1]

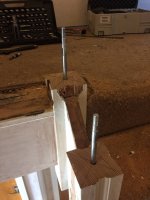
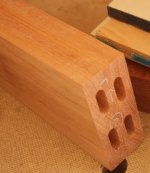
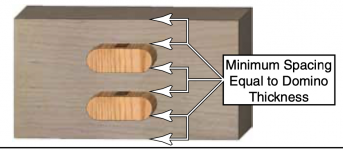
I've got the big Domino XL, and so my question is? What size dominoes should I use for max strength? Since this is end grain to end grain, the domino will provide almost all of the strength. I've done similar joints before, inlaying wood across both pieces on two sides, but now with the Domino I'm thinking I can do something quick and easy and yet strong enough.

The 12mm or 14mm thick ones that are really long? Or better to double up some thinner and shorter ones? I'm leaning towards just the single 14mm ones at full length.

Thoughts?


Attachments

  • Screen Shot 2022-07-06 at 6.17.49 PM.png
    Screen Shot 2022-07-06 at 6.17.49 PM.png
    11.5 KB · Views: 674
If the table’s a big one, and knowing the weight of granite tops - I wouldn’t trust any method other than using threaded steel rod extending at least 150mm into each half of the joint. Use an auger to drill vertically on the centreline around 150mm into each half of the joint, The holes need to be at least 10% bigger than the rod you’re going to use, and for the dimensions you provide, I’d suggest 12-14mm rod as a minimum - it’s cheap and can be cut to length using an angle grinder.  Inject 2-pack anchor resin (Fischer or similar) into each hole, push in the rod and twist it round to ensure all the threads are filled, wipe off any excess which oozes out, and hold the joint firmly together for a few minutes until the resin starts to set. A simple tape-up to ensure correct alignment is all you really need - or you can clamp a piece of scrap to the straight leg edge. You don’t need to apply much pressure to the joint, because the bond is happening chemically inside the holes. Having the table on its back is the easiest way to do it. Dominos are great in the right application, but I’m not sure that joints with such a tiny contact area would survive being accidentally fallen on by a fat guy after too many beers. The other advantage of this method is that after 30 minutes, the resin will be concrete-hard, allowing you to start shaping, filling and painting very quickly. I use this method for replacing newel posts on staircases and they’re as solid as a rock - although on the photos I used rods which also fit to a ziplock bolt, with the fixing holes plugged and covered with strips of veneer. Rod which is threaded all the way down it’s length is the way to go.  Just my opinion.
 

Attachments

  • D3F0EA45-AEEA-4C54-8335-C6BD807254D4.jpeg
    D3F0EA45-AEEA-4C54-8335-C6BD807254D4.jpeg
    287.6 KB · Views: 214
  • 2C69E1EF-1930-4B06-A0FC-5AE6E6DD0E9C.jpeg
    2C69E1EF-1930-4B06-A0FC-5AE6E6DD0E9C.jpeg
    286.9 KB · Views: 186
I'd use the longest tenons you've got for the job, and make it a twin or double tenon joint for strength. Orient the tenons properly depending on the most likely racking direction of the table.

[attachimg=1]

I'm surprised that many users don't employ double or twin tenons or both ( see second pic) more often, even though the size of the joint allows for it.

[attachimg=2]
 

Attachments

  • Twin tenons.JPG
    Twin tenons.JPG
    14.2 KB · Views: 592
  • double twin tenons.JPG
    double twin tenons.JPG
    30.9 KB · Views: 606
I'd use the longest tenons you've got for the job, and make it a twin or double tenon joint for strength.

Well, that's my question. The longest tenons I have are the 140mm in the 12mm and 14mm size. But, I think those are two thick for joining what is essentially two 46mm square surfaces.

I could double up 8mm (or even 10mm) tenons, but then I'm limited to the 100mm length.

Which is better (and why)?
 
I wouldn't worry about the chamfers (unless they are very big), and would use two 12mm x 140mm dominoes (with 12mm space on each side for both dominoes) in what is essentially a 60mm square surface.

If no chamfers were there, even 14mm could be used, but 12mm would meet the "1/3" rule better.
 
ChuckS said:
I won't worry about the chamfers (unless they are very big), and use two 12mm x 140mm dominoes in what is essentially a 60mm square surface.

Due to the taper, it's essentially a 46mm square surface, so that would mean 9mm dominos max. I guess that means 8mm, but then I only get 50mm deep, not the 70mm deep of the 12mm domino.
 
I couldn't tell from your unmeasured sketch how exactly the taper goes and its effect on the depth of the mortises.

What I would do is to fit the longest and biggest tenons possible, in compliance with or close to the "1/3" rule. You can also mix the tenons, using one longer/larger tenon in conjunction with a shorter/smaller tenon for the best result.

 
From the Supplemental Manual:
[attachimg=1]

Given a stock height at 46mm at the joint (taper down from 60mm at the top of the leg):
  • Two  8mm dominos would mean 10mm of spacing between them and between domino and edge.
  • Two 10mm dominos would mean 8.2mm of spacing.
  • One 12mm and one 8mm would also mean 8.2mm spacing

With the 8 or 10mm dominos get 50mm depth in each piece. The 12mm domino gets me 70mm of depth in each.


Attachments

  • Screen Shot 2022-07-08 at 6.38.09 AM.png
    Screen Shot 2022-07-08 at 6.38.09 AM.png
    249.3 KB · Views: 544
"One 12mm and one 8mm would also mean 8.2mm spacing" sounds right to me.

Despite the weight of the top, the force is vertical, and hence dominoes are suitable. The concern is racking which will remain even with the use of metal rods. Orient the twin tenons properly to resist the racking as I pointed out earlier.

Make sure enough glue is applied to the tenons and mortises, and of course the tight setting is used for milling.
 
ChuckS said:
"One 12mm and one 8mm would also mean 8.2mm spacing" sounds right to me.

Yeah, I'm leaving towards that myself. I'll place the 12mm domino along one of the straight edges and have the shorter 8mm domino closer to the taper.

ChuckS said:
The concern is racking which will remain even with the use of metal rods. Orient the twin tenons properly to resist the racking as I pointed out earlier.

With two dominos, I assume that the strongest racking resistance is perpendicular to the orientation of the dominos.  In the illustration I included up-thread, that would be top-to-bottom. However, if only one 14mm domino were used, best racking resistance would be in line with the domino width.
 
So, I milled the stock and they went together very smoothly. Here's a shot with both domino in one piece:

[attachimg=1]

Note that I'm joining two different sized pieces of wood. Since the bottom starts at 46mm, but the top is 60mm, I set things up so the two outer edges will be straight and then I'll cut the tapers on the insides after the glue has dried enough.
 

Attachments

  • IMG_0858.jpg
    IMG_0858.jpg
    1.4 MB · Views: 490
Here are legs coming together. Not just two different sizes, but different species:
[attachimg=1]

After cutting the tapers on the two inside faces and sanding, ready for epoxy primer:
[attachimg=3]

Re-assembled, ready for final paint:
[attachimg=2]

And the final product:
[attachimg=4]

Thanks all for the help. This did turn out to be quick and easy thanks to dominos. One thing I didn't mention in my OP was that the table was originally a full height table. We decided to cut it down to make a coffee table thing out of it, but in the end wished we hadn't. The good news here is that thanks to the tapers, the table looks better than ever!
 

Attachments

  • IMG_0861.jpg
    IMG_0861.jpg
    541.8 KB · Views: 437
  • IMG_0871.jpg
    IMG_0871.jpg
    1.4 MB · Views: 433
  • IMG_0867.jpg
    IMG_0867.jpg
    609.3 KB · Views: 422
  • IMG_0873.jpg
    IMG_0873.jpg
    434.1 KB · Views: 432
Super work - looks really great. The joints are actually so good, it’s a shame to have hidden them under paint. So how long before you decide the table’s too high and cut them off again?  [big grin]
 
Thanks. Since this is an outdoor table and the joints are two different wood species, it'll be interesting to see how invisible the joints stay over time. I did use CPES from Smith & Co., which I've found over the decades to be a great exterior sealer that you can put any kind of finish on top of, so that may help, but wood movement is a thing that can't be avoided. BTW, I used Titebond III for glue.

 
Back
Top