Why a 1mm deflection with Festool Parallel Edge Guides?

MacBoy

Member
Joined
Nov 12, 2021
Messages
16
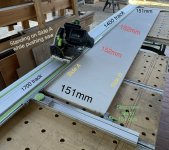
Preparing panels for use by cutting a parallel edge (Side A) to the straight line ripped edge (Side B).

I set the Festool Parallel Edge Guide to 151mm.  (Calibrated to 300mm a few minutes prior).

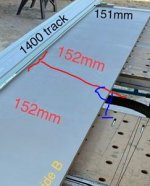
I did the parallel cut operation twice.  Each time there was an extra 1mm of board in the middle of the panel.

At the ends of the panel the desired 151mm was there.  But not in the middle of the panel, it was 152mm.

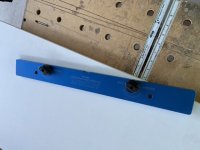
Using the Betterley Straightline Connector, I joined the 1400 and 1700 tracks.

A buddy said I was walking on the wrong side of the tracks. In other words, I did not have to dodge the Parallel Edge Guides by swiveling my hips or angling my arms backwards.

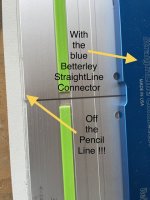
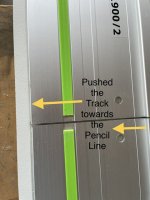
Another buddy said my rails were not joined perfectly, or the joined tracks have deviation in the middle.

I’m gonna get a foam board to lay down on the Kreg ACS table to avoid cutting into their metal tracks.  Then I will walk on Side B.

What y’all think?
 

Attachments

  • 91388468-E15F-4327-8CE9-3F9E2117821A.jpeg
    91388468-E15F-4327-8CE9-3F9E2117821A.jpeg
    144.1 KB · Views: 388
  • B86A37E3-5E07-4D37-975D-F9D0B7884DF8.jpeg
    B86A37E3-5E07-4D37-975D-F9D0B7884DF8.jpeg
    82 KB · Views: 284
I think there is either an issue with the alignment of the joined tracks or your cutting technique.  When I use my track saw on long cuts, I always stand on Side A and behind the saw so my left arm is over the edge of the guide rail.  All the force is pushing the saw down the track.

You can check this by setting up for another test cut on the board, such as 145mm, but don't make the cut.  Make at least four alignment marks referencing from Side B along the board at 145mm.  Put one mark at each end of the board and at least two near the middle on both sides of the track joint.

Set the parallel guides to 145mm and position it on the board as if you were going to make the cut.  If the marks do not line up with the anti-splinter strip along the full length of the joined rails, then the problem is with the alignment of the rails.  If the marks do line up, then the problem is likely with your technique or the rails are moving while you are cutting.
 
Thanks!  That’s a great common sense check I will do.

It was too late yesterday to think straight.
 
That is exactly why I bought a FS3000. I frequently make long cuts with the TS55 and it is far more efficient and reliable for this kind of thing. It's ridiculously expensive for someone who wouldn't need it often enough and it would be a pain to store in many cases, but it's fantastic in my situation.
If you really are having this problem due to technique, changing your cutting position may solve the problem though. I would definitely be cutting from the side you marked as A.
I wouldn't think that the TS would be causing this, it wants to go straight. I have run into problems when using a coupled pair of rails with a router as the cutting action of the bit does pull against the rails.  This was another reason that I went with the single piece unit, but it may never be a need for many people.
 
are you clamping the rails? i would clamp and just draw a line along the rail edge see if it's straight to begin with
 
By the way, all those kerfs cut into the Kreg ACS table are not mine.

Bought the table for $100 from an OfferUp seller.  It normally sells for $400-500.

I like the longer rectangle.

Using a tip on this forum, I modified the Kreg track hinge by drilling a hole into it. The Festool tracks fit nicely on the hinges and work swell on the table.
 
Even a 3000 rail will deflect slightly in the middle. This is normal and cannot be entirely avoided.

This comes from the rail being "only" 180mm wide .. put it into an engineering application and you will see that for a 180x2 mm aluminum profile it is enough to apply about 100N (10kg/20 pounds) side force and you will get about 0.5mm deflection. Do note that the anti-slip pads can "hold/keep" WAY more than 100N side force tension in place (!).

Yes, the Maffel/Bosch rails are even worse on this, being narrower .. but better in a way too by not having a /working/ anti-slip capability ..

There are a couple simple ways to reduce this issue:
- do NOT place the rail by moving it laterally, the anti-slip pads can exert sufficient force to deflect the rail, if you have to do this - like in case of a PG use - place the PG ends, then lift the centre a bit, to remove any tension and let it land from air again, do not apply any major force throughout, CLAMPS WILL NOT HELP but can make it worse as they can hold only the edges and can induce additional side-tension

- when making the cut, never push the saw sideways AND always /actively/ push the saw vertically, not just to overpower the plunge spring but more, this provides pressure on the antislip pads and prevents the rail to move once it was placed correctly

For when joining rails for PG an extra force is applied to the connection:
- use the Makita two-piece connectors instead of the (old type) Festool ones or one new self-aligning Festool piece + one Makita, the Makita connectors can be tightened more without denting the rails so the connection does not move, avoid TSO connectors the same as they cannot be tightened hard either

- *) if possible, use a relatively long straight edge as a reference to place the rails when connecting instead of a short one (or a self-aligning setup), so that any inaccuracy at the start of the rail is avoided/averaged out, e.g. using a third 1400 rail works great for this with just a couple light-tightened clamps pushing against the saw-riding ribs

*) this presumes use of Makita non-self-aligning connectors

My experiences .. YMMV

ADD:
once the rails are placed, an easy way to check your technique for straightness is placing a laser along the reference edge where the saw rides

ADD2:
Above is NOT meant as a bashing for the Festool self-aligning (it is IMO the best possible self-sligning approach) nor to bash the TSO ones (they are the best quick-and-reasonably-accurate approach. But to point the bare fact that
- the original Festool connectors (and the second in the new self-aligning set) nib the rails which prevents maximum-strength tightening without damaging/deforming the rail
- the TSO connectors apply "opening" force on the track, which again prevents maximum-strength tightening without damaging the track/rail
- any self-aligning connector is dependent on (the accuracy of) the piece of rail it comes in a contact with

On the other hand, the Makita two-piece connectors can never be used without a reference so are not "quick-use".

I general this makes the Makitas great for strong connecting, like when using a PG system ona 2500+ mm rail assembly, indispensible I would even say. But not really optimal for the casual low-stress or quick connections of shorter rails where the TSO and new Festool set shine. So one should have both on hand.
 
I have two of the 3000 mm rails and both of them have built-in deflection. Rails are not watch components and some deflection has to be expected. 1 mm is just shy of 4/100 of an inch which should not be a big deal in most projects.

One possibility not discussed is that depending on the length of the cut you might start from behind the rail and then at some point move up parallel to the rail in order to keep the saw moving towards the end of the cut. Even stretching out in order to stay behind the rail could introduce some lateral force.

I’ll add that the plastic adjusters on the bottom of the soft foot cannot be but so tight or you wouldn’t be able to push the saw comfortably down the rail.

I would think on the cheap table saws that while you might not have the deflection in the middle you could have variations on the cut given at the fences on these are not grea, more so on longer boards.
 
Thanks mino for the physics reminder.  Now I'm wondering if the gecko might be worthwhile to pin the center of the rail.
 
woodferret said:
Thanks mino for the physics reminder.  Now I'm wondering if the gecko might be worthwhile to pin the center of the rail.

How about making some kind of a T-square fixture (shown in red) out of plywood that can be clamped (blue) on the board. It is not too difficult to come up with some hardware to attach or hook the T-square to the channel of the track:

[attachimg=1]

Make the T-square arm long enough to cater for different widths of boards, or make more than one T-square fixture. The fixture can also be used for other tasks.
 

Attachments

  • T square.JPG
    T square.JPG
    22.1 KB · Views: 708
if you're deflecting by pushing wrong and you are always getting a deflection in the same direction then it's your technique.

what i do is push the saw down and forward, while the other hand holds down the rail ahead of the cut and there's a sort of shuffle. there's always one point of contact pushing down on the rail so it doesn't have a chance to move.

i run a pencil line along the cutting edge with the track laid out. you can use that as reference to see if the track moves while you are cutting or even when you're placing the saw on the tracks
 
woodferret said:
Thanks mino for the physics reminder.  Now I'm wondering if the gecko might be worthwhile to pin the center of the rail.
Do not over-think it. Gecko is great but not really for this purpose.

With joined rails like in your case, the most likley problem is you cannot tighten the connectors sufficiently and the rails then move. Also, the Festool connectors you use create dents even with gentle use which have a tendency for the connectors to "fall" into the dents on subsequent use.

Just get the Makita connectors set for €20 first, try it with them tightened to the max and see. If you take cade to not push the rail sideways and gently place the assebly, I am 99% that would be enough to solve the issue.
 
Don't forget that if "Side B" was cut with this same rail, then your error is only 0.5mm

 
tsmi243 said:
Don't forget that if "Side B" was cut with this same rail, then your error is only 0.5mm

This.

You have to be very careful to join and then move the rails to avoid that 1/2mm. As JimH2 points out, the longer the rail the easier it is to bend the rail that much even if it’s one piece.

After you get the rail in place double check with a long true straight edge that the rails are still straight. With the ends lightly clamp red you can still budge the middle section if needed.
 
I don't think the suggestion that the error would be halved (to 0.5mm) is always true, because we don't know exactly (yet) what caused the deviation in the middle: the user technique or the joined tracks or BOTH.

Every time a cut is made (under either or both of the above factors), the result is unknown because the user's operating behavior can vary each time he makes a cut. A cut on side B might not produce the same result as a cut on side A.
 
Thanks for the great suggestions.

I did the floppy on the track to make sure it was not sticking when it needs to be on the right spot.

Also drew a pencil line at a 140mm distance from the opposite edge.  Then laid down the PGs on the board, butted onto the opposite edge.

The splinter guard was right on the money at the ends.

But not in the middle, especially not where the 1400 and 2700 track was joined up!

So I nudged-pushed the track joint to get it onto the pencil line.  It was so easy to nudge it with a single finger.

Those joiner bars don’t seem to do a good job.  I’ve tried both the original Festool bars and the Powertec bars.

So then I tried using the Betterley StraightLine Connector in hope that it would align the two tracks correctly.  It got worse!  The track joint moved away from the pencil line!

Then I checked the rail between the tracks with the Betterley to see if the “continuous” rail is alignment.  It wasn’t.  The straight edge was rocking.  However, the other side of the rail was just fine.  Ugh!

See pictures for the visuals.

Thanks again to everyone for helping! 
 

Attachments

  • CD1CD976-27A8-40A2-A1DA-424FC2130CA9.jpeg
    CD1CD976-27A8-40A2-A1DA-424FC2130CA9.jpeg
    94 KB · Views: 233
  • 4C4A0697-447C-4BA2-BD35-82EEE9C309FA.jpeg
    4C4A0697-447C-4BA2-BD35-82EEE9C309FA.jpeg
    85.8 KB · Views: 219
mino said:
Yes, the Maffel/Bosch rails are even worse on this, being narrower .. but better in a way too by not having a /working/ anti-slip capability ..

Do you think the Mafell rails just sit on bare aluminium? They have x2 anti-slip strips. Plus, you can actually join them and they remain straight.
 
To be clear, the goal is to line up the edge of an already-trimmed/cut splinter guard, not the edge of the extrusion itself.  Once cut with a saw, the distance between the top rib of the rail and the edge of the trim guard should be parallel and consistent, even if the distance between the top rib and the edge of the metal is not.

There are others on here who have much more experience and knowledge about aluminum extrusion methods and the inherent limitations thereof, but ultimately the true "cut line" is the cut line of the splinter guard, regardless of how near or far the edge of the aluminum is from the edge of that guard.
 
Lincoln said:
mino said:
Yes, the Maffel/Bosch rails are even worse on this, being narrower .. but better in a way too by not having a /working/ anti-slip capability ..

Do you think the Mafell rails just sit on bare aluminium? They have x2 anti-slip strips. Plus, you can actually join them and they remain straight.
That "/working/" snide mark was for a reason.

The anti-slip function of the Festool rails is just incomparable to the narrow rubber strips on the Maffel/Bosch system. This is a blessing in normal use, but can be a negative when you want to prevent tension in the placed rail. It just grips too much at times. Especially to smooth surfaces like melamine etc.

"Incomparable" as in 10x (and more) better function of the FS/2 strips. This is not just observation but comes from simple physics. The contact patch for the rubber strips is so small there is simply no way it can work as well as the full-width Festool strips.

By the way most non-Festool rails (Makita, Triton ...) are as weak as Maffel since they waste the big surface by using a cheapo slippery foam. FS/2 rails are in a class of their own on this. At times to their detriment even.

With the FS/2 tracks, one does not need to clamp even with dusty surfaces like a dirty MDF etc. The clamps are only needed for special work like mittered cuts etc. This is not the case with any of the other tracks. Be it by design /Maffel/ or by the vendor cheapening out on the foams.

That is why many people do not think about it - especially those who developed their workflows on non-Festool aka "non-sticking" tracks ...
 
Back
Top