Why is there a flange on threaded inserts?

4nthony

Member
Joined
Feb 23, 2021
Messages
772
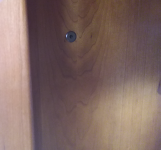
I'm building a knock-down desk for my daughter and had planned on using cross dowels. After some thought, I decided I didn't want the cross dowels holes visible -- however, the connectors will still be visible -- so I ordered some threaded inserts. I wasn't paying close attention and ended up ordering flanged inserts instead of flush.

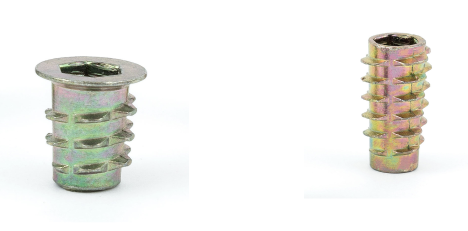
I can countersink the flange so the attaching piece is pulled flush, but it got me thinking: why is there a flange on a threaded insert?

This is probably a silly question, but I'm sure there's a valid reason for the flange. I just can't think of one.

Maybe they are specific to soft-wood inserts as hardwood inserts seem to all be flush. Anyway, just curious about this.

A_guide_to_Threaded_Inserts__T-Nuts_2022-02-12_08-56-47.png


[cool]
 
guybo said:
Hi, maybe to prevent overdriving in soft woods

That would make sense for face grain. I'm installing them in plywood end grain and my first test ended up splitting the ply. Maybe flanged inserts are for face grain and flush is designed for end grain.
 
The flanged insert will provide a bearing surface for whatever you screw into it, which may offer longevity benefits depending on the fastener and the application.
 
Hi, they allow for flush installs like this
 

Attachments

  • Screenshot (112).png
    Screenshot (112).png
    1.8 MB · Views: 431
  • Screenshot (113).png
    Screenshot (113).png
    1.9 MB · Views: 460
squall_line said:
The flanged insert will provide a bearing surface for whatever you screw into it, which may offer longevity benefits depending on the fastener and the application.

[member=75217]squall_line[/member] Got it. Sometimes I have a hard time thinking outside the scope of whatever it is I'm working on.

[member=58842]guybo[/member] This is my test piece. It's meant to mimic the leg attachment to the desktop (thicker ply) and a stretcher/support under the desktop. I want a really tight joint where the leg attaches to the top and why I ended up countersinking the insert. I just ordered some flush inserts so I don't have to deal with the extra step (and the possibility of countersinking into the outer veneer).

Monosnap_2022-02-12_10-57-18.png


This is how it'll be when finished:

IMG_0782-1500.jpg_15001000_2022-02-12_11-14-00.png
 
Check out E-Z lok knife edge threaded inserts are what you want. No flange and different materials available. Brass and stainless.

For some extra strength you can sink them below the surface about a 1/4 inch.

Ron
 
As they maker points out, if you are pulling from the opposite end from your application where the flange is inhibiting the insert from being pulled thru there is a great advantage.
 
The flangeed variety also look better from an atheistic standpoint for applications where the insert will be periodically visible (like for the termojrary mounting of something).
 
One thing that the flange should do is give a little strength to the hex drive portion of the insert.

Those cheap zinc inserts have a tendency to fracture at the drive hex when installing.  I figure about a 15% chance of splitting the hex even in soft woods or particle board.

I don't think I have ever had an application where I wanted the flange, so I always have my EZ-OUT extractors handy when installing those.

 
Anthony do those cross pieces on the legs fit into a mortise? If not what keeps them from spinning with only one screw?

Ron
 
rvieceli said:
Anthony do those cross pieces on the legs fit into a mortise? If not what keeps them from spinning with only one screw?

Ron

It's all butt joints, but I'm thinking that I'll install either a small dowel or domino to prevent it from spinning or movement.
 
Maybe it's just me but even though you drill a pilot hole for the inserts they never seem to thread in perpendicular to the surface. Looks like you application would be hard to do this but I ended up driving in the inserts using an all-thread rod with a nut to lock the insert in place on the drill press. You turn the chuck by hand.
 
Mike instead of all thread take a longer bolt by of the appropriate size and cut the head off. That will give you a smooth shank to put in the chuck. Two nuts on the threaded section, one is a jam nut then thread the insert on.

I like you I start them in the drill press. I usually spin them with motor, kill the motor and use the handle press into the wood to get them started then finish with a wrench.

Letting the insert grab the wood while the motor is still running doesn’t end well. Don’t ask how I know.  [eek]

Ron
 
My threaded insert tool below.
Helps to keep inserts square to mounting surface. 
Just made from a few scrap pieces of maple.
(That's a Rampa insert - solid steel, not die cast zinc -- very nice)
 

Attachments

  • Insert Tool.jpg
    Insert Tool.jpg
    229.9 KB · Views: 361
When screwing the inserts into the edge of sheet goods of pretty much any kind, it is beneficial to tighten a clamp across the hole before you drive the insert in. This will help to prevent splitting. The clamp will hold the sheet together and force the insert to cut its way through, rather than wedging.
I drop or two of cyanoacrylate glue on the threads, just as it is about to reach final depth, can help keep it in place in situations where you remove the bolt frequently.
 
If you screw in the insert below the surface of the material (impossible with the flange) and you tighten the bold sufficiently, you will tear the insert out of the wood. 

You presumably can generate more tensile force by tightening the bolt than it  would experience due to stress on the joint. 

It would be less of a risk with hardwood, which is harder to insert and less likely to be driven in too far. 
 
Packard said:
If you screw in the insert below the surface of the material (impossible with the flange) and you tighten the bold sufficiently, you will tear the insert out of the wood.
...
The way I see it:
- strong materials like wood/woody materials => non-flangedIndeed, in case of wood.
- medium materials like softwood => both can be used, depends
- weak materials like chipboard/MDF => flanged

The ones with flange are commonly used for chipbvoard/particle board as the wider flange allows that the item being screwed is tensioned "against" the flange, not against the piece. This helps with the "lots of void" type of materials like the chipboard especially that can see the insert pulled out easily.

The I do it is to screw the flanged insert slightly (0.2mm/0.01") below the surface. Then, when connecting the second piece, to tighten it to the max until heavy resistance - when the flange "rests" on the thing being screwed in.
This way the flange helps:
- prevent you accidentally pulling the insert out by over-tightening, the flange gives a definite moment of resistance you can tune your drill driver to even etc.
- create optimal/maximum pressure the chipboard can handle by compressing the chips ever so slightlly (that 0.2mm below surface will move to align with the other surtface, creating a pre-tension but not enough of it to break out the insert)

It can be used in a similar capacity with softwood, but even that is more compliated IMO.
 
Back
Top