Wider Tenons Using WP Half-Round Router Bit and DF700 Trim-Stop

Mike Goetzke

Member
Joined
Jul 12, 2008
Messages
1,133
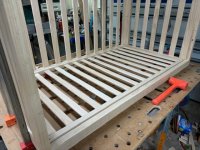
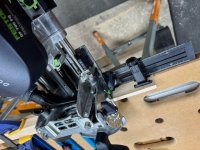
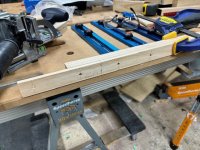
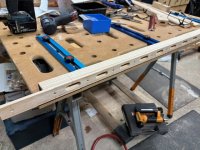
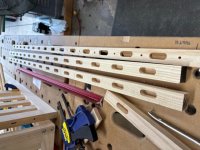
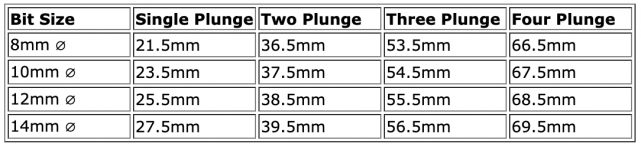
I’m making a crib and had an idea to use the new WP half-round metric bits to make the slats the tenons instead of mortising a smaller Domino into the end of the slats. I made a jig that attached to the rails with pin nails and plunged the mortises with one trim-stop setting and then the second. Ha - I’m getting old so have to work smarter so made trials on scrap to make sure this would work. I was afraid making two mortises by hand using pencil marks would not be accurate. This worked out well!

[attachimg=1]

[attachimg=2]

[attachimg=3]

[attachimg=4]
 

Attachments

  • IMG_6102.jpeg
    IMG_6102.jpeg
    211.1 KB · Views: 198
  • IMG_6059.jpeg
    IMG_6059.jpeg
    196.8 KB · Views: 195
  • IMG_6058.jpeg
    IMG_6058.jpeg
    202.5 KB · Views: 181
  • IMG_6072.jpeg
    IMG_6072.jpeg
    202.6 KB · Views: 178
  • IMG_6087.jpeg
    IMG_6087.jpeg
    136 KB · Views: 53
Thanks for sharing your out-of-the-box thinking and jig. It certainly expands the use of the under-appreciated cross stop. 
 
Mike Goetzke said:
I made a jig that attached to the rails with pin nails and plunged the mortises with one trim-stop setting and then the second.

I see you're using the DF700. Next time around, you might consider using Paul Marcel's technique of using the paddles inside the mortise itself to cut wider mortises that are exact and repeatable:
=b6RZ7-jAn0QB_P2X

Table of widths here:
[attachimg=1]

Note that the centerline of the final mortise won't be the centerline of the first plunge, so you need to take that offset into account either at layout time, or using Marcel's offset technique, as described in video and his blog:
http://www.halfinchshy.com/2012/04/oversized-mortises-with-festool-domino.html

Note that paddles on the DF500 are different (only 1 each side instead of 3 each side), so I don't know if this technique would work.
 

Attachments

  • Screenshot 2024-05-02 at 3.15.22 PM.png
    Screenshot 2024-05-02 at 3.15.22 PM.png
    40.7 KB · Views: 153
smorgasbord said:
Mike Goetzke said:
I made a jig that attached to the rails with pin nails and plunged the mortises with one trim-stop setting and then the second.

I see you're using the DF700. Next time around, you might consider using Paul Marcel's technique of using the paddles inside the mortise itself to cut wider mortises that are exact and repeatable:
=b6RZ7-jAn0QB_P2X

Table of widths here:
[attachimg=1]

Note that the centerline of the final mortise won't be the centerline of the first plunge, so you need to take that offset into account either at layout time, or using Marcel's offset technique, as described in video and his blog:
http://www.halfinchshy.com/2012/04/oversized-mortises-with-festool-domino.html

Note that paddles on the DF500 are different (only 1 each side instead of 3 each side), so I don't know if this technique would work.


Yeah - I saw this video too late (I also PM'd Paul). My slat width was chosen as was their spacing. Plus for 15 mortises cut twice then a second time for the other side I think I would still opt for the jig but will definitely use Paul's pin idea in the future.
 
Both options have their place.

On something like a crib that should theoretically have very specific spacing for safety reasons, the jig is the route I'd take, but for other items where the spacing may be more fungible, the DF700 pins (or the pins on the older DF500 fence) would probably be quicker.
 
squall_line said:
Both options have their place.

On something like a crib that should theoretically have very specific spacing for safety reasons, the jig is the route I'd take, but for other items where the spacing may be more fungible, the DF700 pins (or the pins on the older DF500 fence) would probably be quicker.

Agree - but like I said even if I could use the pin stops on a project if I had 30 to do I still would opt to make a jig. Maybe lack of practice but I have had issues trying to use the pins.
 
What did it take to make the jig?
You had to get the spacing rright-ish (since I assume the space between slats not critical to be better than 2-3mm), but then for each mortise in that long jig you've got to accurate drill two holes a set distance apart.
Did you make a jig to drill those two holes? IOW, a jig to make the jig?  [eek]

Otherwise, using the DF700's paddles [member=3513]PaulMarcel[/member] style, guarantees you consistent mortise widths and since the spacing isn't critical, you can just make the first mortise by pencil lines.
Heck, you could even use the cross-stops as intended to space out the first plunge of the two-plunge wider width mortise. And then everything is exact all the way up and down.

Or, am I missing something?
 
smorgasbord said:
What did it take to make the jig?
You had to get the spacing rright-ish (since I assume the space between slats not critical to be better than 2-3mm), but then for each mortise in that long jig you've got to accurate drill two holes a set distance apart.
Did you make a jig to drill those two holes? IOW, a jig to make the jig?  [eek]

Otherwise, using the DF700's paddles [member=3513]PaulMarcel[/member] style, guarantees you consistent mortise widths and since the spacing isn't critical, you can just make the first mortise by pencil lines.
Heck, you could even use the cross-stops as intended to space out the first plunge of the two-plunge wider width mortise. And then everything is exact all the way up and down.

Or, am I missing something?

It actually took longer to convert my design to metric than make the jig. I had a cutoff from the rails that I cut to about 1/4" thick for the jig. My spacing for the 5mm holes in the jig was 89mm so I carefully marked these with 36" (900mm) WP hexscale rule. Then I used my nice Nova Voyager DP that I added laser x-hairs to and drilling was a breeze. I made my rails longer than needed and trimmed them to size after machining the mortises. Even if my slats were one of the sizes to use the stops built into the mortiser I really think, even taking the time to make the jig, it went quicker with the jig and was less prone to make a mistake.
 
Back
Top