Woodpeckers new MFT Square

Mike, good to see you on the FOG and responding to comments.

One modification I have made to my Woodpeckers precision triangle is to use the holes in it to screw it to my shooting board when I want to plane dead-on accurate mitres.

Works brilliantly.

Ever thought of coming up with an add-on like this for one of your triangles or squares? It would extend the usefulness of the item and increase its appeal.
 
RL said:
Mike, good to see you on the FOG and responding to comments.

One modification I have made to my Woodpeckers precision triangle is to use the holes in it to screw it to my shooting board when I want to plane dead-on accurate mitres.

Works brilliantly.

Ever thought of coming up with an add-on like this for one of your triangles or squares? It would extend the usefulness of the item and increase its appeal.

I would like to see a picture of that set up, if you don't mind please.
 
Mike K,
I understand the decision on the use of Qwas-like dogs, but why not add a usable surface to the hypotenuse of the triangle?

OP Birdhunter
 
To be useful, this device really needs to be redesigned so that it makes squaring the fence, guide rail, and MFT dog holes to each other very easy.  The device should hold all three square to each other at the same time.  Both the fence and guide rail have grooves/T-track that would allow the device to "hold" onto them.

In other words:
1. The triangle hypotenuse should fit tightly in two dogs holes.
2. One leg of the triangle should hold onto the fence while allowing the fence clamps to be properly tightened.
3. The second leg of the triangle should hold onto the guide rail, holding it square to the dog holes and fence while its clamps are adjusted and tightened.

If the device held dog holes, fence, and rail square to each other at the same time while adjustments were made to the fence clamps and guide rail clamps, this device would be more useful than an ordinary square or triangle.
 
Not sure that I agree with that line of thinking.  I prefer to align the fence to the MFT top using QWAS Dogs, then lock it down with the end clamp.  Then I square the rail to the fence, moving the stop keys only if necessary.  Works here; YMMV. 

One nice thing about the MFT Square is that it's 1-1/8" high, making it unnecessary to lower the rail to square it with the fence. 

 
One common thread here seems to be the capability to integrate dogs into the square so that the squaring of the fence and guide rail to the MFT holes in one easy step. Without that, it appears to me that there are a number of other ways to do the job without the square, using either Qwas dogs or some other dogs made for the MFT. Peter Halle's method is simple and works great and makes sense. Integrate dogs into the square and this becomes a one-step process. (I could be missing something here, and sometimes do, but it seems to be that straight forward to me.) Hopefully Woodpeckers is monitoring.
 
@all – I’m really glad to be a part of this, thanks for the warm welcomes, we are getting a lot of good feedback and I enjoy helping out where I can.

@Birdhunter and adding the third leg – fun fact, the first prototype aimed to be that 1-1/8” thick heavy duty square but came out to over 7 lbs. It had 2 solid aluminum legs without any holes or recessing to make it lighter (that’s why we drilled holes and added recessing – to lighten the darn thing up). If we add the third leg, the weight will increase significantly making the balance to size very unappealing and hard to maneuver as the first prototype was. Also not to mention the cost would increase. We kept to the main focus as a thick/tall heavy duty square, but it seems if demand is high enough for a one-time tool that focuses on this, we can consider it for future tools.

@cost of the MFT Square– someone mentioned the reason earlier in this topic or the other; because these are short run productions, cost inherently will be above average. But there are immense benefits and flip sides to this. Small scale production means no automation. It means every single piece of raw stock, hardware and component is touched and seen with experienced and trained proud American labor, not automated machinery. It pretty much means every tool is handmade and no corners are cut to save cost. We take advantage of this so people have that option and choice of better quality tools to not just get the job done, but done with confidence in precision, have longer lasting tools and feel and look great. I love having a clean and organized shop that looks enticing for me to want to work in. Not to mention on top of this are two 1.5”x2”x17” long aluminum blanks and a 14” cross length 13 gauge laser cut stainless steel web. This is one of the heavier and larger one-time-tools we've made in just raw material and machine time.

@MFT Square VS other Woodpecker Squares and triangles – The MFT Square to date is the thickest square we have ever made. It measures 1-1/8” thick. When cutting 1” thick plywood on the MFT table, this now offers the ability to set the height of the guide to the correct height and confidently square it at that height. If using other squares, the height of the guide would have to be raised after the squaring process allowing for error in squareness when moving the guide.

@grbmds and integrating the dog holes – We really do see the practicality of integrating dogs, but we have to look at the end result and have to be careful in claiming what our tool can do and how repeatable the results can be. As mentioned before, each MFT table has its own character, some with holes that are new and still perfectly round, or some that older and a little out of shape. The most repeatable results we can achieve and stand by in backing our product is by designing a square to where its intended and capable function is to square the guide to the fence. From there and depending on the shape of the MFT table, the user has the option to take into their own hands and take it a step further to as best as possible, square the guide and fence to the grid holes with or without a square. We can back that our tool can square the fence and guide up to a height of around 1”, but we cannot back that the guide, fence and grid holes will all be square, due to likely and inherent conditions we cannot control.

@making the square adjustable – dropping tools, especially heavy ones like this, happen and we've experienced this ourselves. When that happens, precision squares can no longer be precision and you are left with an expensive decorative piece. We wanted an option for people to be able to keep this tool around for a long time. It is set and ready to go from our factory so no adjusting is needed out of the box.

@RL - I would also like to see that picture
 
@all - I had posted this in the other topic found here: http://festoolownersgroup.com/other-tools-accessories/woodpecker-mft-square-modification/

"I helped in the design of the MFT Square from Woodpeckers and would love to join in and answer some questions and hear your feedback. Reading through, all of your posts are valid and I hope to address most of them, as many of these thoughts were considered during our design and prototyping process of the Woodpecker MFT Square.

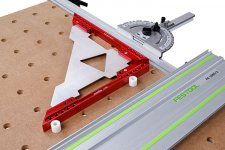
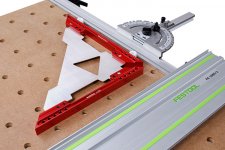
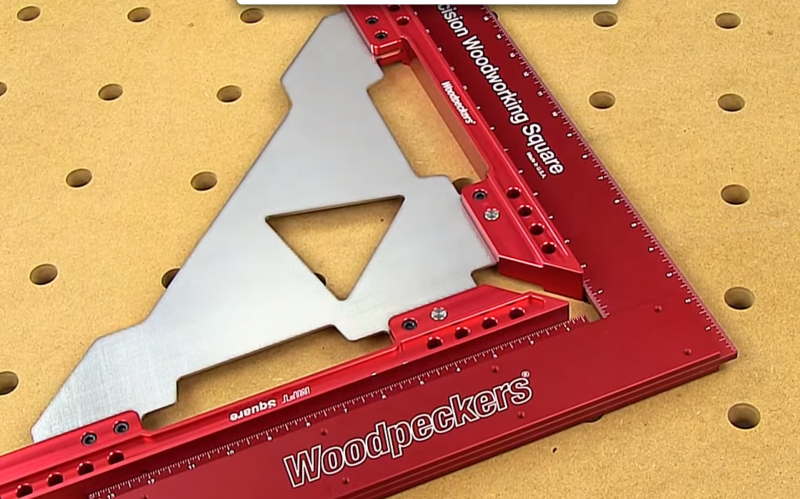
A little about the design behind the Square; it was inspired by the need for a large thick webbed square to ensure the guide rail is 90 degrees perpendicular to the back fence. The approach to exclude the use of the holes as a feature in squaring up the rails is due to the inability to adjust such fixed and uncontrollable features. When features are fixed, you are subjected to rely on the integrity of their perpendicularity and the MFT holes integrity are affected through realistic factors such as true position of MDF holes, age, heavy use and atmospheric conditions.  These factors were key in us deciding to exclude the use of the MFT holes as a squaring feature as we could not guarantee or control the true 90 degree perpendicularity to our standards.

However, the option to square up the holes to the tracks as best as possible, still exist with the use of the MFT Square and the QWAS dogs. See photos below. This free moving option allows for infinite positions compared to the option of including holes for QWAS dogs or integrated/removable dogs in the legs or stainless web of the square. If the square was to include holes for QWAS dogs or if the square was to have integrated/removable dogs in the legs or stainless web, it would limit the flexibility to move the tracks to multiple positions perpendicular to each other. For instance, if the square was fixed through dogs to the limited set grid positions of the MFT holes, you must then move the tracks to such positions. Having the free moving option allows you to slide the square in infinite increments along the dog generated edge allowing for maximum flexibility and setup positions.

Through the internal company expectations, we don’t bend on quality but certainly include flexibility. Every day we enjoy sitting down and figuring out on how to to offer better tools above our competition. The MFT square is hefty and it is a beast. I think it’s just one of those tools you have to pick up to feel the quality (ok …that part may be biased, but in all honesty, the reaction from external customers shared the same feeling). I hope I addressed most of the concerns and suggestions and I’d love to hear any feedback!

Thanks
Mike Koury
designer and mechanical engineer
Woodpeckers, INC.

..."

That thread has a lot of the same comments and answers to them, thought it might help visiting.

Thanks
 

Attachments

  • MFT-Square-Align-to-Dog-Holes_1.jpg
    MFT-Square-Align-to-Dog-Holes_1.jpg
    167.3 KB · Views: 403
  • MFT-Square-Align-to-Dog-Holes_2.jpg
    MFT-Square-Align-to-Dog-Holes_2.jpg
    167.1 KB · Views: 454
While I understand your thoughts and logic, I think that Woodpeckers missed a great opportunity to provide a unique squaring device that inlkegrates the use of the dog holes on the MFT. That is, in fact, the one squaring tool not available anywhere, to my knowledge. It would permit an easy one-step method of squaring, not only the guide rail to the fence, but the fence/guide rail to the holes in the table. Despite your comments about this concept, it still is, to me, one of the most useful ways to square everything. With the fence/guide rail squared to the the holes, you can, for example, using dogs in the holes as a fence to make 45 degree cuts without moving the fence from its 90 degree position. That's just one example. Again, repeating myself, without that capability, it's really just an expensive square, no more useful than your triangles or framing squares (which are less expensive) and just using dogs to square everything up.
 
Here you go- photos as promised.

The triangle can be positioned either way as the holes are symmetrical. The position in the first photo works best as the triangle is closer to the edge. Note that there is a little wooden spacer underneath the triangle to keep it flat.

I'm going to modify it a little so as to use threaded inserts as the screw holes in the mdf enlarge over time as you attach and remove the triangle.

Unlike shooting boards which are kept square by adjusting the fence, on mine you keep the shooting board square by planing the mdf edge that the plane runs against with a shoulder plane rather than the fence.

138cdd4faf606c79e68b891425a1ffe8.jpg


12cb81b54672faa0797368f660738285.jpg


5855ec884ee77df54dfb777eaed06e20.jpg
 
Thanks for the photos.  Very slick.  Could you explain how you use it when installed as in the middle picture?
 
RLJ-Atl said:
Thanks for the photos.  Very slick.  Could you explain how you use it when installed as in the middle picture?

Sometimes you have no choice but to cut the mitre on the obtuse angle instead of acute, for example a moulded picture frame.
 
RL said:
RLJ-Atl said:
Thanks for the photos.  Very slick.  Could you explain how you use it when installed as in the middle picture?

Sometimes you have no choice but to cut the mitre on the obtuse angle instead of acute, for example a moulded picture frame.

Gottcha.  Thanks.
 
It seems to me that people are forgetting the discussion last year about which dogs were acceptable and which were not good enough because they might have a few thousandths of wiggle. I believe Woodpecker when they say that the variables between tables would make having precision holes for dogs impractical.

With the dogs themselves varying by a few thou and the table maybe have just a hair of warp, it is easy to see how a square with dog holes would not work for many tables. Just put a couple of dogs on one side of the guide rail and then square up the rail and other bits. The extra few seconds to put in the dogs does not seem so bad. I think using dogs and a square like this would be better than the Greg P method on the Woodpecker site that just uses the square.

However, the price is something that I gives me pause. Since I do not use the MFT to trim materials very often and since there are other ways to do the square up, I may have to pass on this one.
 
Dear Mark K.

Thanks for your insight as to the development of the MFT square. All the Woodpecker products I have bought (lots) show the careful thought that goes into every one and the high quality shows the care with which they are made.

I totally understand about why the integral dogs idea wouldn't work and how using external dogs does the same job.

Perhaps the third leg could be an option? I know it would make the square heavy but that can be an asset.

Also, I think holes on the inner triangle would be helpful for those of us that make jigs.
 
Im glad about my decision on the framing square now. Not really impressed by that tool.
 
I'm confused, is buying this square going to get our MFT 3 tables any squarer ? I only ask as I do not own a Woodpecker square but the price of the 1281 is more in my budget, if the MFT square for over double the price is absolutely needed I might stump up the extra, but it seems to me having measurements on it like the 1281 would make it more useful. Just my thoughts.
 
I'm really struggling with this tool.  I want it because it looks cool but I already have a 1281 and the one-time tool precision framing square so I don't understand why I would need this for my MFT.  Also, I noticed in the video the demonstrator used the one-time tool precision framing square to "re-square" the MFT square.  I guess the way I look at it is if the tool that one uses to make this tool square works, then why do I need to spend major $$$$ on the MFT Square?

Screenshot2015-01-30071005_zps53e0ec08.png
 
Back
Top