Working with Plywood - how to NOT use pocket screws

sofa_king_rad

Member
Joined
Mar 26, 2016
Messages
100
I'm a total noob, so I apologize if these are super simple questions.

Many of the beginner/intermediate plans I've been looking at are using 3/4" plywood attached to a post (usually a 2x4 or 4x4) with pocket screws.

What is the proper what to work with plywood when being used for panels, like for a headboard.
 
are you asking me? Cuz I was asking you because I don't know, lol

That's sort of what I was thinking, but wasn't sure. If you have a 1-3/4" wide post, taking out a 3/4" would leave a 1/2" of material on each side....Is there a good resource for just general tips on building furniture cabinets, etc. I just have no idea what is acceptable and what isn't which is why I try to find plans.
 
If you're looking at a frame and panel application you'd normally route a slot on the inside of the frame sections and insert the panel. There's a world of panel and slot cutters out there for all sorts styles. A common finish is for the edges of the panel to be reduced to fit into a frame slot that is narrower than the general thickness of the panel.

All of this is achievable with a saw, but you're not going to achieve any decorative edges, as [member=40772]Holmz[/member] mentions ... it's simply a dado (call it groove or slot if you like).

A rebate is probably going to assume you panel is inserted "from the back" like a picture into a frame.

Inserted panels can float or be glued .. but you typically won't be fixing them with metal hardware.

Fixing the frame together that contains the panel is an entirely different story. Is that also part of you dilemma?

 
Yes. Also these plans I've found are probably leaning on the 3/4" plywood panel that is being pockets screwed along both posts for some significant support.
 
The problem with just using pocket screws with no groove/dado is that unless your assembly is perfectly square, you will have gaps in some places.  Now if you're confident you've cut the panel perfectly square, you may be ok -- but that also assumes that your posts are perfectly straight as well so you get a flush mating edge.  But it might also be a challenge to keep everything in alignment as you're screwing it in.  This is why dadoes/slots/grooves are helpful.

Do you have a router to make the slot/dado?  If not, then in a pinch one can use the TS55 and rail -- you'll just have to provide extra support for the rail -- I assume it's only 4x4 post, and so the rail would be floating off the edge  -- should just be able to lay down another post alongside to the left of the one being grooved. 
 
[size=13pt]To prevent any chance of tear out from the router bit [reasonsble chance when creating a Dado with some ply], some members have made cuts with TS and rail on outer edges of Dado, then removed the middle with a router. In using this technique I have found it pays to be careful that the TS and Router depths are similarly set. Using some off cuts helps to check.
__________________

[attachimg=1]

In the case of the ply backing in this island bench, the Dado only needed to be thin to accomodate the ply, and so was cut with two pases of the TS in the Mountain Ash and with the rail moved for second pass.
 

Attachments

  • image.jpeg
    image.jpeg
    934.5 KB · Views: 1,242
There is real roper way to do this. There are various ways to do this. I I understand the question correctly this is for a bed head board/ foot board. You want to attach they to the post to make the headboard ?

I'd route a groove on the back side of the post and use some decorative screws brass, antique etc to attach. Maybe add some sylicone as well.

Pocket hole would work but for this application I don't think they would be the best way.
 
Here's a simple drawing to suggest a strong way to do this.  No pocket screws needed.  The structure and glue hold the frame together and the ply provides strength to prevent racking.

I did not include the plywood in the drawing but it insets into the dado on the leg and the top/bottom rails.

Two advantages to doing it this way over pocket screws - strength and you hide the plywood edge in the solid wood frame.

The leg and rail are sized 3.5" x 1.5" with 1/2" dados and tenons.  You could go to 3/4 ply and grooves, but that's probably overkill for a head / foot board.  You can cut these with a router if you don't have a  table saw with a dado bit.

I chamfered the interior edge 1/8" on a side, again using a router with a bearing guided bit.  Apply this technique on your headboard, footboard and connecting side where you are doing a day-bed and you'll have a simple technique that finishes nicely and removes the chance of splintering.

If you are using 2x4 material from the lumberyard for leg and rail, it's typically going to be rounded over.  That means where you join rail(horizontal) to leg(vertical) you need a square cut.  So you might rip down the legs if you want a flush joint.  If your legs are larger like at 4x4, you can still use this joint but don't need to worry about the edge being rounded over.

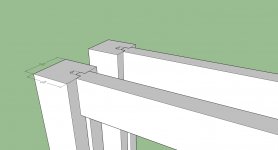
I included a 4x4 post showing both a 1/2 and a 3/4 dado and tenon on the rail.  Either will work, but you probably don't need to go to 3/4 plywood if you can source the material in the species you want in 1/2" ply.

Lots of options.  I'd suggest you draw things out either on paper or with a program like Sketchup so you can figure these details out before you start cutting too much wood.  Cheaper and less frustrating!

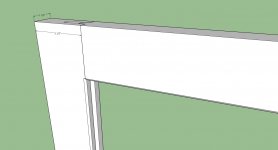
2x rail and leg with a chamfer on show side of rail
View attachment 1

2x rail with a chamfer with options on leg / panel dado's of 1/2 or 3/4"
View attachment 2

Good luck!
 

Attachments

  • frame joint.jpg
    frame joint.jpg
    104.9 KB · Views: 153
  • 4x4 posts.jpg
    4x4 posts.jpg
    119.6 KB · Views: 141
Im working on improving the plans for this bed, namely not using pocket screws. I will also cap off the foot board with a top to appear more 'finished'

http://www.ana-white.com/print/8696

3154824013_1363627801.jpg
 
Back
Top