You are using an out of date browser. It may not display this or other websites correctly.
You should upgrade or use an alternative browser.
You should upgrade or use an alternative browser.
(Yet another) 80/20 MFT/SYS Cart
- Thread starter Richard/RMW
- Start date
Richard/RMW
Member
- Joined
- Jul 11, 2010
- Messages
- 2,947
Michael Kellough said:Is that the metric product? Doesn't the Imperial stuff have a groove in the face?
Nope Imperial. 1515 ULS - Ultra Light Smooth. More than heavy enough for most anything you will need in this type of application.
RMW
Richard/RMW
Member
- Joined
- Jul 11, 2010
- Messages
- 2,947
BadRobot said:What series of 80/20 aluminum extrusion did you use? Festool clamps fit perfectly.
Thanks,
15 series, although 40 series fits the clamps just as well.
RMW
promark747
Member
- Joined
- Jan 9, 2010
- Messages
- 469
I'm building an 80/20 top for my new workstation (which will then have a MFT-style MDF top) and am struggling to figure out the best corner connection to allow for clamp access. I like Richard's idea of the modified 3-way connector, but I will probably just go with butt connections, with the long front and back rails covering the side rails. The trick is then getting access to the slots in the side rails. How big of an access hole/slot would you think is required to slip in the Festool clamps?
(I will be using 36" 3030 profiles for the outer side rails, 36" 1530 for two inner support rails, and 72" 1530 for the front and back. The frame will be attached to a Lista Align motorized workstation that I accidentally discovered on Craigslist for a steal. The only issue with is was that the front and side support brackets were bent, hence the need to build my own out of 80/20.)
(I will be using 36" 3030 profiles for the outer side rails, 36" 1530 for two inner support rails, and 72" 1530 for the front and back. The frame will be attached to a Lista Align motorized workstation that I accidentally discovered on Craigslist for a steal. The only issue with is was that the front and side support brackets were bent, hence the need to build my own out of 80/20.)
Attachments

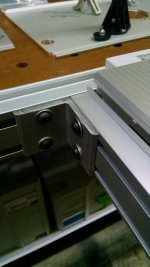
I approach corners with 8020 differently, similar to how the MFTs are constructed. I use 3" aluminum angle .250 thick on the inner edges, drilled through inline with the extrusion slots and attached with tee nuts. I do not overlap the extrusions, thus both sides are open for clamps and other attachments. My last project was co-joined CMS tables. While this is not 8020 material, the process is the same.
View attachment 1
View attachment 2
View attachment 3
View attachment 4
View attachment 1
View attachment 2
View attachment 3
View attachment 4
Attachments
Richard/RMW
Member
- Joined
- Jul 11, 2010
- Messages
- 2,947
Dang [member=25351]rst[/member] - those look really interesting! At some point I want to some up with a modular setup where I can wheel the cart outside, attached some extensions for cutting ply, attach a router table extension, inverted jigsaw, sander, etc. Basically have a workcenter I can customize depending on the project du jure.
What are those extrusions you show - from the MFT but reversed? can you provide details on how to attach the CMS plates?
Thanks,
RMW
What are those extrusions you show - from the MFT but reversed? can you provide details on how to attach the CMS plates?
Thanks,
RMW
rst said:I approach corners with 8020 differently, similar to how the MFTs are constructed. I use 3" aluminum angle .250 thick on the inner edges, drilled through inline with the extrusion slots and attached with tee nuts. I do not overlap the extrusions, thus both sides are open for clamps and other attachments. My last project was co-joined CMS tables. While this is not 8020 material, the process is the same.
View attachment 1
View attachment 2
View attachment 3
View attachment 4
RMW, I know this is late but for some reasons I'm no getting notifications. Your question regarding the extrusions looking like MFT is because this setup is two VLs with two pieces of MFT rail connecting the tables, giving me enough room to attach my Woodpeckers adjusters using two 8020 15 series t slots. The only other 8020 material is the 2X2 brackets and t slot t nuts.
Richard/RMW
Member
- Joined
- Jul 11, 2010
- Messages
- 2,947
It's been a while since I updated any of the threads I started, mostly since every project is struck in an unfinished state. [embarassed]
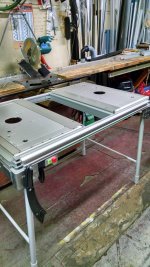
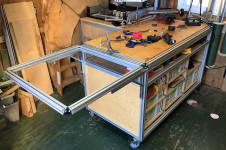
Finally got around to adding a folding wing to the MFT/SYS cart. It's strong & stable as heck, & adds about 30" by 28" of work surface.
[attachimg=1]
[attachimg=2]
[attachimg=3]
Next I need to use the Parf guide and make a MFT-holey top for the wing. Was originally planning to have dog holes in the main top but I find I like working on it sans-holes, so I'm planning to use the wing w/holes for a cutting station using a set of Rip Dogs.
After seeing how stable this wing is I am really considering adding one to the rear, with it flipped up I will have a worktop that is about 53" wide by 60" deep. Too large to use inside the shop, but my big projects mostly happen out on the deck anyway.
Someday I may even get some fronts on the SYS drawers...
RMW
Attachments
![ScreenClip [1].png](/data/attachments/33/33551-b0074084926ce0d807b1be807ee531f8.jpg?hash=OWIUbtnd4O)
![ScreenClip [2].png](/data/attachments/33/33549-b20abbe7cde156e23c8dac82bf440ff6.jpg?hash=XfS_uOg1_t)
Richard,
What an incredible cart. Have you finalized your plans yet? If so, are you able to share them? Do they include a materials list with costs. How much in total do you think you have invested in the cart (money and time)? Now that's its done, would you do it again? Would you do anything differently? Would there be disadvantages to purchasing the extract lengths from 80/20 versus cutting them to final dimensions yourself?
I just got an MFT and wanted to build a Systainer storage cart, but was thinking of constructing using 3/4 plywood. What are the advantages of your cart over all plywood construction? Disadvantages?
Have you approached 80/20 about marketing your project? I actually wish they had more tool/workshop plans available for those of us creatively challenged.
Awesome work! I also love the extension idea.
Thank you!
nickao
Member
- Joined
- Feb 24, 2008
- Messages
- 4,561
I have a slow internet connection, I am out in the country struggling with 5MB/s service, my old home had 100MB/S service 10 years ago. It takes a full minute to look at your pics.
Guys please shrink the file sizes. 2.7Mg? the file size can be shrunk 10 times smaller with no loss in picture quality.
This took me 30 seconds to do, the file is over 10 times smaller at 200K instead of 2700K and loaded on my computer in less than 1 second. I know I have a slow connection and that's on me, but if everyone keeps uploading files this large for no reason this website will be out of control in 10 years. I am surprised the forum allows more than a 1MB file size, it's just not necessary for internet pictures on a forum off this type :
[attachimg=1]
Attachments

Richard/RMW
Member
- Joined
- Jul 11, 2010
- Messages
- 2,947
Sorry Dovetail, didn't realize the images were that large. I actually take screenshots of my photos to try to keep the size down.
RMW
RMW
Dovetail65 said:I have a slow internet connection, I am out in the country struggling with 5MB/s service, my old home had 100MB/S service 10 years ago. It takes a full minute to look at your pics.
Guys please shrink the file sizes. 2.7Mg? the file size can be shrunk 10 times smaller with no loss in picture quality.
This took me 30 seconds to do, the file is over 10 times smaller at 200K instead of 2700K and loaded on my computer in less than 1 second. I know I have a slow connection and that's on me, but if everyone keeps uploading files this large for no reason this website will be out of control in 10 years. I am surprised the forum allows more than a 1MB file size, it's just not necessary for internet pictures on a forum off this type :
[attachimg=1]
Richard/RMW
Member
- Joined
- Jul 11, 2010
- Messages
- 2,947
[member=62084]Rhino1789[/member] Howdy, you packed a lot of questions in there! Here goes:
Nope the "plans" were never finished, I kept having to make changes based on actual construction and the final design hasn't been documented. The idea was to have a cut-list calculator spreadsheet and corresponding plans. You enter all the details into the calculator like desired OAL height/width/depth, extrusion profile (15 or 40 series), caster size, how many banks of Systainers, etc. pick metric or imperial and it gives you a parts list. Problem with the cut-list calculator is it is loaded with formulas and references and everything has to be checked and rechecked to prevent costly errors. Might happen this winter if I end up stuck inside at night a lot.
As far as cost, there is over 50' of extrusion @ $300-$350 full list price, which is about $5/LF for 1515 ULS (ultra-light smooth) and $10/LF for 1530 ULS. Fasteners & (4) brackets are another ~$100. Casters, drawer slides and plywood add a couple hundred bucks. Total call it ~$600-$650.
I buy the extrusions mostly in 8' sticks from 80/20 on eBay whenever I find a deal, just picked up some 2nds for around 1/3 of the list price. Using 2nds & cutting/drilling/tapping them yourself will keep the cost down. If you bought everything cut-to-size, drilled and tapped the cost would darn near double for the extrusions. Every hole and/or tap costs a couple bucks from 80/20.
After the learning curve a second cart went together in a few hours, it took more time to cut to size & rabbet the plywood than it took to cut/drill/tap the extrusions. I do have a good metal cutting shop saw and the necessary drill guide for the extrusions, and power tap them with a drill. If you are not set up for this it will take a bit more time.
There are lots of examples of similar all-plywood carts on the FOG. I like the ability to use the t-slots for clamps, etc., especially the Kreg Automaxx, which is an advantage to using 80/20. It's probably more rigid but I don't have a plywood cart to compare to so this is just a guess. The cart loaded up is pretty heavy & it takes a bit effort get it moving but there is zero racking no matter how much I jerk it around. With the casters locked it is plenty stable enough for hand planing.
Hopefully this answers everything. Where in PA are you located? I'm in Brigantine Jurzey.
Thanks,
RMW
Rhino1789 said:Richard,
What an incredible cart. Have you finalized your plans yet? If so, are you able to share them? Do they include a materials list with costs. How much in total do you think you have invested in the cart (money and time)? Now that's its done, would you do it again? Would you do anything differently? Would there be disadvantages to purchasing the extract lengths from 80/20 versus cutting them to final dimensions yourself?
I just got an MFT and wanted to build a Systainer storage cart, but was thinking of constructing using 3/4 plywood. What are the advantages of your cart over all plywood construction? Disadvantages?
Have you approached 80/20 about marketing your project? I actually wish they had more tool/workshop plans available for those of us creatively challenged.
Awesome work! I also love the extension idea.
Thank you!
Richard,
Thanks for the very detailed response and yes you definitely answered my litany of questions. I figured you had that much invested in the 80/20, its quality certainly shows. I just got myself an MFT that I plan to pair up with a Mafell MT55, so I got some short pieces of 80/20 to use as Guide Rails and material support. That little bit wasn't cheap either.
You actually gave me an idea since I have some 80/20 incorporated into my MFT. Because I have a number of Kreg Automax clamps already, I'll use my 80/20 pieces (with Qwas dogs) to affix my Kreg clamps to the table. Thanks for the tip.
I actually just moved to Bucks County, PA from Scotch Plains, NJ, and grew up in Gloucester County, NJ, so I know Brigatine a little. Growing up, I spent my summers in Ocean City, NJ, so I'm always jealous of folks living down there year round. Good for you! Thanks again and let me know if you ever decide to sell your well designed 80/20 carts.
Richard/RMW
Member
- Joined
- Jul 11, 2010
- Messages
- 2,947
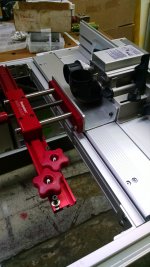
Finally got to use the awesome Parf guide from UJK & [member=11196]Peter Parfitt[/member] and make myself a Holey MFT surface. The system works perfectly, simple to use and great results.
I've found since building this cart I have not missed having MFT holes in the main work surface so I only added them to the wing, and mostly so I can set up a Rip Dogs cutting station:
[attachimg=1]
[attachimg=2]
[attachimg=3]
The guide fence from the MFT makes it easy to set a stop for repetitive cuts. I have a bunch of 2" wide cherry to rip to length for some cabinet end panels and door frames, which is what prompted me to finish up the fold down wing. The main table itself gives me a 60-some inch support for the offcuts & I can use this setup for cutting 8' material without often having to move the cart.
RMW
Attachments

![ScreenClip [1] (Small).png](/data/attachments/32/32784-0da5c93964b1c40488f14e1c1745ae6d.jpg?hash=6c8sJI4iDF)
![ScreenClip [2] (Small).png](/data/attachments/32/32786-a7011a5c3e9e62e67931c42abc3fdf4b.jpg?hash=kXVseGNKwY)
Richard/RMW
Member
- Joined
- Jul 11, 2010
- Messages
- 2,947
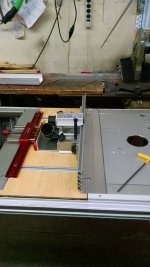
Howdy [member=8584]Ocram[/member] - those are the guide fence adapters for the Rip Dogs. Take a look athttp://www.ripdogs.com/guide-fence-adapter/
I just use 2 sets of them with the guide dogs to hold the fence.
Thanks,
RMW
I just use 2 sets of them with the guide dogs to hold the fence.
Thanks,
RMW
Ocram said:It looks very nice Richard. I got a question for you, can explain to me how the guide fence from the MFT is attached to the dogs? Or even better cap you post a closeup picture?
Greets Ocram
Ocram said:It looks very nice Richard. I got a question for you, can explain to me how the guide fence from the MFT is attached to the dogs? Or even better cap you post a closeup picture?
Greets Ocram
Hi [member=8584]Ocram[/member]
I am in the middle of making a new video with some updates on the Parf Guide System and so on. One thing that I do mention are the UJK Guide Rail Clips for the Parf (or any other 20 mm) dogs. They are available from Axminster. Here is a link:
http://www.axminster.co.uk/ujk-technology-dog-rail-clip-pair-102973
They have been designed by Axminster, I have nothing to do with them at all but I have used them and they work brilliantly.
Peter
Ocram
Member
- Joined
- Jun 10, 2010
- Messages
- 59
Thanks for the replay [member=8712]Richard/RMW[/member]
Didn't see the Rip Dogs adapters before. They look good en i bet they work perfect but only with Rip Dogs looking at the pictures. The diameter on top of the Rip Dog is not 20mm if i am correct. So this is no option for me.
Ocram
Didn't see the Rip Dogs adapters before. They look good en i bet they work perfect but only with Rip Dogs looking at the pictures. The diameter on top of the Rip Dog is not 20mm if i am correct. So this is no option for me.
Ocram
Richard/RMW said:Howdy [member=8584]Ocram[/member] - those are the guide fence adapters for the Rip Dogs. Take a look athttp://www.ripdogs.com/guide-fence-adapter/
I just use 2 sets of them with the guide dogs to hold the fence.
Thanks,
RMW
Similar threads
- Replies
- 9
- Views
- 810
- Replies
- 2
- Views
- 1K
- Replies
- 10
- Views
- 1K