Yet another Sysport build

Gwerner

Member
Joined
Jan 3, 2015
Messages
260
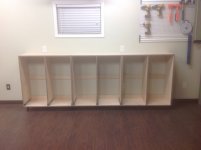
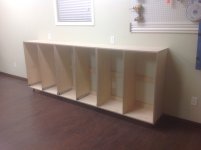
Before undertaking a Sysport build using good plywood (need to build 6), I decided to make a practice run out of MDF. Huge shout out to MrBigerock and his great youtube videos. Got the cabinet put together tonight and will start on the drawers tomorrow. I plan on making this one mobile and adding some tool hooks, paper towel holder, and maybe a power strip to it so I can roll it up next to the workbench while working on a project.

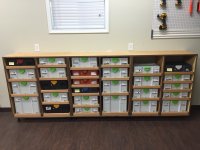
Learned a lot while working this, mostly how to use the LR 32 and begin my conversion to measuring everything in metric. I do need to learn how to prevent my joints from drifting apart while using pocket screws. I used dominos in each panel hoping that would prevent the drift but it didn't. Anyone have any tips on keeping the joints flush when driving the pocket screws?


Attachments

  • Sysport Proto.jpg
    Sysport Proto.jpg
    146.5 KB · Views: 6,540
  • Sysport Proto 2.jpg
    Sysport Proto 2.jpg
    140.8 KB · Views: 4,236
I have always driven the screws slowly and used corner clamps (mine are Jet) and/or the Rockler Clamp-It squares and several deep throat f-style clamps.  It can be tedious setting everything up, but IMO, a little extra time spent at that stage is better than the constant irritation the unevenness would cause me (I have some minor OCD issues - only with tools and fishing equipment...).

I really like the design of those cabinets and have watched MrBigerock's videos several times.  We are loosely planning on moving in a year so I am debating whether to build sysports or a chaos wall in the new space.  Please post more pictures as you go.
 
Had to take some time away from the shop but was finally able to get the cabinet boxes built and mounted. Used maple plywood and edge banded it in walnut. Time to start building the drawers.


Attachments

  • image.jpg
    image.jpg
    956.9 KB · Views: 3,140
  • image.jpg
    image.jpg
    804.2 KB · Views: 2,795
Nice clean job in what seems like a very organized workshop.  Be sure to post the doors when you finish.  With regard to your pocket hole question, I have had good luck with the Kreg right angle clamp. i drill the holes in pairs next to each other, then use one for the clamp and drive the screw in the other.  Remove the clamp and then drive the second screw.  With practice and the right amount of clamping pressure, everything can line up nicely, especially if you use dominos. 

I made the switch to metric a couple of years ago and haven't looked back. Tons easier.  No more fractions!
 
ikea makes some perfectly sized melamine cabs for the sys. and the holes lines up perfectly for the sys az
 
#Tee said:
ikea makes some perfectly sized melamine cabs for the sys. and the holes lines up perfectly for the sys az

Got a name or product number? Thanks
 
Finally got the cabinets finished and loaded up today. Now to decide what to fill the empty space with  [wink]


Attachments

  • image.jpg
    image.jpg
    1.5 MB · Views: 6,369
Gwerner said:
Now to decide what to fill the empty space with  [wink]

Two more Festools...that's obvious.

Nice job, really like the RTS 400 T-loc. Makes that tool jump right out at you. I've tried to do the same with different colored T-locs but then I forget what color signifies what tool.
 
Pizza Steve said:
Great job on the sysports!

How did the mobile sysport cart go?  Does the MDF hold up for a sysport?

The mobile cart went together great but I can't really say yet how well the MDF will hold up since I haven't really been using it much. I'm waiting on some more drawer slides so I can reinstall them in the mobile cart (I had to steal some out of it to finish the mounted sysports). I would imagine the MDF will be just fine in my application since it's only going to be used in shop.
 
Looks really nice, a job well done!

I'm currently working on a layout for a similar "sysport" that additionally to my systainer and future systainers can also house my l-boxxes.

Again, yours looks really nice and very well built!

Kind regards,
Oliver
 
Gwerner said:
Finally got the cabinets finished and loaded up today. Now to decide what to fill the empty space with  [wink]

Hey looks good , I really want a black and yellow systainer, where did you get those ?
Billy
 
rvieceli said:
#Tee said:
ikea makes some perfectly sized melamine cabs for the sys. and the holes lines up perfectly for the sys az

Got a name or product number? Thanks

[member=37561]#Tee[/member]
I too am interested.

Thanks, Mike A.
 
Billy stray said:
Gwerner said:
Finally got the cabinets finished and loaded up today. Now to decide what to fill the empty space with  [wink]

Hey looks good , I really want a black and yellow systainer, where did you get those ?
Billy

Lee Valley sells them.
 
Hello all

I am very interested in the IKEA solution as it would kill two birds with one stone [eek]

1.  I finally agree to take the Mrs to IKEA and then she is a happy bunny!
2.  I get an out of the box solution that I could begin using immediately (I am very very new to wood working and festool)!!!

If anybody could help me locate the item from he IKEA UK store then that would e greatly appreciated.  I have already search from the original link and I get the US IKEA site that I do not seem to be able to cross reference with the Europe site?

Thank you in Advance
 
That is brilliant thank you for the link.

I have just checked the dimensions and unless I am missing a trick I do not think the IKEA cabinet would work and the wife is going to be gutted that I shall now refuse to take her to IKEA  [crying] [crying] [crying]

SYS AZ specs
•427 wide
•380 deep

IkEA "bodgit and scarper" solution
•400 wide (I presume this includes the wooden frame)
•370 deep (maybe work if we do not want a gay door blocking all of my green koolaid boxes!

Any other suggestions?

 
Back
Top