20 huge garden benches made with the DF500

ChuckM

Member
Joined
Sep 7, 2015
Messages
5,732


The cross stop (a must in my opinion for repetitive work/multiple pieces) is indispensable for his project, and at 10:20, he cleverly used a shop-made guide to position the machine. 2 placement lines instead of 80.

Double/twin tenons are the key to super strong joints if you don't have the DF700.
 
Twenty at a time of something like that is definitely worth putting some time/effort/thought into jigs and fixturing. That's a good looking bench, I wonder what they sell for?
 
I save almost all my Domino jigs.

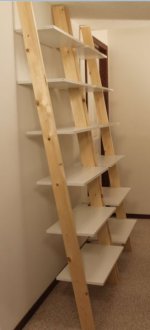
I started with 2 of these ladder shelves using a jig. In the end, about two dozen (different wood and sizes, and number of steps) have been made over time, some for family and some for friends, and some even made by others using my jig. Like the garden bench jig, placement lines are scribed on the jig, saving so many pencil lines to be marked on the rails. Because of the consistency offered by the jig, all mortises were cut with the tight setting.

[attachimg=1]
 

Attachments

  • Ladder shelves.JPG
    Ladder shelves.JPG
    23.8 KB · Views: 497
Looking great! :) I'm so glad I have DF500 ready to serve me whenever I have time, plan, and skill.... :p
 
ChuckS said:
I save almost all my Domino jigs.

I started with 2 of these ladder shelves using a jig. In the end, about two dozen (different wood and sizes, and number of steps) have been made over time, some for family and some for friends, and some even made by others using my jig. Like the garden bench jig, placement lines are scribed on the jig, saving so many pencil lines to be marked on the rails. Because of the consistency offered by the jig, all mortises were cut with the tight setting.

I save mine too, some are effectively permanent. Others, I save for a while and when the stack gets too big, I go through them and throw out the ones least likely to get used again. I have learned, over the years, to clearly mark what they were for, what bit and template guide was used, etc.
 
Crazyraceguy said:
Snip. I have learned, over the years, to clearly mark what they were for, what bit and template guide was used, etc.
For furniture makers/woodturners, equally important, if not more, is to date and sign every major piece of your work.
 
ChuckS said:
Crazyraceguy said:
Snip. I have learned, over the years, to clearly mark what they were for, what bit and template guide was used, etc.
For furniture makers/woodturners, equally important, if not more, is to date and sign every major piece of your work.

Oh, yeah. I have been doing that for many years. Everything I build gets the job number, which is assigned when the job comes in. That is only a partial clue though, because some big jobs don't get to me for a long time. The custom pieces are usually done last.
Then the name of the job itself, along with the date that I take it down to the floor from the blocks, followed by my scribble of an autograph, with a black marker.
What is really cool is getting to rework a project after many years and finding the original date/autograph on the back or inside, depending on what it was. We have re-made cabinets that were damaged by a water leak and find name and date from 10 years back or more sometimes.
This is a habit that started when we first started using a second cabinet carcass press. One of them was clamping slightly out of square, which became noticeable to the installers on long runs of uppers. Marking them with "who" assembled them would tell us if it ever happened again. Also, since the cabinets themselves are CNC cut, they have stickers identifying each part. Most of them are peeled off during assembly, but the ones on the backs and nailers are left on. They have all of the job name, room number, sequence number, etc too.
 
Back
Top