3D printed Qwas dog

sprior

Member
Joined
Feb 15, 2012
Messages
460
I've been a little scarce around here for a couple of months and a big reason why is that I got a 3D printer and have been obsessing over it.  I'm just getting started designing things to print and just for goofs decided to model a Qwas dog and printed it  out in white ABS plastic.  The first try came out pretty good!  It's not quite as tight in the MFT hole as the real thing, but pretty close.  The faceted surface is because I forgot to change to a finer setting in Sketchup.  3D printed parts are printed a layer at a time (in this case 0.2mm) so they won't have the shear strength of molded plastic.  This piece is 70% solid (webbed on the inside).

I'm having fun.
 

Attachments

  • 2014-05-03 18.44.17.jpg
    2014-05-03 18.44.17.jpg
    2.8 MB · Views: 984
Pretty awesome!  I've been dreaming of a 3d printer for awhile.  I saw someone with one making and selling Kreg jig dust collection ports that worked with festool hoses.

Been meaning to track him down and get one.

BTW... born and raised in Bethel right next to you.
 
That's pretty cool.  I've been thinking of looking into a custom dust shroud for my OF 2000 routers (something cylindrical similar to the OF 2200 that would contain more of the dust than the OF 2000's standard attachment)...it would be cool if something could be fabricated on a 3D printer, especially if the material could be clear/translucent instead of white.
 
There's a Kickstarter project called 'the micro' going with the first consumer friendly priced 3D printer at $299.

46h to participate as a backer if you havent already... Waiting for mine in Feb 2015...
 
Sonicfedora - the trick with the Kreg jig is to use the circular brush that came with your Festool dust collector and stick it on the Kreg Jig dust port, then stick the vacuum hose in the brush end - works like a charm.
 
sprior, just curious which 3d printer you have?  I would really like to have one of these, but am still a bit leery to get in at this stage mainly due to price and newer ones coming along (like "the micro" that was posted above...very cool by the way).  The one I was looking at was the printrbot simple (all metal).  Kind of reminds me of when I bought my first CD writer when they first came out.  Paid close to $500 for it and another $250 for the blank CDs...now DVD burners are $20.  I would imagine the same thing will happen with 3d printers, maybe just not to that extent.  Just for the woodworking jigs alone these 3d printers would come in real handy  ;)
 
After a lot of research I got the Makergear M2 (not to be confused with the bigger company MakerBot).  The printer costs about $1700 fully assembled, I got mine a little cheaper in kit form because I wanted the experience of building it.

The M2 is in some ways a very well chosen set of standard parts (except the all metal frame which is very sturdy) so it's capable of very high quality output.  The open source design gave me some comfort in dealing with a smaller company because no matter what happens I can fix it myself.  Even the source code for the firmware of the electronics is readily available (and I once looked at it to answer a question I had - I'm a programmer).  The support from the company itself is great and community support is also fantastic.

I first looked at the cheaper options like the printerbot and decided that I didn't want something I'd grow out of too quickly or become frustrated at the build quality.

Funny you mention early CD burners - I was there for that as well and this is very much like that.  3D printing is NOT ready for the general consumer no matter how much articles you read tell you otherwise.  You will have to get involved in stuff like leveling the print bed and getting distances set precisely, but the biggest black magic is to get the print to stick to the print bed while it's printing (and not warping) but still being able to remove it when the print is done.  Everyone has their magic formula for this from blue painters tape to a specific brand of hair spray to a specific Elmers glue stick applied to the glass.  The easy plastic (PLA) is hard but a little brittle and the other main plastic (ABS) requires a more controlled printing environment so it doesn't cool unevenly, but the result is stronger.

I'm having fun, but 3D printing is currently for people willing to get elbows deep in things, but that may very well be you.
 
I grabbed a printrbot Simple Metal when it was first announced, received it 2-3 weeks ago. A laser cut wood printer was not of interest, nor was spending anywhere near $2K for the makerbot machines. I probably would not have jumped on the printrbot if it were much more than the $600 it cost.

My use is mostly for woodworking gadgets and prototyping new ideas. So far using it has been dead simple, I whacked together a couple models in Sketchup, exported them to .stl files, imported them into Repetier-Host, processed with slicr and printed. Every piece of software in the process is free and works great.

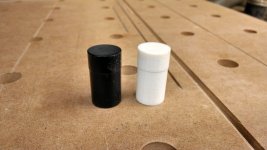
The print quality is only okay, and I don't know enough about this yet to understand if this is due to the limitations of the machine or my own ignorance. The Simple also is limited to printing PLA and it's pretty slow. This little gadget took at least 20 minutes to print:

[attachthumb=#]

[attachthumb=#]

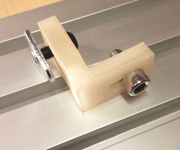
I also found that, printing holes for example, the tolerances are not that good. In another part there was a 6.5 mm hole, and when done it still had to be drilled out for a 6 mm cap screw to fit thru. I assumed a 0.5 mm tolerance would work but apparently not.

On the plus side the Simple has a bed-leveling gadget built in that seems to work, and there was no problem using blue masking tape on the bed and getting the print to stick and come off. Overall it has been a fairly painless experience so far.

RMW 
 

Attachments

  • ScreenClip.png
    ScreenClip.png
    804.1 KB · Views: 446
  • ScreenClip [1].png
    ScreenClip [1].png
    761.3 KB · Views: 555
Thanks for posting that Richard.  If the printrbot simple metal also printed in ABS I think I would be more inclined to get it.

For the print quality, isn't there a way to adjust that (ie. resolution)?  I'm thinking 20 minutes is pretty good for that part. I would have thought it would take over an hour, so maybe try adjusting the resolution and see if that resolves your tolerance issue.  It will definitely add to the print time, but personally I would be more interested in the quality vs print time.

Too bad there isn't a way to demo these 3d printers...maybe Festool will make one and we can use their 30-day guarantee  [tongue]
 
I started doing the research before the metal printerbot came out and a $600 printer was sure tempting, but the MakerGear M2 turned out to be the right decision for me and it does everything the MakerBot does for $500 less, in fact it does more than the MakerBot.  It's also got a 8x8x10 inch build area which is significantly bigger.

Like everyone else I started playing with PLA plastic because it's easier, but I'm pretty convinced now that PLA is good for cute things on your desk, but for anything which needs to be even a little tough ABS is the requirement.  The M2 can also work with some other materials like nylon, but I haven't tried it yet.  The other thing is that PLA loses strength at a lower temp so if you're going to print anything that'll sit in a hot car PLA isn't the way to go.

As for print quality, here is a picture of stuff I've printed recently.  The things in white are ABS, red is PLA.  And yes those nuts and bolts worked, right off the printer and I printed them with 0.1mm layers.  The complex white thing is actually an upgraded extruder drive part for the printer itself - it's cool that a 3D printer can print replacement parts for itself.
 

Attachments

  • 2014-05-05 19.40.14.jpg
    2014-05-05 19.40.14.jpg
    2.2 MB · Views: 648
Richard, I'm also a big user of open source tools, so I started out using Repetier-Host with my M2 and got OK results.  But there's a commercial package called SImplify3D which costs $140 which is just a lot better and worth the money, especially when you get into adding/modifying temporary supports, the free code just doesn't compare.

I also quickly got tired of having my laptop tied up while printing so I switched to a $50(ish) Raspberry Pi tiny computer running OctoPrint controlling the printer.  So now I prepare my prints on my laptop and then upload them via the OctoPrint web interface for printing which I can then use to monitor the progress.  Soon I'll even be able to control the power to the printer that way so I won't have to go downstairs to the printer until I'm going to pick up the print.  I've even got a webcam hooked up so I can watch it print via a browser and it collects a timelapse video and emails me with a picture when the print is complete.  Check out  this timelapse.

 
Sprior, did you get the heated bed? I have a Makibox and I don't have any sticking problems. Right now, I'm building my own using the SainSmart RAMPS kit. Probably going to take a few months, but I'll be able to print much larger pieces.
 
The M2 comes with a heated bed, so yes.  This last week I've been playing with ABS plastic using Elmers glue stick on the heated bed and it seems to be working well.
 
Back
Top