ryanjg117
Member
- Joined
- May 18, 2015
- Messages
- 328
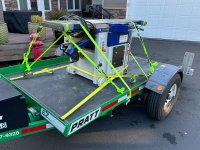
I lucked into a Knapp Profi T 16" jointer/planer combo some months back, a big upgrade from my earlier 8" Delta jointer and Woodmaster planer. Here it is coming home:
[attachimg=8]
(Probably one of my better rigging jobs. The hydraulic lift bed trailer is a great $100 day rental.)
It was in great shape, but missing the back cutterhead guard, shown here:
[attachimg=9]
Fine by me, as I understood from other owners this back guard requires you to completely remove the fence between each jointer/planer conversion, since it's bolt-mounted to the back portion which doesn't rotate. I figured I could 3D print a better solution, one that allowed me to keep the fence installed during conversion, and settled on a two piece design.
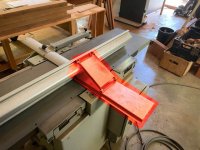
Part 1: Fence stabilizer
[attachimg=3] [attachimg=11]
Without the back-mount, the fence only attaches along the infeed edge of the jointer. It's a good solid attachment, but this is a long fence and it's quite easily to nudge it on the outfeed side. So, I designed a 3D printed bracket fitting a MagSwitch 150 which connects into the T-track along the back of the fence. I was able to use 80/20 T-nuts and M8 SHCS to fix the bracket to the fence. When the switch is activated, it provides a rock-solid attachment to the table, which can't be easily nudged. Also, a bonus, there is "margin" for it to mount behind the planer table, meaning I can still get the full 16" of jointing capacity with this bracket engaged, if I needed it. The only downside - it does fix the fence at 90 degrees. If I wanted to adjust the angle of the fence, let's say to 45 degrees, I would have to remove this bracket or design another for that circumstance. Honestly, I've never had the need to adjust my jointer fence to anything but a perfect 90 and would likely use the track saw, table saw, or router for such an operation anyway.
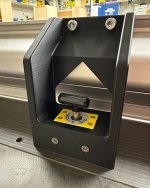
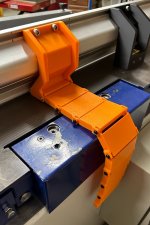
Part 2: The "snake"
[attachimg=4]
Inspired by an older Hammer instruction manual I stumbled upon (I think, can't find it now), I made a segmented/articulating back cutterhead cover which connects in a similar fashion to the magnetic mount, and is attached via M4 screws and nyloc nuts. It has the capacity to completely cover the exposed cutterhead on the back, even when I have the fence pulled all the way up, and slides down nicely when I need to lift the table up.
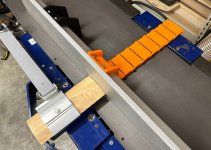
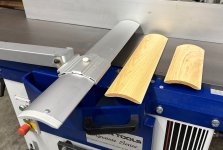
Bonus: Shorter Euro guard inserts
[attachimg=5]
[attachimg=6]
Credit to an AskWoodman video inspiring me to come up with some shorter Euro guard inserts since the OEM insert is massive at around 400mm long. I couldn't find other inserts from SCMI or Felder for less than $300, so I modeled the profile of the OEM guard and cut it on my CNC router using a bullnose router bit, though I could have done it in 10% of the time using a coving jig on the tablesaw.
Ready to work:
[attachimg=7]
P.S. Added a Byrd cutterhead to it as well:
[attachimg=12]
[attachimg=8]
(Probably one of my better rigging jobs. The hydraulic lift bed trailer is a great $100 day rental.)
It was in great shape, but missing the back cutterhead guard, shown here:
[attachimg=9]
Fine by me, as I understood from other owners this back guard requires you to completely remove the fence between each jointer/planer conversion, since it's bolt-mounted to the back portion which doesn't rotate. I figured I could 3D print a better solution, one that allowed me to keep the fence installed during conversion, and settled on a two piece design.
Part 1: Fence stabilizer
[attachimg=3] [attachimg=11]
Without the back-mount, the fence only attaches along the infeed edge of the jointer. It's a good solid attachment, but this is a long fence and it's quite easily to nudge it on the outfeed side. So, I designed a 3D printed bracket fitting a MagSwitch 150 which connects into the T-track along the back of the fence. I was able to use 80/20 T-nuts and M8 SHCS to fix the bracket to the fence. When the switch is activated, it provides a rock-solid attachment to the table, which can't be easily nudged. Also, a bonus, there is "margin" for it to mount behind the planer table, meaning I can still get the full 16" of jointing capacity with this bracket engaged, if I needed it. The only downside - it does fix the fence at 90 degrees. If I wanted to adjust the angle of the fence, let's say to 45 degrees, I would have to remove this bracket or design another for that circumstance. Honestly, I've never had the need to adjust my jointer fence to anything but a perfect 90 and would likely use the track saw, table saw, or router for such an operation anyway.
Part 2: The "snake"
[attachimg=4]
Inspired by an older Hammer instruction manual I stumbled upon (I think, can't find it now), I made a segmented/articulating back cutterhead cover which connects in a similar fashion to the magnetic mount, and is attached via M4 screws and nyloc nuts. It has the capacity to completely cover the exposed cutterhead on the back, even when I have the fence pulled all the way up, and slides down nicely when I need to lift the table up.
Bonus: Shorter Euro guard inserts
[attachimg=5]
[attachimg=6]
Credit to an AskWoodman video inspiring me to come up with some shorter Euro guard inserts since the OEM insert is massive at around 400mm long. I couldn't find other inserts from SCMI or Felder for less than $300, so I modeled the profile of the OEM guard and cut it on my CNC router using a bullnose router bit, though I could have done it in 10% of the time using a coving jig on the tablesaw.
Ready to work:
[attachimg=7]
P.S. Added a Byrd cutterhead to it as well:
[attachimg=12]
Attachments
-
 jointer2.jpeg84.7 KB · Views: 61
 -
 jointer9.jpg361.1 KB · Views: 378
 -
 jointer3.jpg208.1 KB · Views: 409
 -
 jointer4.jpg114.8 KB · Views: 56
 -
 jointer2.jpeg84.7 KB · Views: 407
 -
 jointer1.jpg520.7 KB · Views: 303
 -
 jointer8.jpg433.2 KB · Views: 398
 -
 jointer7.jpg197.9 KB · Views: 387
 -
 jointer6.jpg253.6 KB · Views: 392
 -
 jointer5.jpg159.4 KB · Views: 402
 -
 jointer4.jpg114.8 KB · Views: 414
 -
 jointer3.jpg208.1 KB · Views: 62