- Joined
- May 24, 2014
- Messages
- 388
I am starting a refinishing project on a Modern dresser which looks to be Alder and Walnut, with Burl accents which was pained completely red. Now stripping off the layer of thick red paint and a lot of work to go. I picked up a LS130 yesterday to help with the job and liked the idea of making my own contoured pads. The DIY kit for the LS 130 which will make you one pad is $60, so I thought I would try making my own. I have made some accessories for my Domino, and clips and such for my systainers with my 3d printer, so I thought I would continue to make more accessories.
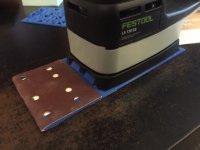
I designed the backer plate in autocad then 3d printed it and glued a block of Polystyrene foam to it, with holes drilled for dust collection. Contoured the block per the DIY pad instructions and added some velcro then added sandpaper.
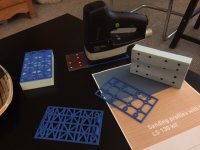
My LS 3d printing accessories
View attachment 1
This is the basic pad set up with the 3d printed back.
View attachment 2
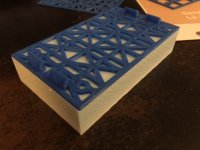
Then after contouring an adding sandpaper.
View attachment 3
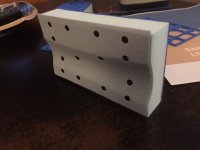
This is the drilling guide to drill the hole in the right place into the foam pads.
View attachment 4
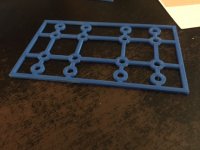
My version of the Flat Sanding Pad Long.
View attachment 5
I am looking at other foams that are a little less firm, but at a savings of $55 per pad I can't complain too much. My printer has already paid for itself in a variety of accessories for my shop and home and I continue to come up with more ideas. If I make a dozen pads at my cost it would be the equivalent of one from Festool, or the equivalent in $720 in Festool pads. That pays for the 3D printer and then some.
If you are using 3D printing for your shop, what are you making? Do you think a 3D printer could be a valuable tool in your shop?
I designed the backer plate in autocad then 3d printed it and glued a block of Polystyrene foam to it, with holes drilled for dust collection. Contoured the block per the DIY pad instructions and added some velcro then added sandpaper.
My LS 3d printing accessories
View attachment 1
This is the basic pad set up with the 3d printed back.
View attachment 2
Then after contouring an adding sandpaper.
View attachment 3
This is the drilling guide to drill the hole in the right place into the foam pads.
View attachment 4
My version of the Flat Sanding Pad Long.
View attachment 5
I am looking at other foams that are a little less firm, but at a savings of $55 per pad I can't complain too much. My printer has already paid for itself in a variety of accessories for my shop and home and I continue to come up with more ideas. If I make a dozen pads at my cost it would be the equivalent of one from Festool, or the equivalent in $720 in Festool pads. That pays for the 3D printer and then some.
If you are using 3D printing for your shop, what are you making? Do you think a 3D printer could be a valuable tool in your shop?
")