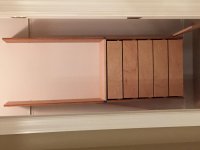
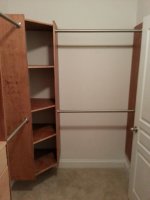
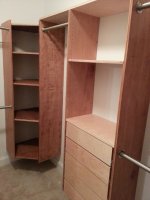
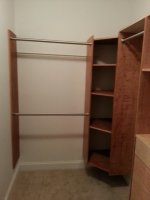
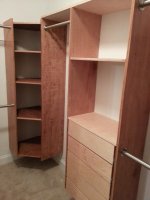
Son, David, just bought his first house, and he wanted to replace the original "wire" closet system in the master bedroom. Here's the design I came up with. It uses Easy Track rails screwed into the studs to hang all the vertical members which were cut from plywood, edge banded, and poly stained. There are five adjustable shelves in each corner, and five drawers (using 14" GlideRite ball bearing drawer slides) in the middle section.
You are using an out of date browser. It may not display this or other websites correctly.
You should upgrade or use an alternative browser.
You should upgrade or use an alternative browser.
A Closet for David
- Thread starter sandy
- Start date
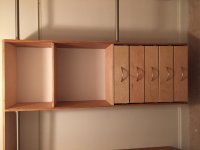
For the drawers, I purchased 8' long prefinished 6" x 1/2" maple drawer stock. It comes already edge banded, with a 1/4" dado cut for the bottom, and it's already polyurethaned, so all I had to do was cut it to length on my Kapex, cut the bottoms from a prefinished 1/4" maple 4' x 8' sheet, and assemble it with 4 mm Dominos (using a Domiplate). The verticals came from big box plywood cut to 14" width and 1824 mm length (close to 6', but a multiple of 32 mm) using the parallel guides, with shelf holes made using an LR32 and OF1400. The verticals and corner shelves were finished using Minwax poly stain.
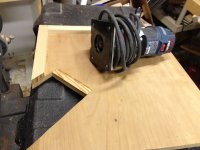
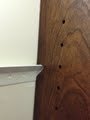
Here's a photo of the jig I created to cut the slots in the verticals so they all hang consistently from the Easy Track rails. You simply flip it over, clamp it to a vertical with the top and side aligned with the guide pieces, and use the Bosch Colt trim router with a 1/4" bit to create the slots. See, close up.
Here's a photo of the jig I created to cut the slots in the verticals so they all hang consistently from the Easy Track rails. You simply flip it over, clamp it to a vertical with the top and side aligned with the guide pieces, and use the Bosch Colt trim router with a 1/4" bit to create the slots. See, close up.
Attachments
I am in Atlanta, and they carry it at Atlanta Wood Products, but I have also seen it at Rockler and Woodcraft. The drawer pieces come in 8' lengths and in 4", 6", and 8" heights, all 1/2" thick.
Since I use 14" wide verticals and 14" drawer slides, I cut the drawer sides to 13" which makes them 14" deep (when butt joined to the fronts/rears). By making the fronts/rears 23" wide, together with the extra 1/2" per side for the drawer slides, the distance between the verticals that house the drawers is 24". With those drawer dimensions you get five drawers out of four 8' pieces with very little waste. In order to have them fit into the rear of my SUV I have two boards cut in half (48" each, which provides eight of the front/rear 23" pieces) and the other two cut at 53"/43" (with the 53" pieces each providing a 23" front/rear and two 13" sides, and the 43" pieces each providing three 13" sides).
Since I use 14" wide verticals and 14" drawer slides, I cut the drawer sides to 13" which makes them 14" deep (when butt joined to the fronts/rears). By making the fronts/rears 23" wide, together with the extra 1/2" per side for the drawer slides, the distance between the verticals that house the drawers is 24". With those drawer dimensions you get five drawers out of four 8' pieces with very little waste. In order to have them fit into the rear of my SUV I have two boards cut in half (48" each, which provides eight of the front/rear 23" pieces) and the other two cut at 53"/43" (with the 53" pieces each providing a 23" front/rear and two 13" sides, and the 43" pieces each providing three 13" sides).
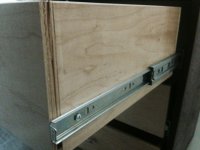
@wow, Thank you, and good question. The ends of the front/back, i.e., both the raw plywood and the drawer bottom notch, are only visible when the drawers are open, so I did not feel that it was necessary to "finish" them. After all, the purpose of using the prefinished drawer stock is to avoid having to do any finishing. Also, portions of the ends of the front/back are covered, in any event, by the drawer slides mounted on the sides of the drawers. I guess I could have mitered the corners which would have made using the Domino (with 4 mm dominos) a bit more difficult, or I could have edge banded the cut ends but most people don't even think of that question; nor do they look at the drawer sides when the drawers are opened, so you must be spending too much time being snowed in up there in the north country. [wink]
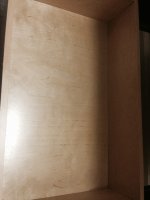
Now, if you're wondering about the drawer bottoms, it turns out that the prefinished bottom stock (4' x 8' sheets) is also finished on one side (hopefully, the side facing up when the drawer is assembled), so if you should happen to show up at David's to do a closet inspection, I will be sure to tell him to keep the closet lights off, but if you're really interested, I have attached photos of a drawer side and bottom.
Now, if you're wondering about the drawer bottoms, it turns out that the prefinished bottom stock (4' x 8' sheets) is also finished on one side (hopefully, the side facing up when the drawer is assembled), so if you should happen to show up at David's to do a closet inspection, I will be sure to tell him to keep the closet lights off, but if you're really interested, I have attached photos of a drawer side and bottom.
Attachments
- Joined
- Nov 14, 2013
- Messages
- 3,574
sandy said:@wow, Thank you, and good question. The ends of the front/back, i.e., both the raw plywood and the drawer bottom notch, are only visible when the drawers are open, so I did not feel that it was necessary to "finish" them. After all, the purpose of using the prefinished drawer stock is to avoid having to do any finishing. Also, portions of the ends of the front/back are covered, in any event, by the drawer slides mounted on the sides of the drawers. I guess I could have mitered the corners which would have made using the Domino (with 4 mm dominos) a bit more difficult, but most people don't even think of that question; nor do they look at the drawer sides when the drawers are opened, so you must be spending too much time being snowed in up there in the north country. [wink]
Now, if you're wondering about the drawer bottoms, it turns out that the prefinished bottom stock (4' x 8' sheets) is also finished on one side (hopefully, the side facing up when the drawer is assembled), so if you should happen to show up at David's to do a closet inspection, I will be sure to tell him to keep the closet lights off.
LOL!
My question wasn't a criticism at all, just curiosity. It was the fact that you used prefinished material that prompted me to ask. It makes sense that you wouldn't have finished them - but if you had, I wanted to know what you did.
No inspection visit is planned. Carry on!
[thumbs up]
Similar threads
- Replies
- 8
- Views
- 2K