African Hardwood Pinless Leg Vice Screw & Chop

carrera4s

Member
Joined
Jul 25, 2014
Messages
33
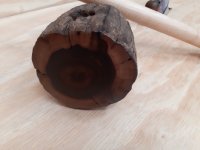
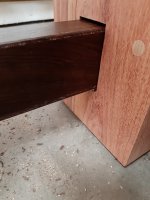
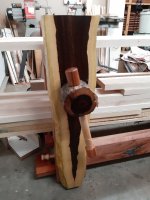
I am busy building a Roubo workbench and have recently finished the screw for the leg vice. The screw is made from leadwood (an indigenous South African hardwood), the handle from maple and the handle knobs from African Rosewood. The diameter of the screw is 64 mm (around 2 1/2 inches), the hub is around 125 mm (5"), the handle is about 30 mm (c 1 1/4"). Overall length is 640 mm (just under 26 inches). The No 4 Stanley is added for scale.

[attachimg=1]

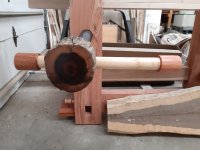
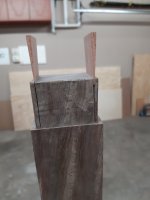
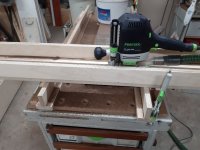
I had to build one custom jig for the internal threads and another router lathe for the external threads. A local engineering shop also made me a custom router bit for the internal threads.

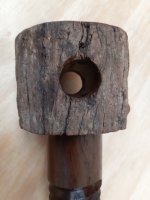
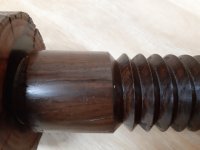
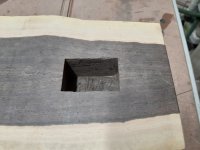
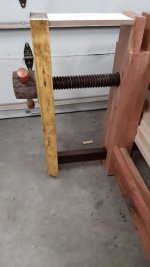
The body of the screw was made from 70 x 70 mm square stock and turned to 64 mm diameter with a 50 mm tenon at the front end. It was then threaded. The hub was turned from a separate branch of the same type of wood (also leadwood) and a 50 mm hole drilled into the end. The main screw was then glued into the hub. A hole was then drilled and the handle added (the handle and knobs were also turned on the lathe).

I finished it with 3 coals of Danish Oil and then added Cobra floor polish to the threads to assist with smooth operation (that is the white you see on the photo - it makes a HUGE difference).

I must say, it turned out almost better than I thought! At one stage through the process I almost gave up, I tried a Beal type (Carter Whitling type) threading approach for the external threads but for some reason I just could not make it work...

I just need to edit my video a bit - will upload it once done and then you can see it in action.

Next up is the chop, will show it when done.  EDIT 13 July 2020:  The chop is now done, see the YouTube video in the comments below.  PS:  I have also made it "pinless" - have a look!

[attachimg=2]
[attachimg=3]
[attachimg=4]
[attachimg=5]
 

Attachments

  • Skroef 1.jpg
    Skroef 1.jpg
    477.2 KB · Views: 831
  • Skroef 2.jpg
    Skroef 2.jpg
    451.9 KB · Views: 764
  • Skroef 2a.jpg
    Skroef 2a.jpg
    460.3 KB · Views: 845
  • Skroef 3.jpg
    Skroef 3.jpg
    427.8 KB · Views: 736
  • Skroef 5.jpg
    Skroef 5.jpg
    508.1 KB · Views: 790
I enjoy watching a YouTube video series by Kieth Rucker and he’s an expert at cutting all types of threads on metal cutting lathes. I would appreciate seeing your method of cutting threads in wood.
 
Looks like a nice project. Please post a pic once you've finished the bench.

I looked up 'leadwood' and one reference shows its density at 76 lbs per cubic foot. For comparison, white oak is listed at 47 lbs/cubic ft.  [eek]
 
Look forward to the video -- the wooden screw looks beautiful.
 
Thanks Guys,

Rob Z, yes, it is HEAVY.  I weighed one piece - 1 180 kg / cubic meter (74 lbs/cub ft).  Water is 1 000 kg / cubic meter, so this will sink in water.  In Afrikaans the local name is Hardekool ("hard coal" directly translated) - that is very apt, the wood is very hard, see these Janka Hardness for a few species:

White Oak:  1,350 lbf (5,990 N)
Hard Maple:  1,450 lbf (6,450 N)
Leadwood:  3,570 lbf (15,880 N) - almost 2.5x as hard as Oak or Maple

The last picture shows the chop: it was 19 kg (c 42 lbs), but it was too heavy, so I have cut it narrower, should be around 11 kg ( 24 lbs) now. Will hopefully have the chop done and installed by the end of next week.

I will posts pics of the full bench when done.
 
And a few photos:

Front view: (the temporary mdf gator was removed to use as template while I am making a brass one)
[attachimg=1]

Side view, about 300 mm (12") of clamping width:
[attachimg=2]

Chop being glued up:
[attachimg=3]

Router sled:
[attachimg=4]

Blind Mortice with angled sides:
[attachimg=5]

Wedged tenon (first time I did a wedged tenon, and then a blind one!  I must say, it was a bit stressfull, but it came out perfect.)
[attachimg=6]

Added some suede leather on the inside (and 3 coats of Danish oil):
[attachimg=7]

Parallel guide going through the leg:
[attachimg=8]

And the guide running on a waxed mild steel flat bar that is attached at the bottom of the stretcher with some WoodRiver UHMW strip for lower friction:
[attachimg=9]


Attachments

  • Leg Vice 9.jpg
    Leg Vice 9.jpg
    553.4 KB · Views: 509
  • Leg Vice 8.jpg
    Leg Vice 8.jpg
    523.1 KB · Views: 564
  • Leg Vice 6.jpg
    Leg Vice 6.jpg
    407.3 KB · Views: 579
  • Leg Vice 5.jpg
    Leg Vice 5.jpg
    510.7 KB · Views: 579
  • Leg Vice 3.jpg
    Leg Vice 3.jpg
    518.7 KB · Views: 553
  • Leg Vice 2.jpg
    Leg Vice 2.jpg
    598.4 KB · Views: 593
  • Leg Vice 1.jpg
    Leg Vice 1.jpg
    351.7 KB · Views: 553
  • Leg Vice 11.jpg
    Leg Vice 11.jpg
    530.3 KB · Views: 583
  • Leg Vice 10.jpg
    Leg Vice 10.jpg
    625 KB · Views: 528
[member=37464]carrera4s[/member]  The natural edge chop looks fantastic, and beautiful work getting it put together on the bench.  BTW, looks like the link to the video is missing.

That wedged tenon is for the blind mortise I assume?  I guess the angled sides then help lock in the tenon as the wedges get pressed in and it expands.  Brilliant.  How much of an angle do you put on the mortise?  And is the tenon otherwise straight, and only acquire a corresponding angle from the wedges?
 
ear3 said:
[member=37464]carrera4s[/member]  The natural edge chop looks fantastic, and beautiful work getting it put together on the bench.  BTW, looks like the link to the video is missing.

That wedged tenon is for the blind mortise I assume?  I guess the angled sides then help lock in the tenon as the wedges get pressed in and it expands.  Brilliant.  How much of an angle do you put on the mortise?  And is the tenon otherwise straight, and only acquire a corresponding angle from the wedges?

[member=37411]ear3[/member] Thanks!  For some reason the link is not showing in Chrome, but when I use Explorer, the link is there - I do not know why.

Here it is again, not sure if it will show in Chrome now (sorry, you have to copy and paste)...
youtu.be/iMiapoEqyis

Yep, the wedged tenon is for the blind mortice.  In most videos I see the guys do a through mortice when attaching the parallel guide and then strengthen it with wedges, but a through mortice would have spoiled the live edge look.  I used a 4 degree wedge (got that angle from Christopher Schwarz).  Yep, the tenon is straight, and the mortice is only angled at the top and bottom.
 
Nice video, very helpful and the cardboard cutout made it immediately apparent what you were doing and how it all worked.

And the Hot Wheels video you have takes me back 50 years, when I used to do the same thing with my HW cars.  [big grin]
 
Rob Z said:
Nice video, very helpful and the cardboard cutout made it immediately apparent what you were doing and how it all worked.

And the Hot Wheels video you have takes me back 50 years, when I used to do the same thing with my HW cars.  [big grin]

Hi Rob Z,

Thanks!

The HW video is my son's video.  Glad to hear he is not the only one "crashing" his cars!  [big grin]
 
Back
Top