Alex's Major Home Improvement Thread

FestitaMakool said:
Couldn’t you install either single or double glazing inside. That way you would have 1+1 or 1+2 insulated? To keep the old glass and frame (which usually are of much better quality than new windows).

I'm not going to do anything with these windows, only paint them, and that's it.

But quality they aren't. Nothing is quality in this house, not even the work by the original builders. Originally meant as a cheap labourer's house, it was built in 1938 for around 7000 euro's. Everything is crooked, walls, doors, floors, everything. They just didn't care as long as it was finished quickly and cheaply. Only luck is the exterior wood, a neighbour of mine called it American Pine, and it is indestructible due to a very high fat content. Water has little effect on it, so it just won't rot.
 
Here in the states, a lot of that pre-WWII lumber was from good slow-growth forests.  It is easy to recognize the tight grain in that old fir or pine.  Also, that old lumber had a lot more resin in it.  I am assuming the drying kilns take it out now, but that is a pure guess.  But yes, that old lumber is definitely better, and definitely heavier. 

I also like those leaded-glass windows.  That adds character. 
 
Alex said:
Well, the long wall of the room has its first layer of plaster. I was trying to do too much at once, so when I got back to where I started in order to smooth things out it was already too hard. I decided to leave it like that and do the smoothing with a second layer. At least now everything is dead straight due to the stuc profiles. Normally you take them out once you filled the spaces between them and fill the seams up in one go, but my big amateur bottom decided to do that the next day.

Need to store the bike in the room for now as the shed where it normally recides is filled to the brim with building materials like wood and plaster.

"stuc profiles",  so I thought those were just rails for the shelving, and where embedded in the wall.  Are those actually something part of the plaster process over there?  Like screed rails for leveling sand when doing a brick patio?

Of course you have a bicycle.  First the dutch door, now the bike.  Just keep checking boxes  [smile]
 
DeformedTree said:
1. Like screed rails for leveling sand when doing a brick patio?

2. Of course you have a bicycle.  First the dutch door, now the bike.  Just keep checking boxes  [smile]

1. Exactly...just oriented vertically rather than horizontally.

2. Now that's hilarious... [big grin]
 
DeformedTree said:
"stuc profiles",  so I thought those were just rails for the shelving, and where embedded in the wall.  Are those actually something part of the plaster process over there?  Like screed rails for leveling sand when doing a brick patio?

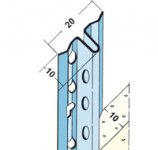
Exactly like those.  They are metal profiles which you stick to the wall temporarily. You can use a few screws or glue them with a bit of plaster. Then fill the space in between with plaster, and then level it out with your screed by scraping it in a zig-zag fashion over the profiles. After you've made it level with the screed you have to take the profiles out and fill their space with more plaster. You can get them in different heights, like 3, 6, 10, 15 & 20 mm. This way you get a straight wall that has exactly the thickness you want.

[attachimg=1]

DeformedTree said:
Of course you have a bicycle.  First the dutch door, now the bike.  Just keep checking boxes  [smile]

If it were summer you might also find some tulips in my house. But you'll never be able to check the wooden shoes box with me.  [big grin]

By the way, I find it amazing that owning a bike isn't standard everywhere like it is here. For us it is like owning shoes.
 

Attachments

  • 055-Untitled-1.jpg
    055-Untitled-1.jpg
    17.3 KB · Views: 615
You’re skilled plasterer and brick layer [cool]
I recognise your technique used by some of the best brick layers I worked with when we sold fireplaces, built on site. Very interesting and fun to watch and learn from them. Your place is going to have the finish it deserves.

But, cheaply build house or not, chances are they build even cheaper now [blink] They might be straighter, thicker insulation and so on, but I doubt the materials and skills. Not knowing Dutch building techniques, but I guess it’s not too far from here, a bit more north.
Good you have quality cladding, me too.. funny, as Ron B also says; slow grown pine with a lot more resin. The core of the pine was used for window frames, as a testament that these windows, some 50-70 year old still hold up well, even in our climate.

Bicycle.. is that an odd piece? Between the bicycles I might even have a pair of wooden shoes as well laying around  [big grin]

 
Alex said:
DeformedTree said:
"stuc profiles",  so I thought those were just rails for the shelving, and where embedded in the wall.  Are those actually something part of the plaster process over there?  Like screed rails for leveling sand when doing a brick patio?

Exactly like those.  They are metal profiles which you stick to the wall temporarily. You can use a few screws or glue them with a bit of plaster. Then fill the space in between with plaster, and then level it out with your screed by scraping it in a zig-zag fashion over the profiles. After you've made it level with the screed you have to take the profiles out and fill their space with more plaster. You can get them in different heights, like 3, 6, 10, 15 & 20 mm. This way you get a straight wall that has exactly the thickness you want.

DeformedTree said:
Of course you have a bicycle.  First the dutch door, now the bike.  Just keep checking boxes  [smile]

If it were summer you might also find some tulips in my house. But you'll never be able to check the wooden shoes box with me.  [big grin]

By the way, I find it amazing that owning a bike isn't standard everywhere like it is here. For us it is like owning shoes.

Interesting, not sure if such things are used in the US when the plaster or not.  I have only ever seen them going over the entire wall, no screeds.  Of course you are also putting on the plaster massively thick compared to here.

On the bicycle, part of the answer is you live in a part of the world where basically everything comes together for them to be viable.  It's flat, distances are short (not a big country), and the possible the most important part, climate.  You are not too hot or too cold.  In the US, there are only a few limited areas where year round bicycle usage is an option to consider.  Not just hobby rides, but to regularly travel by it.  Portland Oregon being one of those few places, and there, they have all sorts of bike. Most places in the US either have months of winter where it's just not an option. Or it's hot as hell and is just another way to end up dead.  You will always find some crazies in these extremes, but it's not stuff anyone would commute on.  We also don't have the dedicated paths.  Most places you are on the roads with cars.  Biking on a pot hole filled road, with tractor trailers going by you, and 3 ton SUVs piloted by the back side of a cell phone, while you are pushing thru 5 inches of salt/slush is not something people are going to do.

If you have the right climate, level terrain, dedicated paths, and viable trips, everything changes.  Most of our urban areas have been altered by zoning, so housing, shopping, and work are in completely separate areas.  So folks have to travel long distances for the simplest of things. 

I think lots of folks like the idea, it's just not really possible.  But lots of folks do have bikes, but they toss them on a rack on their car, drive to someplace, and then go for a bike ride there, then come home. Everyone bought a bike in covid.  I even saw someone go by with a cargo bike, the kind that takes systainers on the front.

If someone had a dedicated path for the 10-15 miles to work, and it never got below ~40F or above ~80F a lot of folks probably would commute on them.  Still, you will find folks in Minnesota in winter biking to work, those folks are out there.

Plus, you can get some form of car cheap, gas is cheap, space is plentiful for the car.
 
Works keep going on, put a lot of hours in the house now I can't work elsewhere due to the corona lockdown here.

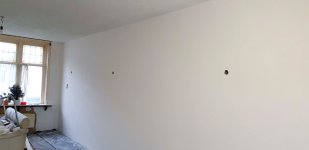
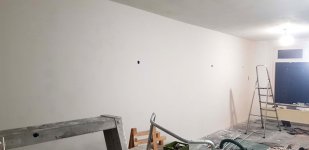
I finished the long wall in the living room, and I am very happy to say it has become dead straight. This sure feels like an achievement for me. Maybe I am not as fast as a real plasterer yet, but at least I can get the same result now.

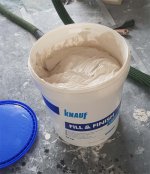
First applied a layer of Fill & Finish paste, this is basically the same stuff that's used in America for skim coats over drywall. This is to remove the last small bad spots. It has a very fine consistency, so it can be applied very thin (smear it out to 0 mm) and dries quickly. When it is dry you have to sand it lightly to get it totally smooth.

[attachimg=1]

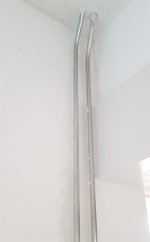
Applied the stuff royally behind the heating pipes. Very difficult to get it all straight behind the pipes in one go.

[attachimg=2]

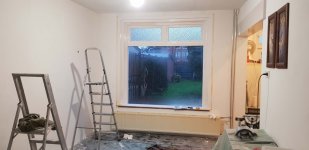
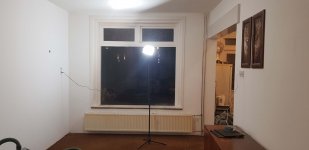
The back window frame also got it's first layer of primer. Looks better right away.

[attachimg=3]

And the full wall in all its glory.  [smile]

[attachimg=4]

[attachimg=9]

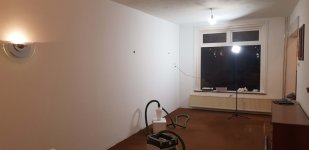
Time to reinstall the lights. Getting cosy again in the room.

[attachimg=5]

Also removed all the floor protection and did a thorough vacuuming.

[attachimg=6]

It's starting to look like a living room again. It has been too long a building site. But I'm not entirely done yet.

[attachimg=7]

[attachimg=8]
 

Attachments

  • 060-20210116_201114.jpg
    060-20210116_201114.jpg
    215.9 KB · Views: 507
  • 064-20210119_210726.jpg
    064-20210119_210726.jpg
    205.2 KB · Views: 480
  • 063-20210119_210210.jpg
    063-20210119_210210.jpg
    214.6 KB · Views: 472
  • 062-20210119_210106.jpg
    062-20210119_210106.jpg
    202.3 KB · Views: 482
  • 061-20210119_175412.jpg
    061-20210119_175412.jpg
    160.4 KB · Views: 512
  • 059-20210116_143711.jpg
    059-20210116_143711.jpg
    200.6 KB · Views: 525
  • 058-20210115_170123.jpg
    058-20210115_170123.jpg
    271.1 KB · Views: 556
  • 057-Untitled-1.jpg
    057-Untitled-1.jpg
    108 KB · Views: 524
  • 056-Fill-&-Finish.jpg
    056-Fill-&-Finish.jpg
    218.9 KB · Views: 506
"Maybe I am not as fast as a real plasterer yet, but at least I can get the same result now."

When I was an apprentice I was told; "get good first, speed comes later".

No use doing it fast if its wrong.

It is a good feeling when you tackle something new and it looks great when you're done. Enjoy!
 
looking good.

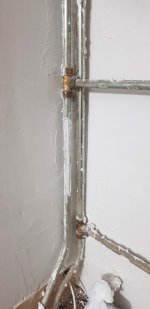
What material are those pipes?  Usually they are iron/galvanized here, plus 100 years of paint for added strength.  Those look to have bends in them, so bit curious.  Not usually exposed except where they pop out of the floor.  Are you planning some escutcheon plate at the top, or boxing them in with something.
 
That wall looks much better than my only foray into plastering in my previous house. I got it mostly straight and smooth, but it took me a lot of time to get there. After that I decided to keep to things I was better at and enjoyed more.  [embarassed] My hat off to you sir! Well done!  [thumbs up]
 
Bob D. said:
When I was an apprentice I was told; "get good first, speed comes later".

Absolutely true.

Bob D. said:
No use doing it fast if its wrong.

At first I was doing it slow AND wrong!  [big grin]

I do enjoy the result of all these blood and tears I have to shed here.

DeformedTree said:
What material are those pipes?  Usually they are iron/galvanized here, plus 100 years of paint for added strength.  Those look to have bends in them, so bit curious.  Not usually exposed except where they pop out of the floor.  Are you planning some escutcheon plate at the top, or boxing them in with something.

They are iron, steel. Bending pipes is a normal thing here, no need to use couplings everywhere. When you have stone houses it is more difficult to hide them than with wooden houses, so you see them very often, especially in older houses where they were added long after the original build. This house from 1938 originally had a chimney in the living room, with a single heater for the entire house, in the middle of the long wall I just plastered. My father removed it in 1982. I do plan on something like an escutcheon plate for the pipes, but have not put much thought in it yet.

hdv said:
That wall looks much better than my only foray into plastering in my previous house. I got it mostly straight and smooth, but it took me a lot of time to get there. After that I decided to keep to things I was better at and enjoyed more.  [embarassed] My hat off to you sir! Well done!  [thumbs up]

Thanks a lot!  [smile]
 
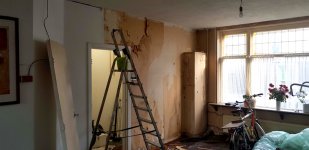
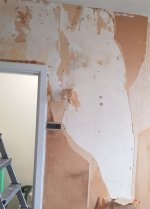
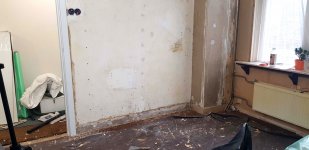
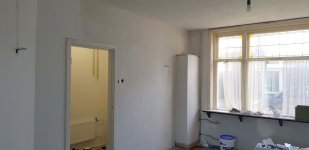
Time to tackle the next wall. Another example of old, rotten mess. 5 layers of wallpaper again. I tell you, sometimes I just want to get the jackhammer  out and level the entire wall instead of scraping that paper off.  [smile]

[attachimg=1]

I was lucky, a large piece came off at once. I was not so lucky with the rest.
[attachimg=2]

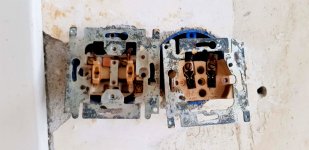
The sockets and switches in the room are 46 years old. Worn out, plastic crumbled, and the metal brittle and corroded by the chalk from the wall. They will have to go.
[attachimg=3]

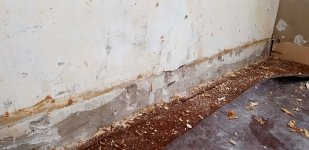
More mess. My father just ripped the old plinths from the wall and put wallpaper over them without levelling anything out.
[attachimg=4]

But in the end I got the wall free off all paper. Now I can build it up again.
[attachimg=5]

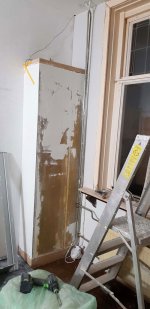
Started plastering it all. Put a corner profile on the corner of the closet to get a nice, sharp edge.
[attachimg=6]

The heating pipes again, difficult. I take it slowly and do it piece by piece.
[attachimg=7]

All done here for now. Nice and white again.

[attachimg=8]

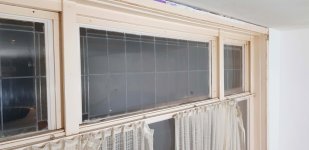
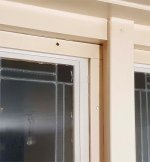
Had a look at the window at the front of the room. I painted these for the last time over 20 years ago. The glass-in-led panels have acryllic panels over them. Funny thing is, the paint behind the acryllic panels is still in its original white, while the rest is totally yellowed, what a difference. Those acryllic panels provide quite some protection gainst UV radiation.

[attachimg=9]

[attachimg=10]

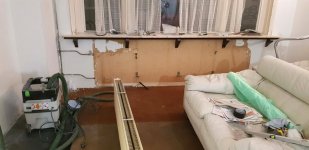
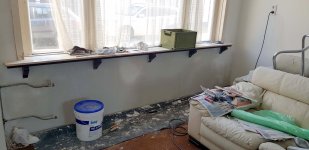
Time to do the very last wall of the room, under the windows. First I have to remove the radiator.
[attachimg=11]

Wallpaper went of easily here, done in 15 minutes.
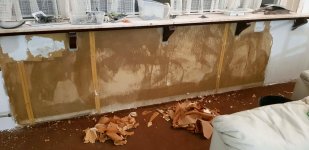
[attachimg=12]

Used plenty of water to remove the wallpaper. I let it dry overnight and applied primer the very first thing the next morning.
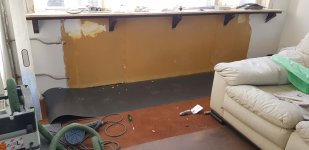
[attachimg=13]

And I plastered it. You can still see the stuc profiles in there, I removed them and filled their space with more plaster.
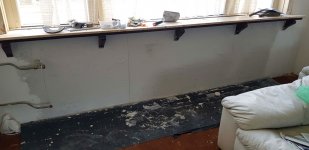
[attachimg=14]

And all done. This is the first time I did an entire patch in one go and it is just good, smooth and straight, no further work needed. Now it needs to dry for a week before I can paint it. Only in the bottom left corner you can see a small plastic bag, this is where my cable for TV and internet enters the house, so I didn't touch it for now to protect the box. I'll fix that later.
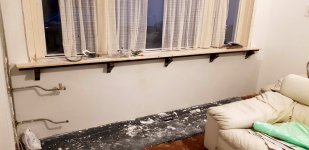
[attachimg=15]

And the entire corner done. Only need to paint it now.
[attachimg=16]

You can see clearly when the plaster is dry or wet. When it is still wet it is grey, and slowly but surely you see white spots emerge and get bigger and bigger every day.
[attachimg=17]
 

Attachments

  • 075-20210120_210339.jpg
    075-20210120_210339.jpg
    299.7 KB · Views: 469
  • 076-20210120_212305.jpg
    076-20210120_212305.jpg
    351.8 KB · Views: 461
  • 077-20210121_124051.jpg
    077-20210121_124051.jpg
    298.5 KB · Views: 468
  • 078-20210121_140415.jpg
    078-20210121_140415.jpg
    305.6 KB · Views: 469
  • 079-20210121_173841.jpg
    079-20210121_173841.jpg
    319.2 KB · Views: 471
  • 080-20210122_134540.jpg
    080-20210122_134540.jpg
    243.6 KB · Views: 463
  • 081-20210122_134549.jpg
    081-20210122_134549.jpg
    345.9 KB · Views: 450
  • 074-Untitled-1.jpg
    074-Untitled-1.jpg
    128 KB · Views: 475
  • 073-20210117_202201.jpg
    073-20210117_202201.jpg
    276 KB · Views: 468
  • 072-20210116_201049.jpg
    072-20210116_201049.jpg
    830.1 KB · Views: 465
  • 065-20201210_125448.jpg
    065-20201210_125448.jpg
    342.3 KB · Views: 477
  • 066-Untitled-1.jpg
    066-Untitled-1.jpg
    186 KB · Views: 482
  • 067-20201211_123200.jpg
    067-20201211_123200.jpg
    224.3 KB · Views: 466
  • 068-20201211_134510.jpg
    068-20201211_134510.jpg
    405.6 KB · Views: 474
  • 069-20201211_134546.jpg
    069-20201211_134546.jpg
    336.9 KB · Views: 481
  • 070-20210116_190135.jpg
    070-20210116_190135.jpg
    318.6 KB · Views: 462
  • 071-20210116_193014.jpg
    071-20210116_193014.jpg
    250.4 KB · Views: 475
Hope you don't discover all that wall paper is load bearing.  [tongue]

Did some looking, looks like there are places that will bend steel pipe for home radiator setups.  It looks like you have compression fittings, so this isn't old school heavy iron pipe.  Radiators here are almost all just part of remodels/restorations. Not many install them new. From what I found, it looks like most folks use iron till into the floor, then switch to PEX when working on there old house.  Obviously this only works on hot water systems, not steam systems.  I'm sure if someone was installing a brand new radiator system, there would be some trendy looking bits. 
 
DeformedTree said:
Did some looking, looks like there are places that will bend steel pipe for home radiator setups.

You just do it yourself with a pipe bender.

I'm putting in a new radiator in the bathroom, and I have to adjust the existing pipe a bit, I'll make some pictures then.

[attachimg=1]
 

Attachments

  • 083-Pijpenbuiger.jpg
    083-Pijpenbuiger.jpg
    54.9 KB · Views: 415
oh, so vastly thinner pipe than what we think of here.  That's more like EMT conduit here, which people bend with the same tools.
 
Tube and pipe, with respect to the mechanical trades, both can be used for a wide variety of process fluids, gasses, or vacuum (with the correct specs).

The difference between them in the trade has to do with how they are called out or specified. Tube usually is sized by the OD and wall thickness, and pipe is known by its nominal size and schedule of which there are about 20 IIRC.

For example look at 1/2" TUBE. You have the 0.500" OD plus a choice of materials (CS, SS, Cu, Al, various plastics, and other materials) and a choice of wall thickness such as .035, .038, or .065" wall, are common wall thicknesses used for instrument tubing.
Example: 1/2" .035" wall 316 SS Tube

For PIPE it would be called 1/2" pipe but almost nothing about it is 1/2". The OD is 0.840", just shy of 7/8". The ID is not 1/2" either, and depends on the pipe schedule. For STD wall or Sch. 40, the wall thickness is .068" and the ID is .704". Not all pipe sizes are available in all schedules. And beginning at 14" NPS and ABOVE, the OD actually _is_ the NPS size, just to make it a little more confusing. And on top of all that add the dozens of different material types and specs.
 
The Tee fittings look like bronze. Are you sure the pipe is still rather than silver painted or plated copper?

Is the heat source steam or hot water? Here, hot water heat “pipe” are just copper tube, but the tubes are seldom bent. They use soldered fittings instead.
 
Oh, I'm very aware of tube vs pipe vs hose, etc.    I just don't know much about how a modern Radiator system would be plumbed.  You don't bend "pipe".  They are using some form of tube for it,  I have no idea what is defined in US building code for that.

When I think radiator systems like that, I think traditional pipe, thus my curiosity.  We bend soft copper in plumbing, but we don't run that for stuff through the house, we used L and M thickness, which you don't bend (but you can by pre-bent stuff that does done with proper bending machines).  We also bend small stuff like supplies under sinks and such.

If it's just a hot water system, not a steam, then there isn't much reason it can't be done just like we do hot water supply plumbing, or radiant floor heating.  But this is why I'm curious to know more specifically what is being used there, a spec. I can't think of anything we do here that is thin wall tube, in steel, used for plumbing.  But I'm not a licensed plumber either.  We used copper or PEX for basically everything, or in some instances of evil, galvanized pipe.  A food plant would have custom stainless plumbing.
 
DeformedTree said:
Interesting, not sure if such things are used in the US when the plaster or not.  I have only ever seen them going over the entire wall, no screeds.  Of course you are also putting on the plaster massively thick compared to here.

A couple of things I noted, I've watched a local plasterer in action and he did not use stuc profiles, he just slathered the stuff on. I really think those profiles are great for getting a uniform plaster thickness.

Nice job on that long wall Alex  [big grin] it does indeed look flat and smooth.

I also like your choice of lighting, those sconces produce some nice shadow lines on the wall which is what Euro lighting has always been about. [smile]

Those "pipes" look similar to our electrical conduit both in the ability to hand bend the stuff and also the exterior finish.

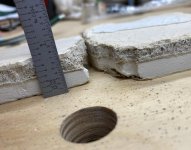
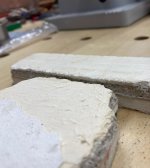
Here is a photo of the bathroom plaster (smooth finish) and the living room plaster (textured finish). It may be difficult to see but there is approximately a 1/8" difference in thickness between the room plasters, the living room plaster being the thicker of the two.

[attachimg=1]

[attachimg=2]
 

Attachments

  • 10033.jpg
    10033.jpg
    253.6 KB · Views: 347
  • 10035.jpg
    10035.jpg
    147.2 KB · Views: 343
Back
Top