Alex's Major Home Improvement Thread

"I am not yet sure what to do here with this hole for the stairs. Make a lid there, or leave it open? There are some practical concerns. Also still deciding on the fence, leave it like this or paint it?"

Make a swing gate for the opening in the railing. It should open out onto the floor and only swing one way. That way if you bump into it accidently you won't fall through the gate into the stairwell. If you hinged the gate such that it could open 180 degrees it could lay flat against the rail when moving materials in and out so as not be a PITA. The risk is you leave it latched open and the safety feature is lost.

If you stain or paint the railing use a contrasting color so it does not blend in with the wall. This could disguise the opening in the floor. Maybe even replace the nosing at the top of the stair with a contrasting color wood to make the edge of the floor easier to see. Sounds a little too industrial I guess but these ideas could be integrated into a home environment without being obtrusive.

I didn't notice any type of heat in the attic space, maybe a lid or hatch hinged at the wall with a counter weight would help keep the house warmer. Place the weight inside a PVC pipe so it does not bang around or get hung up on anything. The weight could be over in a corner or some other place out of the way, just run a rope or cable from the hatch through a couple pulleys.

 
Thanks Bob, good ideas. I'd do like to make a hatch there to keep the heat down in the floors where it is needed. The attic is very well insulated so that's not a problem, but I'm only sporadic there.

The problem with a hatch is that the heater is placed slightly over the hole of the stairs, so I can't make it in one piece unfortunately.

 
Alex said:
The problem with a hatch is that the heater is placed slightly over the hole of the stairs, so I can't make it in one piece unfortunately.

Just move the heater over...slightly.
 
When I look at that picture with the fence then I would expect the heater not to be in the way if you have the hinges of the hatch away from the heater. That is, on the right side of the hatch, as oriented in the picture. Or am I interpreting that picture wrong? It would be quite easy to check with a piece of wood of the proper length that you rotate along that right-side edge. I realise that would make hinging up a bit harder due to the longer span length-wise than oriented the other way, but it would also mean that the hatch won't be anyway near your head when you go up to the attic. Anyway, you will probably have realised this yourself.
 
[member=66485]hdv[/member], if I make a hatch the hinghes will be along the long side, where the wall is. Hinges on the far, short side don't seem like a good idea to me.

DeformedTree said:
Just move the heater over...slightly.

Creating everlasting peace on earth is probably easier.
 
Remember the "dutch door" discussion.  Make a dutch door trap door.  Small half on the heater end.

Opportunity for a fun project, some sort of crazy door/doors.  Maybe a Lamborghini style door with a single pivot that moves up and out.
 
"Hinges on the far, short side don't seem like a good idea to me."

With a counterweight it can be just as easy to open as any other configuration, and as stated might make egress easier. You could even run the rope for the counterweight to the level below so you could open the door/hatch before you ascend the stair.

If you did that the counterweight could be hidden in a pocket in the adjacent wall.
 
https://www.festoolownersgroup.com/index.php?action=dlattach;topic=65274.0;attach=327443;image

Better pictures of the heating interference would help. Until then...

Hollow-core bi-fold doors that fold to store against the wall. Bi-fold keeps folded height below heating equip. Could have a counterweight that keeps them up and use small magnets to keep them closed, after pulling down when going downstairs. Slight push from underneath as you climb would defeat the magnets and doors would fully open.

The existing fence around opening doesn’t look so bad.
 
Alright, some pictures here.

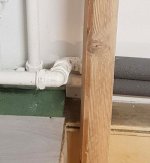
I placed a piece of wood next to the heater so you can see how far it sticks out, it's about 4 cm.

On the right there's this little water tap with the red handle which also sticks out. I could move this though, not that much work. 

[attachimg=1]

This little bend here also sticks out 1,5 cm over the edge.

[attachimg=2]

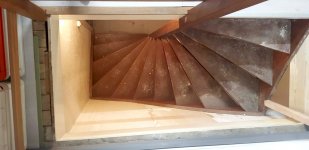
And a full picture of the stairway. The central column of the stairs also sticks out, this is what makes a hatch in the full length impossible.

[attachimg=3]

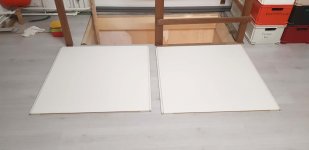
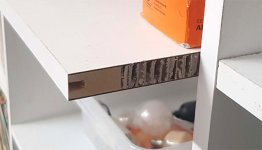
I have these two hollow core boards I want to use for the hatch. They are very lightweight. They exist out of a hollow honeycomb core of cardboard, surrounded by a thin piece of poplar wood on all sides, and thin plastic laminate over it. I can adjust them to the exact size needed.

[attachimg=4]

Here's how that looks inside.

[attachimg=5]

As I have two boards, I was thinking of the dutch door, just like DeformedTree said, and make it in two parts, left and right. The right part is straightforward and not a problem, but the left part will hit the heater and that little bend there. I could just make a small strip of wood under the heater to off-set the difference, but I do not find that a very elegant solution.
 

Attachments

  • 214-Untitled-1.jpg
    214-Untitled-1.jpg
    168 KB · Views: 482
  • 215-Untitled-2.jpg
    215-Untitled-2.jpg
    131.8 KB · Views: 470
  • 216-20210212_211600.jpg
    216-20210212_211600.jpg
    318.6 KB · Views: 474
  • 217-20210212_211939.jpg
    217-20210212_211939.jpg
    220.7 KB · Views: 487
  • 218-Untitled-1.jpg
    218-Untitled-1.jpg
    127.9 KB · Views: 474
Clearly the answer is to move the starcase over 50mm.  [wink]

That top view gives me vertigo just looking at it.
 
Man that is a sticky wicket.

What about two hatch panels hinged on each side (left/right) that meet in the middle and are notched around the central post of the stair. Single action using counterweight would open/close both at once.

The left side with the heater looks to be the trouble side with the heater interference.
 
Yup. like I said, there are some practical concerns. I will let it smoulder in the pot for now and see what comes out of it later. Still a lot to do here.
 
I think a "flat door/floor door" what ever one wants to call it will have some issues no matter what. Have to think about how you interact with it coming up those "stairs". You have to open it while coming up them, or near the start, unless you plan to just use your head to push it up.

Something like a roll cover you roll back to the lower floor end might be an option.

Still, why not box it in on the upper floor with a conventional door into the room. Maybe build cabinets in/around the build out.

Heats going to go up thru the house no matter what, putting a door there really won't change anything energy wise unless you insulate the floor. Plus with stuff in that space, i doubt you want it to become uncontrolled.  I don't think you have kids running around up there were you are trying to either suppress their sounds, or have concern about them falling down the stairs (nothing about that setup is safe). So I guess it comes down to whats the reason for the door. Clearly it has made it a long time without. I guess if a burglar broke in, a locked door might slow them down from stealing your bins or flooring.

I would think something like a hand rail would be more of a priority, but I'm guessing you are in the mode of "I've lived here my whole life without...."
 
It is just to keep the heat from the second floor escaping to the attic. All that requires is a thin hatch that prevents the air from moving.

No, I'm not gonna box it in. I am also not going to make a handrail, totally not needed.

Got no kids running around now, but might not be that long, and then I will make a fence with a gate as somebody suggested above.
 
By the way, I was sanding in the living room today with 180 grit paper on the DS 400, and an odd effect occured. Made a video of it. Shows why it is important that you can dial the suction of your vac down.

I am just holding the hose to prevent it from wandering off, the sander is stuck to the ceiling all by itself.
 
Now you've publicly uncovered the secret of how Festool came up with the idea for the CT wings  [big grin] [tongue] [big grin] [wink]

Kind regards,
Oliver
 
A little bit done again. Now that I'm all done with plaster for a while, it's mostly painting, and a bit of carpentry. I have to adjust parts of the window and doors frames everywhere. Sometimes only a round over with the router, other times fix the miters or make a door fit. Or this:

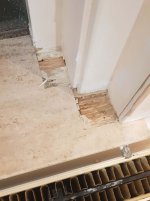
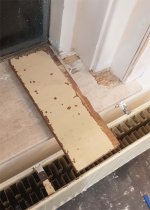
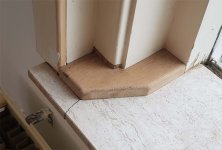
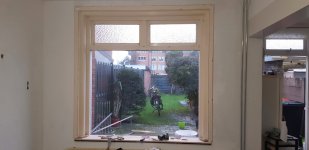
Looking at the window in the back of the living room, for some reason the windowsill did not align with the jambs. Probably wrongly measured before ordering.

[attachimg=1]

Luckily I had some extra oak from the old closet in the attic.

[attachimg=2]

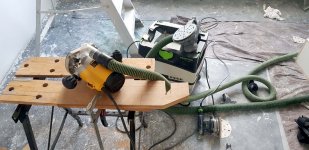
So I quickly put the 70 outside. Just 2 cuts, but I have to haul that whole thing outside. Most of the time I don't bother putting the legs up for a quick cut.

[attachimg=3]

And the rough shape finished with the 70 and the jigsaw.

[attachimg=4]

I had been working this day for over 10 hours already and it was close to 9 PM. I told myself I should quit and finish next day as this could only lead to mistakes. But I was foolish and wanted to finish this first, just a little thing.

So I promptly put the roundover on the wrong side. Bottom instead of on top.

[attachimg=5]

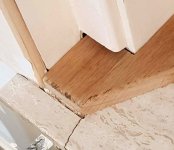
And made it just 4 mm too short on the other side so you'd still see a ghastly seam in front of it. I really should have quit.

[attachimg=6]

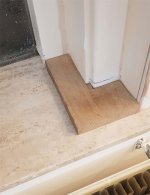
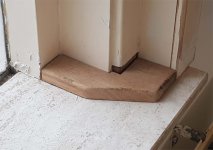
So I had to redo them the next day. At least I had the shapes already, so just a quick copy with a pencil and then cut it with the Metabo jigsaw. Made sure the roundover was at the right side now.

[attachimg=7]

[attachimg=8]

[attachimg=9]

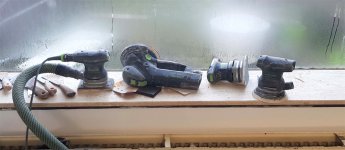
Then I had to sand the entire window and everything around it. A few patches on the wall also, and the radiator beneath. These four always seem to do the brink of the work for me.

[attachimg=10]

And this guys of course. Time for a selfie in my Covid gear.  [tongue] I wear this a lot lately.
 
[attachimg=11]

All the schuren en plamuren done. Time to paint. First two coats of primer on the blank spots and then high gloss paint to finish it. Have to wait a day between each layer as it's all oil based.

[attachimg=12]

And done.

[attachimg=13]
 

Attachments

  • 226-Untitled-1.jpg
    226-Untitled-1.jpg
    191.2 KB · Views: 341
  • 227-Untitled-1.jpg
    227-Untitled-1.jpg
    181.2 KB · Views: 352
  • 229-Untitled-2.jpg
    229-Untitled-2.jpg
    304.2 KB · Views: 338
  • 228.jpg
    228.jpg
    178.2 KB · Views: 341
  • 230-20210112_164021.jpg
    230-20210112_164021.jpg
    298.6 KB · Views: 350
  • 225-20210112_131431.jpg
    225-20210112_131431.jpg
    456.1 KB · Views: 342
  • 224-Untitled-3.jpg
    224-Untitled-3.jpg
    146.6 KB · Views: 344
  • 223-20210111_184606.jpg
    223-20210111_184606.jpg
    250 KB · Views: 344
  • 222-Untitled-1.jpg
    222-Untitled-1.jpg
    182.5 KB · Views: 345
  • 221-Untitled-1.jpg
    221-Untitled-1.jpg
    257.6 KB · Views: 344
  • 220-Untitled-1.jpg
    220-Untitled-1.jpg
    223.1 KB · Views: 351
  • 219-Untitled-1.jpg
    219-Untitled-1.jpg
    192.8 KB · Views: 349
  • 231-Untitled-1.jpg
    231-Untitled-1.jpg
    216 KB · Views: 346
Great recover!  We all make mistakes.  Learning how to blend a mistake away is what separates the "men from the boys" in my book.  And remember next time to "measure twice cut once" and learn from this mistake. 

I enjoyed your progress on this project.  I also enjoy your dumpster diving adventures-probably because I have done the same. 
 
It is a lot of big things and even more small things, you are taking care of them very effectively and making very good use of the lockdown. 

Maybe you need a curfew to stop working after a certain time or after so many hours.  But we all know what it is like to want to finish something that is almost done.
 
Great job Alex, fun to see your challenges going through it’s paces to finish. The window looks great!
But, hrm.. your sanders are dusty [scared] [tongue]
 
Back
Top