Jacks Moonshiner
Member
- Joined
- Aug 9, 2019
- Messages
- 45
[attachimg=1]
[attachimg=2]
Hey there Fellow Festoolians ! Hope everyone is well and enjoying the week …working hard n having fun .
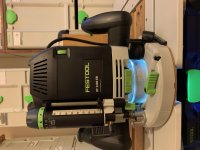
So this here’s my impression of the All4Tools OF2200 Light Unit .
First off I would like to say that although illumination for routers is probably not a necessity, I personally feel that it can greatly assist and improve accuracy and precision on many applications at best, and at worst, can simply be a useful feature that makes things a bit easier when setting up your router .
Some folks here have rightly talked about the fact that most router work is usually dependent on guides, fences, stops etc. and so relying on a visual reference for routing work is mostly unnecessary. I agree with this for the most part , but feel the need to elaborate on when and how illuminating either the workpiece, the bit, or both can be very helpful and sometimes even necessary. Mainly I think the bulk of router illumination’s advantage n benefits come into play more during setup and fine tuning than in the actual milling of the material , be it wood, aluminum or anything else.
To better understand this, I’ve included some simple and straightforward application examples with accompanying photos . These are deliberately oversimplified, and serve more as an abstract example of different situations , than actual real-world routing applications . In other words , these examples are here to demonstrate, inspire and encourage the user to find instances where routing illumination can help them in their workflow. I’ve decided to present it this way as opposed to showing actual work examples , because of the simple fact that I’ve not yet had nearly enough man hours with the light module, but wanted to give y’all the opportunity to decide for yourself if a light module for your OF2200 can benefit you or not, as quickly as possible.
If I may, I’ll show the examples first, and then proceed with the actual review of the light module:
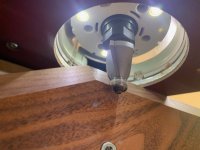
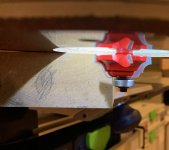
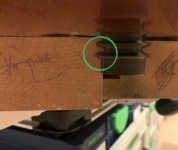
In this first example I’ll show the light’s advantage when lining up a shaping router bit to a predetermined mark . When done without the light, hitting the desired mark is definitely possible, but the photos clearly show how easier this task can be with illumination, as well as potentially improving precision.
[attachimg=3][attachimg=4][attachimg=5][attachimg=6][attachimg=7]
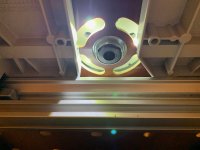
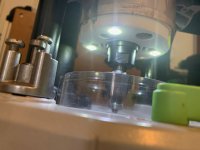
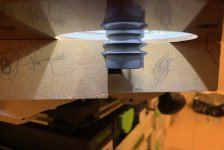
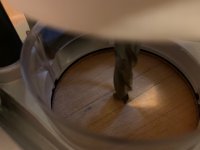
This next example involves using the module as a means to light the surface of the workpiece in order to get a better idea of “what’s goin on “ before, after, or during a routing application, without needing to pick up and move or completely remove the router from its current position. I know I’ve been in plenty of situations where I stopped a template routing task ,for instance, midway ,to check if everything was going as planned .It would have been great to better see the state of my routing , by just de-plunging , but ,alas, even during daytime , on most of these occasions , I had to remove the router completely from its current position if I wanted to get a proper glimpse of the result. With the light ,simply de-plunging and turning it on ,can give a very clear view of the surface.
[attachimg=8][attachimg=9]
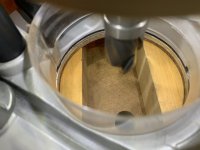
A similar situation is presented here:
[attachimg=10][attachimg=11]
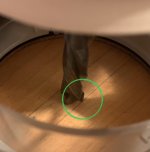
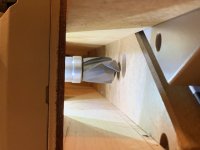
Only here we are checking the state of the bit while still plunged…, its rotation ,position , proximity to ground zero, etc … whatever the user might need to see or examine in a situation such as this . Without illumination, discerning or evaluating these things becomes substantially more difficult , even impossible at times. Of course one could just use a flashlight in there, but…well…
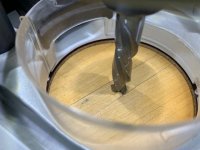
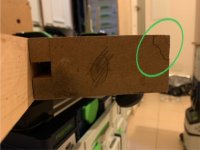
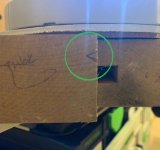
This final example shows the common application of accurately lining up a spiral bit to a scribed line or mark, yes we’ve all done this countless times and got away with not having the bit hit that line EXACTLY , but with illumination it’s that much easier to get it …like Sedge would say…
Dagg-On-Perfect!
 ( I think that’s what he says , anyway….
 )
)
[attachimg=12][attachimg=13]
It’s not immediately noticeable,but if you zoom in and look closely , in the bottom photo where the light is on, you’ll see the tip of the bit actually misses the line by just a hair. Whereas in the pic without the light it looks like it’s right on it.
Illumination helps spot these seemingly minute details.
[attachimg=14][attachimg=15]
Of course, for most applications ,this kind of precision either isn’t needed …or calls for more accurate machinery such as a CNC or Shaper Origin ….but in those cases where you do end up needing or desiring it, a light module will help greatly in achieving just that.
Ok ! I think that’s it for the examples…I gathered I could have conjured up some more or these…as everyone here well knows there are endless applications,tasks…and even more approaches to these tasks , but I gather this sufficiently demonstrates the advantages of a router light module. I would encourage anyone to post more examples here .
Onwards to the unit itself:
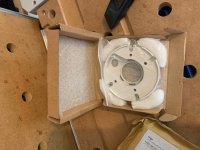
So,…first, the light unit arrived very nicely n neatly packaged …you can tell it’s maker took great care in packing it:
[attachimg=16][attachimg=17][attachimg=18][attachimg=19][attachimg=20]
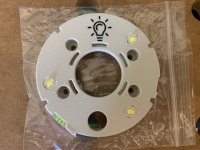
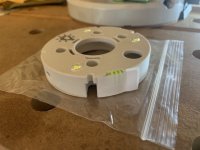
As shown, it’s made of a nice quality plastic, the design is straightforward yet fairly elegant…curves n cutouts are smooth, bevelled nicely and don’t show any tear out or plastic leftovers hanging anywhere.
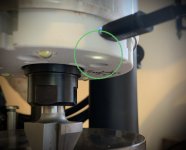
Three LEDs ,equally spaced, and a nifty logo , reside on the top side of the module . The inside houses and hides the electronics I presume , and on the side is the switch(in green, and taped to prevent it from turning on while in transit…a nice idea I think ), and the charging port.
BTW when charging there’s a small additional “concealed” light to indicate that the charging is actually happening :
[attachimg=21]
Run time according to the manufacturer is 6 hours.
Ok… on to Installation:
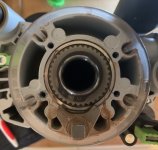
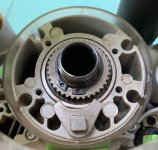
Very straightforward and simple , the eBay listing also provides a video , just unscrew the 4 T15 Screws that secure the black cover . Once that’s done, a good idea would be to clean up in there, before installing the light unit . Before this , I actually never opened that cover ,even though I try to keep all me Festool as sleek,slick,spick n span as I possibly can , so I was more than happy to discover all that dust dirt n grime I could now get rid of:
[attachimg=22][attachimg=23]
There …all clean n shiny(ish)!….Ok one can get it even cleaner I guess but I was keen on trying out that light module already…
Nother thing worth mentioning is that while I was doing that , notice the dust hood is retracted of course , well I “cleverly” pushed the hood latch …..one plastic hood n all 4 springs went up n flying about …clever me. Without a cover to limit the hood from continuing into infinity and beyond, well…it’ll do just that. But I found all the springs and took the opportunity to clean everything that was under the hood ,and re-installed em . So that was also good to discover you can do that.
moving on…
So, after positioning the light module and securing it with the four screws you’re good to go!
Slight Caveat to watch out for :
after I installed it , put in a router bit and proceeded to lock it in with the OF2200’s ratcheting function , I was flabbergasted n dismayed to discover that the ratcheting is not working
 The Horror!
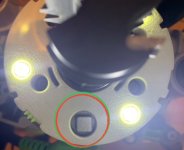
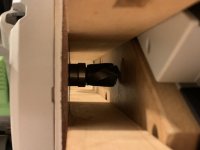
After recovering from my initial shock , I managed to fix it by pressing DOWN on this square part , aka “Festool 494884 Catch” ,
and , Lo an Behold , the ratcheting function was working fine again, so pay attention to that after installing the module.If you see that it’s raised a bit, push it back down to its original position.
[attachimg=24]
Ok !!
So turning the light ON is done with the switch (duh ) , hit that switch back in and you’ll be pleasantly surprised to discover you have just turned the light OFF.
Sorry for that ‘un …it’s getting late …
What else ?
Ah yes,…Color temperature and brightness …
In the OF1010 Light Module YouTube Festool Friday from a few weeks back, Sedge talks a bit about Color Temp ,Calvins and the likes. I honestly ,regrettably, skipped that part , so if you’re interested in learning about that check that out. But in reality this module’s lights seem to be a bluish tint…to my eyes at least.
I , personally , prefer the whitish/warmer tint of Festool’s 1010 light , but I got used to this one pretty quick and now it doesn’t matter that much to me. But if you’re knit picky about that kinda thing …FYI.
Brightness however, like I mentioned in the original post for this light module, can be improved by a wee bit in my opinion, and a 2 brightness setting would be a definite plus if a “Gen2” ever comes out .
But the brightness as it stands now IS totally enough for everything this unit is meant to do, it’s simply a convenience issue for me, as it is a “why not” thing, but of course i have no idea how much extra work is involved in adding more brightness, more LEDs , etc… not to mention if such an improvement might raise the price of the module substantially,so…
A few words regarding Overhead lighting VS. Base /Ring lighting :
In that YouTube vid, Sedge also discusses the benefits of the 1010’s base positioned ring-light vs the more common router overhead lights such as this one. Shadows from the router bits themselves are one thing in particular that allegedly might detract from the quality of the lighting . I mentioned this to the All4Tools dude, and he said he was aware of this, and that a friend of his who uses the OF1010 with a similar unit( not the Festool one) said that he prefers the All4Tools overhead one because the Festool Module cannot be used with the Template Guides .
I thought it would be nice to actually have a double lighting module for the OF2200 , one overhead and one base positioned ring light , but perhaps some might consider that overkill for such a feature.
Regardless ,as it is right now, any shadows I noticed did not seem to interfere with the quality of the lighting in the applications I tested it on.
Another really cool idea that grabbed my mind while testing this out , was for a shiny , mirror-like (chrome ,steel or whatever, )Chip Deflector, that would improve the lighting from under by reflecting it …
Light Reflecting Chip Deflector, if you will.
Similar in concept I guess to the just released translucent Base Runner for the OF1010 ( Base runner LAS-OF 1010 R , 578057).
To sum up .
I really like this module, the price is totally reasonable ( I paid 46 quid for the item, and 12 for international shipping) , I have a very good impression regarding the quality so far, especially considering it’s a third party, aftermarket item . I really like Festool products, and if they ever release a similar light for the OF2200 you be sure I’d darn well will buy it in a split second . Heck if it’s a ring light like the OF1010’s , I’ll use both the Festool AND this one . And if it’s an overhead one like this one , I’d still buy it to compare the two and have a spare if I ever needed one. But until they do, IF they do…this All4Tools module is gonna be working days, nights n overtime for me OF2200 ! I highly recommend it to anyone who likes to have proper illumination when routing .
As a last word, the bloke who makes n sells these on eBay was really kind, nice ,informative n helpful . I dunno his name but he also makes similar light modules for both 1010, and 1400 Routers . Also a bunch of other cool n handy tidbits on his seller listing so check em out if you feel like it. I think he’s on vacation right now cause it’s hard to find all of a sudden , but I’m hoping he’ll reappear soon.
All done I guess. Hope this review was helpful to anyone n everyone reading it. The missus asked me if I’m writing a thesis on thermodynamics or a continuation of Tolstoy’s works ,so apologies if this was rather long. Any feedback, corrections (regarding terminology or anything else), opinions, etc…are greatly appreciated and welcomed, so ….lemme have it , no mercy .If I messed it all up or went completely off board, lemme know and I’ll improve for next time.
I hope.


Take care everyone , hope you enjoyed reading this as much as I enjoyed writing it .
Now let’s get back to some actual work , eh? !!(uh…sleep …then work)
Best Regards
Guy


[attachimg=25][attachimg=26]
[attachimg=2]
Hey there Fellow Festoolians ! Hope everyone is well and enjoying the week …working hard n having fun .
So this here’s my impression of the All4Tools OF2200 Light Unit .
First off I would like to say that although illumination for routers is probably not a necessity, I personally feel that it can greatly assist and improve accuracy and precision on many applications at best, and at worst, can simply be a useful feature that makes things a bit easier when setting up your router .
Some folks here have rightly talked about the fact that most router work is usually dependent on guides, fences, stops etc. and so relying on a visual reference for routing work is mostly unnecessary. I agree with this for the most part , but feel the need to elaborate on when and how illuminating either the workpiece, the bit, or both can be very helpful and sometimes even necessary. Mainly I think the bulk of router illumination’s advantage n benefits come into play more during setup and fine tuning than in the actual milling of the material , be it wood, aluminum or anything else.
To better understand this, I’ve included some simple and straightforward application examples with accompanying photos . These are deliberately oversimplified, and serve more as an abstract example of different situations , than actual real-world routing applications . In other words , these examples are here to demonstrate, inspire and encourage the user to find instances where routing illumination can help them in their workflow. I’ve decided to present it this way as opposed to showing actual work examples , because of the simple fact that I’ve not yet had nearly enough man hours with the light module, but wanted to give y’all the opportunity to decide for yourself if a light module for your OF2200 can benefit you or not, as quickly as possible.
If I may, I’ll show the examples first, and then proceed with the actual review of the light module:
In this first example I’ll show the light’s advantage when lining up a shaping router bit to a predetermined mark . When done without the light, hitting the desired mark is definitely possible, but the photos clearly show how easier this task can be with illumination, as well as potentially improving precision.
[attachimg=3][attachimg=4][attachimg=5][attachimg=6][attachimg=7]
This next example involves using the module as a means to light the surface of the workpiece in order to get a better idea of “what’s goin on “ before, after, or during a routing application, without needing to pick up and move or completely remove the router from its current position. I know I’ve been in plenty of situations where I stopped a template routing task ,for instance, midway ,to check if everything was going as planned .It would have been great to better see the state of my routing , by just de-plunging , but ,alas, even during daytime , on most of these occasions , I had to remove the router completely from its current position if I wanted to get a proper glimpse of the result. With the light ,simply de-plunging and turning it on ,can give a very clear view of the surface.
[attachimg=8][attachimg=9]
A similar situation is presented here:
[attachimg=10][attachimg=11]
Only here we are checking the state of the bit while still plunged…, its rotation ,position , proximity to ground zero, etc … whatever the user might need to see or examine in a situation such as this . Without illumination, discerning or evaluating these things becomes substantially more difficult , even impossible at times. Of course one could just use a flashlight in there, but…well…
This final example shows the common application of accurately lining up a spiral bit to a scribed line or mark, yes we’ve all done this countless times and got away with not having the bit hit that line EXACTLY , but with illumination it’s that much easier to get it …like Sedge would say…
Dagg-On-Perfect!
( I think that’s what he says , anyway….)[attachimg=12][attachimg=13]
It’s not immediately noticeable,but if you zoom in and look closely , in the bottom photo where the light is on, you’ll see the tip of the bit actually misses the line by just a hair. Whereas in the pic without the light it looks like it’s right on it.
Illumination helps spot these seemingly minute details.
[attachimg=14][attachimg=15]
Of course, for most applications ,this kind of precision either isn’t needed …or calls for more accurate machinery such as a CNC or Shaper Origin ….but in those cases where you do end up needing or desiring it, a light module will help greatly in achieving just that.
Ok ! I think that’s it for the examples…I gathered I could have conjured up some more or these…as everyone here well knows there are endless applications,tasks…and even more approaches to these tasks , but I gather this sufficiently demonstrates the advantages of a router light module. I would encourage anyone to post more examples here .
Onwards to the unit itself:
So,…first, the light unit arrived very nicely n neatly packaged …you can tell it’s maker took great care in packing it:
[attachimg=16][attachimg=17][attachimg=18][attachimg=19][attachimg=20]
As shown, it’s made of a nice quality plastic, the design is straightforward yet fairly elegant…curves n cutouts are smooth, bevelled nicely and don’t show any tear out or plastic leftovers hanging anywhere.
Three LEDs ,equally spaced, and a nifty logo , reside on the top side of the module . The inside houses and hides the electronics I presume , and on the side is the switch(in green, and taped to prevent it from turning on while in transit…a nice idea I think ), and the charging port.
BTW when charging there’s a small additional “concealed” light to indicate that the charging is actually happening :
[attachimg=21]
Run time according to the manufacturer is 6 hours.
Ok… on to Installation:
Very straightforward and simple , the eBay listing also provides a video , just unscrew the 4 T15 Screws that secure the black cover . Once that’s done, a good idea would be to clean up in there, before installing the light unit . Before this , I actually never opened that cover ,even though I try to keep all me Festool as sleek,slick,spick n span as I possibly can , so I was more than happy to discover all that dust dirt n grime I could now get rid of:
[attachimg=22][attachimg=23]
There …all clean n shiny(ish)!….Ok one can get it even cleaner I guess but I was keen on trying out that light module already…
Nother thing worth mentioning is that while I was doing that , notice the dust hood is retracted of course , well I “cleverly” pushed the hood latch …..one plastic hood n all 4 springs went up n flying about …clever me. Without a cover to limit the hood from continuing into infinity and beyond, well…it’ll do just that. But I found all the springs and took the opportunity to clean everything that was under the hood ,and re-installed em . So that was also good to discover you can do that.
moving on…
So, after positioning the light module and securing it with the four screws you’re good to go!
Slight Caveat to watch out for :
after I installed it , put in a router bit and proceeded to lock it in with the OF2200’s ratcheting function , I was flabbergasted n dismayed to discover that the ratcheting is not working
The Horror!After recovering from my initial shock , I managed to fix it by pressing DOWN on this square part , aka “Festool 494884 Catch” ,
and , Lo an Behold , the ratcheting function was working fine again, so pay attention to that after installing the module.If you see that it’s raised a bit, push it back down to its original position.
[attachimg=24]
Ok !!
So turning the light ON is done with the switch (duh
) , hit that switch back in and you’ll be pleasantly surprised to discover you have just turned the light OFF.Sorry for that ‘un
…it’s getting late …What else ?
Ah yes,…Color temperature and brightness …
In the OF1010 Light Module YouTube Festool Friday from a few weeks back, Sedge talks a bit about Color Temp ,Calvins and the likes. I honestly ,regrettably, skipped that part , so if you’re interested in learning about that check that out. But in reality this module’s lights seem to be a bluish tint…to my eyes at least.
I , personally , prefer the whitish/warmer tint of Festool’s 1010 light , but I got used to this one pretty quick and now it doesn’t matter that much to me. But if you’re knit picky about that kinda thing …FYI.
Brightness however, like I mentioned in the original post for this light module, can be improved by a wee bit in my opinion, and a 2 brightness setting would be a definite plus if a “Gen2” ever comes out .
But the brightness as it stands now IS totally enough for everything this unit is meant to do, it’s simply a convenience issue for me, as it is a “why not” thing, but of course i have no idea how much extra work is involved in adding more brightness, more LEDs , etc… not to mention if such an improvement might raise the price of the module substantially,so…
A few words regarding Overhead lighting VS. Base /Ring lighting :
In that YouTube vid, Sedge also discusses the benefits of the 1010’s base positioned ring-light vs the more common router overhead lights such as this one. Shadows from the router bits themselves are one thing in particular that allegedly might detract from the quality of the lighting . I mentioned this to the All4Tools dude, and he said he was aware of this, and that a friend of his who uses the OF1010 with a similar unit( not the Festool one) said that he prefers the All4Tools overhead one because the Festool Module cannot be used with the Template Guides .
I thought it would be nice to actually have a double lighting module for the OF2200 , one overhead and one base positioned ring light , but perhaps some might consider that overkill for such a feature.
Regardless ,as it is right now, any shadows I noticed did not seem to interfere with the quality of the lighting in the applications I tested it on.
Another really cool idea that grabbed my mind while testing this out , was for a shiny , mirror-like (chrome ,steel or whatever, )Chip Deflector, that would improve the lighting from under by reflecting it …
Light Reflecting Chip Deflector, if you will.
Similar in concept I guess to the just released translucent Base Runner for the OF1010 ( Base runner LAS-OF 1010 R , 578057).
To sum up .
I really like this module, the price is totally reasonable ( I paid 46 quid for the item, and 12 for international shipping) , I have a very good impression regarding the quality so far, especially considering it’s a third party, aftermarket item . I really like Festool products, and if they ever release a similar light for the OF2200 you be sure I’d darn well will buy it in a split second . Heck if it’s a ring light like the OF1010’s , I’ll use both the Festool AND this one . And if it’s an overhead one like this one , I’d still buy it to compare the two and have a spare if I ever needed one. But until they do, IF they do…this All4Tools module is gonna be working days, nights n overtime for me OF2200 ! I highly recommend it to anyone who likes to have proper illumination when routing .
As a last word, the bloke who makes n sells these on eBay was really kind, nice ,informative n helpful . I dunno his name but he also makes similar light modules for both 1010, and 1400 Routers . Also a bunch of other cool n handy tidbits on his seller listing so check em out if you feel like it. I think he’s on vacation right now cause it’s hard to find all of a sudden , but I’m hoping he’ll reappear soon.
All done I guess. Hope this review was helpful to anyone n everyone reading it. The missus asked me if I’m writing a thesis on thermodynamics or a continuation of Tolstoy’s works ,so apologies if this was rather long. Any feedback, corrections (regarding terminology or anything else), opinions, etc…are greatly appreciated and welcomed, so ….lemme have it , no mercy .If I messed it all up or went completely off board, lemme know and I’ll improve for next time.
I hope.
Take care everyone , hope you enjoyed reading this as much as I enjoyed writing it .
Now let’s get back to some actual work , eh? !!(uh…sleep …then work)
Best Regards
Guy
[attachimg=25][attachimg=26]
Attachments
-
 IMG_6084.JPG607.6 KB · Views: 474
 -
 IMG_6048.JPG89 KB · Views: 424
 -
 IMG_6049.JPG72.9 KB · Views: 428
 -
 IMG_6050.JPG84.3 KB · Views: 426
 -
 IMG_6051.JPG91.2 KB · Views: 424
 -
 IMG_6052.JPG92.4 KB · Views: 428
 -
 IMG_6053.JPG315.5 KB · Views: 422
 -
 IMG_6054.JPG119.7 KB · Views: 424
 -
 IMG_6055.JPG109.4 KB · Views: 421
 -
 IMG_6056.JPG72.6 KB · Views: 425
 -
 IMG_6083.JPG500.2 KB · Views: 428
 -
 IMG_6082.JPG526.4 KB · Views: 429
 -
 IMG_6047.JPG74 KB · Views: 429
 -
 IMG_6046.JPG97.8 KB · Views: 423
 -
 IMG_6045.JPG74.5 KB · Views: 431
 -
 IMG_6085.JPG414.4 KB · Views: 454
 -
 IMG_6035.JPG72.9 KB · Views: 452
 -
 IMG_6036.JPG98.2 KB · Views: 431
 -
 IMG_6037.JPG86.4 KB · Views: 429
 -
 IMG_6038.JPG70 KB · Views: 432
 -
 IMG_6039.JPG87.2 KB · Views: 433
 -
 IMG_6040.JPG71.3 KB · Views: 435
 -
 IMG_6041.JPG90.3 KB · Views: 427
 -
 IMG_6042.JPG74.7 KB · Views: 427
 -
 IMG_6043.JPG80.7 KB · Views: 430
 -
 IMG_6044.JPG43.4 KB · Views: 425


