An unusual way to design a floor lamp - COMPLETED

Frank Pellow

Member
Joined
Jan 16, 2007
Messages
2,743
Earlier this year, I made a cactus coat rack for my granddaughters Brooke and Jamie.  It is now in their bedroom.  See the thread: http://festoolownersgroup.com/member-projects/cactus-coat-rack/

I’m planning to make a floor lamp for Jamie and Brooke’s room that sort of looks like a cactus.  I want to have it made in time for Christmas and have been trying to think of a plan for quite a while.

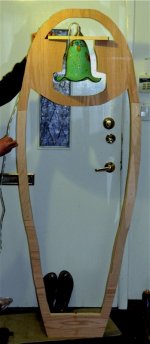
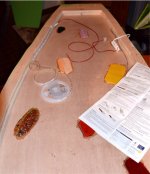
This week, I was inspired by the hanging lamp in Home Depot that is shown below:

[attachthumb=#1]
             
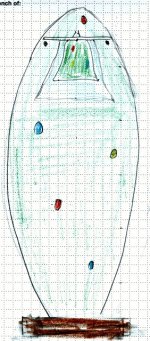
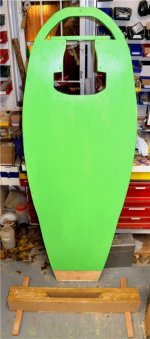
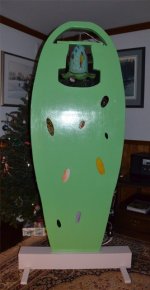
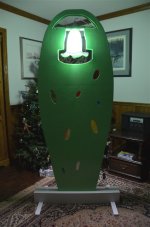
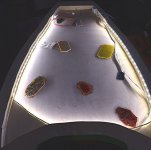
I think that I can design what will sort of look like a flowering cactus around it.  A rough design appears below.  The lamp shade will be secured in an opening in the cactus and will be removable.

[attachthumb=#2]

I'm going to be driving to Ottawa Saturday morning so only have four days to make the lamp.  Wish me luck.
 

Attachments

  • Hanging lamp shade that inspirted a floor lamp cactus.jpg
    Hanging lamp shade that inspirted a floor lamp cactus.jpg
    73.6 KB · Views: 260
  • Cactus floor lamp design.jpg
    Cactus floor lamp design.jpg
    90.6 KB · Views: 283
Today I made a frame for the lamp out of two thicknesses of (nominal) 3/4 inch plywood. 

First, I drew and approximate outline of half the cactus with chalk then cut it out with a jigsaw:

[attachthumb=#1]

I want the frame to be as light as possible so I cut out most of the interior.  The frame will be covered with some very thin plywood.

Here I am using half the frame as a template for the mirror image:

[attachthumb=#2]

And here both halves are being used to mark a piece of plywood to be used for the second layer of the frame:

[attachthumb=#3]

Lots of clamps were employed in the glue-up:

[attachthumb=#4]

A few screws were used as well.

I think that it is going to look OK once the frame is clad and a heavy (MDF) base is added:

[attachthumb=#5]


Attachments

  • Cactus floor lamp 05 -Testing the shade in the frame -small.JPG
    Cactus floor lamp 05 -Testing the shade in the frame -small.JPG
    92.4 KB · Views: 289
  • Cactus floor lamp 04 -Frame glue-up -small.JPG
    Cactus floor lamp 04 -Frame glue-up -small.JPG
    109.4 KB · Views: 250
  • Cactus floor lamp 03 -Using both halves of the frame taemplate to mark a reinforcing piece -sm...JPG
    Cactus floor lamp 03 -Using both halves of the frame taemplate to mark a reinforcing piece -sm...JPG
    100.3 KB · Views: 228
  • Cactus floor lamp 02 -Using half the frame as a template when cutting the second half on the f...JPG
    Cactus floor lamp 02 -Using half the frame as a template when cutting the second half on the f...JPG
    81.8 KB · Views: 225
  • Cactus floor lamp 01 -Cutting along the edge of half the frame -small.JPG
    Cactus floor lamp 01 -Cutting along the edge of half the frame -small.JPG
    95.2 KB · Views: 221
I now have a thin (6 mm thick) sheet of plywood attached to the frame and have started to make a base out of MDF:

[attachthumb=#1]

To reach this stage:

I first cut out the plywood sheet with a jigsaw then cut a few ovals into the plywood:

[attachthumb=#2]

After gluing the sheet to the frame, I sculpted the edge off the "cactus" using 60 grit paper on my Festool Rotex 90 sander.  I love this small sander and am constantly finding new uses for it!

[attachthumb=#3]

There were a few hard to reach places where I used my Festool Deltex sander equipped with an extension pad:

[attachthumb=#6]

I plan to glue pieces of glass behind the ovals.  I conducted this test:

[attachthumb=#4]   [attachthumb=#5]

and am happy with the result.

A very long bit was used to drill a hole for the cord:

[attachthumb=#7]

I then sanded all the exterior surfaces down to 120 grit and applied a primer/sealer coat of paint.


Attachments

  • Cactus floor lamp 11 -Drilling hole for cord -small.JPG
    Cactus floor lamp 11 -Drilling hole for cord -small.JPG
    95.1 KB · Views: 213
  • Cactus floor lamp 10 -Sanding into corners using Deltex sander with extension pad -small.JPG
    Cactus floor lamp 10 -Sanding into corners using Deltex sander with extension pad -small.JPG
    100.5 KB · Views: 220
  • Cactus floor lamp 09 -Test piece of glass viewed from the front -small.JPG
    Cactus floor lamp 09 -Test piece of glass viewed from the front -small.JPG
    73 KB · Views: 193
  • Cactus floor lamp 08 -Test piece of glass glued -small.JPG
    Cactus floor lamp 08 -Test piece of glass glued -small.JPG
    60.9 KB · Views: 193
  • Cactus floor lamp 07 -Sculpting the edge of the cactus with a Rotex 90 -small.JPG
    Cactus floor lamp 07 -Sculpting the edge of the cactus with a Rotex 90 -small.JPG
    87 KB · Views: 209
  • Cactus floor lamp 06 -Cutting ovals into front sheet -small.JPG
    Cactus floor lamp 06 -Cutting ovals into front sheet -small.JPG
    101.7 KB · Views: 234
  • Cactus floor lamp 12 -Testing the cactus in the partly finished base -small.JPG
    Cactus floor lamp 12 -Testing the cactus in the partly finished base -small.JPG
    79 KB · Views: 202
I didn't get much time to work on the lamp today -and I now have only one day to complete it.  [eek]

I did get the base completed (but not yet painted), attach the (removable) back, attach the piece that the lamp shade screws onto, and get one coat of paint on all sides of the upright.

There is only one picture today and it shows the base (on the floor) with the  back side of the upright leaning up behind it.

[attachthumb=#1]
 

Attachments

  • Cactus floor lamp 13 -The base and the back side -small.JPG
    Cactus floor lamp 13 -The base and the back side -small.JPG
    82.8 KB · Views: 281
The lamp has been completed on timer and is now standing beside our tree.  Before Christmas, I need to take it to Ottawa.

Carrying on from yesterday's report, the first thing that I did was to select the glass that is to be glued behind the openings.  One of my hobbies is stained glass work so I have lots of small glass fragments to choose among.

[attachthumb=#1]

Next, I wired the lamp:

[attachthumb=#2]

Here are two photos of the lamp in front of our tree, one with the lamp turned on and one with it turned off:

[attachthumb=#3]   [attachthumb=#4]

It is hard to capture the lighting in a photo, but I can say that the effect is dramatic.  The lamp will definitely be noticed.

I'm now thinking that the effect could be even better if I were to put a strip of LED lights within the cactus.  I may or may not get that done in time for Christmas.
 

Attachments

  • Cactus floor lamp 17 -In front of Xmas tree with the light turned off -small.JPG
    Cactus floor lamp 17 -In front of Xmas tree with the light turned off -small.JPG
    74.1 KB · Views: 287
  • Cactus floor lamp 16 -In front of Xmas tree with the light turned on -small.JPG
    Cactus floor lamp 16 -In front of Xmas tree with the light turned on -small.JPG
    89.4 KB · Views: 285
  • Cactus floor lamp 15 -The interior -small.JPG
    Cactus floor lamp 15 -The interior -small.JPG
    73.7 KB · Views: 219
  • Cactus floor lamp 14 -Selecting glass -small.JPG
    Cactus floor lamp 14 -Selecting glass -small.JPG
    76.6 KB · Views: 202
Because of the freezing rain that we have had in Southern Ontario for the last couple of days, I delayed my trip to Ottawa until Monday.

This gave me the chance to purchase the cheapest LED ribbon kit that Lee Valley sells and to install it inside the "cactus".  It is really really easy to install.

[attachthumb=#1]   [attachthumb=#2]

Again, I can't seem to take a photo that properly captures the effect of the light shining through the glass inserts, but I am very happy with it.
 

Attachments

  • Cactus floor lamp 18 -Installing LED lighting inside the cactus -small.JPG
    Cactus floor lamp 18 -Installing LED lighting inside the cactus -small.JPG
    112.5 KB · Views: 195
  • Cactus floor lamp 19 _LED lighting installed and working -small.JPG
    Cactus floor lamp 19 _LED lighting installed and working -small.JPG
    120 KB · Views: 211
Did you try taking a photo with the flash turned off on your camera but the camera held steady on a foot-stool or table?

I'm sure the LED's add a nice touch to showing the glass inserts.

neil
 
Back
Top