lerberg1969@gmail.com
Member
- Joined
- Jan 28, 2017
- Messages
- 30
Hello!
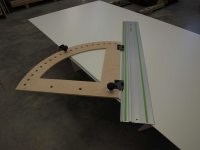
Does anybody know of another jig, simular as in this link, that could take larger angle then 60 degree??https://www.woodpeck.com/woodpeckers-adjustable-track-square.html
Regards
Kåre!
Does anybody know of another jig, simular as in this link, that could take larger angle then 60 degree??https://www.woodpeck.com/woodpeckers-adjustable-track-square.html
Regards
Kåre!
")
")