You are using an out of date browser. It may not display this or other websites correctly.
You should upgrade or use an alternative browser.
You should upgrade or use an alternative browser.
Another loose tenon jig coming to the market
- Thread starter ChuckS
- Start date
GoingMyWay
Member
Here's the video that was embedded in the previous post:
The full URL (youtube.com) and not the shortened URL (youtu.be) needs to be used in order for the video to load properly on the forum.
The full URL (youtube.com) and not the shortened URL (youtu.be) needs to be used in order for the video to load properly on the forum.
Packard
Member
I have the original (all metal) Beadlock loose tenon jig. I think I paid $39.00 for that piece. It works and functions fine. I rarely use it because like the Jessem setup it uses a drill and it is extremely slow to execute.
It does result in a nice tight fitting tenon/mortise joint.
The current version is (I think) $99.00 and the body is molded from resin but the working parts are all steel.
If you are enamored with the process, the Beadlock system is much more cost effective and just as versatile.
It does result in a nice tight fitting tenon/mortise joint.
The current version is (I think) $99.00 and the body is molded from resin but the working parts are all steel.
If you are enamored with the process, the Beadlock system is much more cost effective and just as versatile.
GoingMyWay said:Here's the video that was embedded in the previous
The full URL (youtube.com) and not the shortened URL (youtu.be) needs to be used in order for the video to load properly on the forum.
The video trumps all the photos they've put on the product page, which don't show how one uses the jig at all. It should be on the website. Another video should be produced to show how the mating mid-board is mortised.
Mike Goetzke
Member
- Joined
- Jul 12, 2008
- Messages
- 1,208
Glad I have a Domino jointer - gives me more beer time [big grin].
Packard
Member
It works just like the Beadlock jig, which is to say it is tedious.
Also, conventional drill bits do not like to break into the adjacent hole. That angle lead-in causes the drill bit to veer of to the side. Because of that I would drill the outside holes (the ones at the far right and far left) first to avoid a sloppy fit.
And note that conventional drill bits do not perform well as milling bits, so the horizontal movement will not go as easily as shown.
The beadlock system avoids that by requiring special shaped tenons, which you can buy or make in your shop.
If I were to invest in a tedious joinery method today, I would go with Rockler’s $99.00 beadlock over the equally tedious Jesse, version for $400.00
Packard,
I fully agree that drilling is a tedious task, and no other mortising machine or jig can match the Domino Joiner in terms of speed. But speed is not something every woodworker considers the most important criterion when deciding what to buy or what to use. We all are motivated by different things.
For example, I'd never mull drilling and making an MFT table myself. Yet, to my surprise, one vendor told me he had sold a lot of the MFT hole drilling jigs, despite it was a very tedious thing to drill all those holes! I know one woodworker who owns one of the jigs, but has yet to use it after more than two years of purchase, because his Festool MFT is still in good condition.
Michael Kellough
Member
Packard said:It works just like the Beadlock jig, which is to say it is tedious.
Also, conventional drill bits do not like to break into the adjacent hole. That angle lead-in causes the drill bit to veer of to the side. Because of that I would drill the outside holes (the ones at the far right and far left) first to avoid a sloppy fit.
And note that conventional drill bits do not perform well as milling bits, so the horizontal movement will not go as easily as shown.
The beadlock system avoids that by requiring special shaped tenons, which you can buy or make in your shop.
If I were to invest in a tedious joinery method today, I would go with Rockler’s $99.00 beadlock over the equally tedious Jesse, version for $400.00
Looks like it is an end mill bit.
4nthony
Member
Interesting idea. This is the kind of tool I would've bought when I didn't have confidence in my ability to build jigs to use with the tools I already own.
A trim router on a plunge base and a couple simple jigs (or a complex jig) can do everything the JessEm does and much more for quite a bit less.
I don't see how the JessEm offers any advantages, is faster, or any more efficient. You're still doing a bunch of setup and need additional jigs to work with the jig. Once you're setup for the cut, the router will make the mortise much faster than the bit on the drill. You'll also expand your skillset much more by learning all that the router can do.
For a hobbyist, or someone on a budget, my opinion is the router wins every time.

Otherwise, the JessEm sure looks like a pretty tool.
[member=65451]Steve1[/member] 's jig looks pretty great, too.
A trim router on a plunge base and a couple simple jigs (or a complex jig) can do everything the JessEm does and much more for quite a bit less.
I don't see how the JessEm offers any advantages, is faster, or any more efficient. You're still doing a bunch of setup and need additional jigs to work with the jig. Once you're setup for the cut, the router will make the mortise much faster than the bit on the drill. You'll also expand your skillset much more by learning all that the router can do.
For a hobbyist, or someone on a budget, my opinion is the router wins every time.
Otherwise, the JessEm sure looks like a pretty tool.
[member=65451]Steve1[/member] 's jig looks pretty great, too.
4nthony said:Snip.
Otherwise, the JessEm sure looks like a pretty tool.
[member=65451]Steve1[/member] 's jig looks pretty great, too.
My slotted jig idea was STOLEN!!!
[attachimg=1]
(Note: One template (multiple fences/slots) is shown here.)
Just joking. [tongue] The use of the slotted template and guide bushing to mill mortises has been around for a long time. (I think I first saw it in New Router Workshop around the same time I was watching New Yankee Workshop.)
Attachments

Packard
Member
Michael Kellough said:Packard said:It works just like the Beadlock jig, which is to say it is tedious.
Also, conventional drill bits do not like to break into the adjacent hole. That angle lead-in causes the drill bit to veer of to the side. Because of that I would drill the outside holes (the ones at the far right and far left) first to avoid a sloppy fit.
And note that conventional drill bits do not perform well as milling bits, so the horizontal movement will not go as easily as shown.
The beadlock system avoids that by requiring special shaped tenons, which you can buy or make in your shop.
If I were to invest in a tedious joinery method today, I would go with Rockler’s $99.00 beadlock over the equally tedious Jesse, version for $400.00
Looks like it is an end mill bit.
I suppose that would work.
Steve1
Member
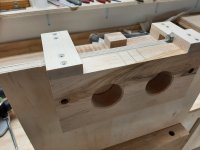
Nice jig Steve1. Why is the support block ( the part just a bit wider than this mortise) so short?
[/quote]
The support for the router base includes the long piece at the front that has the pencil marks on it. So the router has nice, wide plane of support when routing on the edge of a workpiece. The support in the back is limited by the size of the hole in the edge guide. Kinda like 3-point support - router can not tip.
For a narrow piece, I have to put the workpiece flush with the the support surface and use a strap to clamp it in place. (shown in first photo)
For a wide workpiece, I can just drop the jig on the workpiece and it is automatically at the perfect height - then c-clamp it in place.
For mortices on the face of a panel (such as the side of the cabinet), I just use that edge guide without the jig, and mortice location is at perfect height with the piece cut with the jig (same datum).
Attachments

Similar threads
- Replies
- 16
- Views
- 760
- Replies
- 22
- Views
- 1K
- Replies
- 24
- Views
- 24K