The method I used is the one that Michael_Swe posted in the link below so wanted to thank him for his post.
http://festoolownersgroup.com/festool-jigs-tool-enhancements/make-a-perfect-%27mft%27-with-qwas-raildogs/
I just wanted to elaborate on the steps that were taken for any others wishing to make their own MFT top to whatever size they want. QWAS rail dogs also rock!
I started out with a standard 4x8 sheet of 1/2" MDF I got at Home Depot. 3/4" would work as well, but I opted to go with 1/2"
Other tools/materials:
Festool OF1400 router
32 mm Hole Drilling Guide Rail 55" (1400 mm) (496939)
LR 32 Hole Drilling Set (583290)
Euro-hinge boring router bit, 20mm diameter (491072)
Quick Clamp (491594)
F-clamps
Scraps of MDF long enough to make spacers (I cut 3" strips off the MDF sheet)
Festool TS55
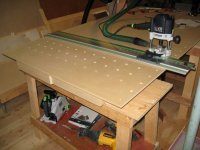
Long edge (right) was cut using TS55 to give a nice straight edge.
Short edge (bottom) was cut 90 degrees to the long edge. This is CRITICAL!
Used the 3-4-5 method to check for square. Used 45"-60"-75" measurements.
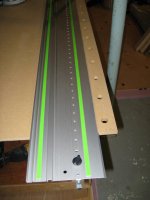
Edge stops are 30 mm offset from long edge.
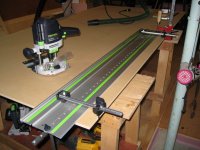
[attachimg=#1]
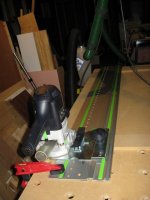
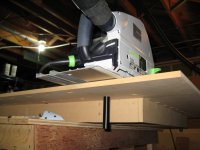
9.5 setting on the guide rail index butted up to short edge of MDF.
I found the 9.5 setting allowed me to make my marks on the guide rail and work off them for the entire top.
Make sure to clamp the guide rail before drilling the holes.
[attachimg=#2]
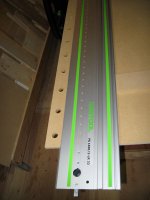
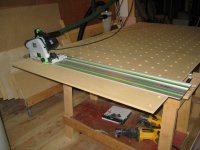
Marked an X on the guide rail on every 3rd hole as I want 96mm spacing between holes.
[attachimg=#3]
Ready to cut the first set of holes.
[attachimg=#4]
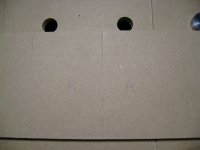
First set of holes done as far as I could go.
[attachimg=#5]
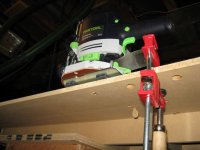
Extending the holes along the side. Overlapped 2 holes so I could plunge the router down and get it aligned with the previous holes.
Using the edge stops at 30mm again. Repeat as often as needed.
[attachimg=#6]
Made 2 spacers out of MDF to use as parallel guides for drilling the holes on the other edge.
Notice they are referenced off the same long edge as the first set of holes.
I guess I could have cut this edge parallel to the other long edge and then used the edge stops, but I chose this method.
[attachimg=#7]
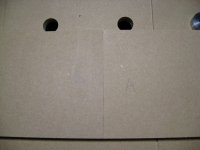
2nd set of holes done as far as I could go.
[attachimg=#8]
Extending the 2nd set of holes. Again overlapped 2 holes so I could plunge the router down and get it aligned with the previous holes.
Using the MDF spacers again.
[attachimg=#9]
Here you can see the router is plunged and locked in that position and the bit is showing through the hole that was already cut.
[attachimg=#10]
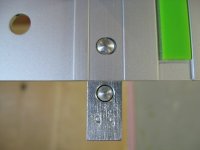
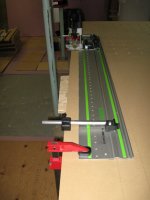
Placed the QWAS rail dogs in the first hole on each side and attached to guide rail loosely.
This allows you to slide the guide rail back and forth.
[attachimg=#11]
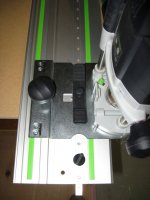
Once again am using the 9.5 setting on the guide rail index referencing off the long edge of the MDF.
Slide the guide rail until the guide rail index butts up against the edge of the MDF and then tighten down the QWAS rail dogs. Slightly pull towards the center while tightening.
[attachimg=#12]
Another photo from underneath.
[attachimg=#13]
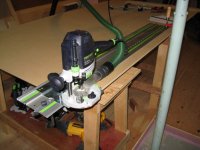
Ready to make the holes.
[attachimg=#14]
Keep repeating all the way down the table.
[attachimg=#15]
Still going.
[attachimg=#16]
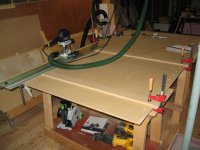
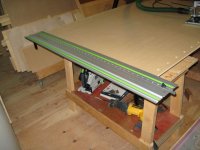
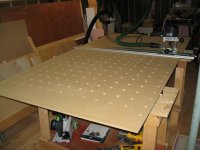
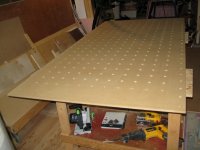
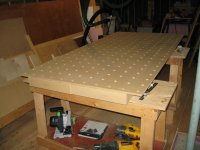
Grid holes are all cut. Now just need to cut to final size.
[attachimg=#17]
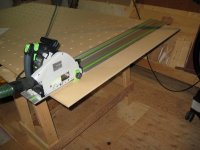
Used the QWAS rail dogs to make the cuts. This worked out quite well.
[attachimg=#18]
Shot from below.
[attachimg=#19]
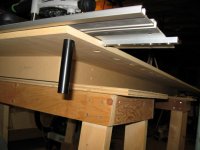
Down at the other end. Did the same thing along each long side and just made 2 separate cuts for each since the QWAS rail dogs kept everything aligned.
[attachimg=#20]
Top cut to final size. This worked out to 1026mm (40 3/8") wide x 1986mm (78 3/16") long. Total of 11 holes wide and 21 holes long.
[attachimg=#21]
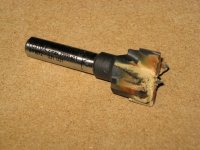
Here is the bit after drilling 231 holes for the grid and another 42 that were drilled along the sides.
[attachimg=#22]
Tested squareness by making a cut and butting the 2 pieces together.
[attachimg=#23]
Piece on the left is then flipped over. Still no gap so dead on square.
[attachimg=#24]
http://festoolownersgroup.com/festool-jigs-tool-enhancements/make-a-perfect-%27mft%27-with-qwas-raildogs/
I just wanted to elaborate on the steps that were taken for any others wishing to make their own MFT top to whatever size they want. QWAS rail dogs also rock!
I started out with a standard 4x8 sheet of 1/2" MDF I got at Home Depot. 3/4" would work as well, but I opted to go with 1/2"
Other tools/materials:
Festool OF1400 router
32 mm Hole Drilling Guide Rail 55" (1400 mm) (496939)
LR 32 Hole Drilling Set (583290)
Euro-hinge boring router bit, 20mm diameter (491072)
Quick Clamp (491594)
F-clamps
Scraps of MDF long enough to make spacers (I cut 3" strips off the MDF sheet)
Festool TS55
Long edge (right) was cut using TS55 to give a nice straight edge.
Short edge (bottom) was cut 90 degrees to the long edge. This is CRITICAL!
Used the 3-4-5 method to check for square. Used 45"-60"-75" measurements.
Edge stops are 30 mm offset from long edge.
[attachimg=#1]
9.5 setting on the guide rail index butted up to short edge of MDF.
I found the 9.5 setting allowed me to make my marks on the guide rail and work off them for the entire top.
Make sure to clamp the guide rail before drilling the holes.
[attachimg=#2]
Marked an X on the guide rail on every 3rd hole as I want 96mm spacing between holes.
[attachimg=#3]
Ready to cut the first set of holes.
[attachimg=#4]
First set of holes done as far as I could go.
[attachimg=#5]
Extending the holes along the side. Overlapped 2 holes so I could plunge the router down and get it aligned with the previous holes.
Using the edge stops at 30mm again. Repeat as often as needed.
[attachimg=#6]
Made 2 spacers out of MDF to use as parallel guides for drilling the holes on the other edge.
Notice they are referenced off the same long edge as the first set of holes.
I guess I could have cut this edge parallel to the other long edge and then used the edge stops, but I chose this method.
[attachimg=#7]
2nd set of holes done as far as I could go.
[attachimg=#8]
Extending the 2nd set of holes. Again overlapped 2 holes so I could plunge the router down and get it aligned with the previous holes.
Using the MDF spacers again.
[attachimg=#9]
Here you can see the router is plunged and locked in that position and the bit is showing through the hole that was already cut.
[attachimg=#10]
Placed the QWAS rail dogs in the first hole on each side and attached to guide rail loosely.
This allows you to slide the guide rail back and forth.
[attachimg=#11]
Once again am using the 9.5 setting on the guide rail index referencing off the long edge of the MDF.
Slide the guide rail until the guide rail index butts up against the edge of the MDF and then tighten down the QWAS rail dogs. Slightly pull towards the center while tightening.
[attachimg=#12]
Another photo from underneath.
[attachimg=#13]
Ready to make the holes.
[attachimg=#14]
Keep repeating all the way down the table.
[attachimg=#15]
Still going.
[attachimg=#16]
Grid holes are all cut. Now just need to cut to final size.
[attachimg=#17]
Used the QWAS rail dogs to make the cuts. This worked out quite well.
[attachimg=#18]
Shot from below.
[attachimg=#19]
Down at the other end. Did the same thing along each long side and just made 2 separate cuts for each since the QWAS rail dogs kept everything aligned.
[attachimg=#20]
Top cut to final size. This worked out to 1026mm (40 3/8") wide x 1986mm (78 3/16") long. Total of 11 holes wide and 21 holes long.
[attachimg=#21]
Here is the bit after drilling 231 holes for the grid and another 42 that were drilled along the sides.
[attachimg=#22]
Tested squareness by making a cut and butting the 2 pieces together.
[attachimg=#23]
Piece on the left is then flipped over. Still no gap so dead on square.
[attachimg=#24]
Attachments
-
 Homemade MFT Top 004 (Custom).JPG193.5 KB · Views: 1,699
 -
 Homemade MFT Top 010 (Custom).JPG129.9 KB · Views: 1,347
 -
 Homemade MFT Top 014 (Custom).JPG163 KB · Views: 1,238
 -
 Homemade MFT Top 012 (Custom).JPG173.3 KB · Views: 1,297
 -
 Homemade MFT Top 017 (Custom).JPG144.5 KB · Views: 1,233
 -
 Homemade MFT Top 040 (Custom).JPG145.8 KB · Views: 1,390
 -
 Homemade MFT Top 021 (Custom).JPG180.2 KB · Views: 1,262
 -
 Homemade MFT Top 023 (Custom).JPG139.9 KB · Views: 1,271
 -
 Homemade MFT Top 049 (Custom).JPG160.5 KB · Views: 1,237
 -
 Homemade MFT Top 048 (Custom).JPG158.2 KB · Views: 1,287
 -
 Homemade MFT Top 026 (Custom).JPG173.8 KB · Views: 1,255
 -
 Homemade MFT Top 032 (Custom).JPG147 KB · Views: 1,239
 -
 Homemade MFT Top 036 (Custom).JPG142.7 KB · Views: 1,257
 -
 Homemade MFT Top 027 (Custom).JPG187.2 KB · Views: 1,309
 -
 Homemade MFT Top 038 (Custom).JPG185 KB · Views: 1,235
 -
 Homemade MFT Top 054 (Custom).JPG162.2 KB · Views: 1,204
 -
 Homemade MFT Top 061 (Custom).JPG158 KB · Views: 1,539
 -
 Homemade MFT Top 062 (Custom).JPG167.8 KB · Views: 1,209
 -
 Homemade MFT Top 066 (Custom).JPG160.9 KB · Views: 1,187
 -
 Homemade MFT Top 068 (Custom).JPG179.6 KB · Views: 1,263
 -
 Homemade MFT Top 078 (Custom).JPG166.6 KB · Views: 1,189
 -
 Homemade MFT Top 103 (Custom).JPG219 KB · Views: 1,254
 -
 Homemade MFT Top 091 (Custom).JPG142 KB · Views: 1,199
 -
 Homemade MFT Top 092 (Custom).JPG145.2 KB · Views: 1,187