Apparently I need More Practice

Ray.DuBose

Member
Joined
Oct 11, 2019
Messages
27
New Festool Owner here, just purchased a TS75, Domino 700, Midi Dust Extractor and a MFT/3 table. 

Use to working with table saw and standard joinery, making 3/4 plywood box for the wife and nothing seems to line up. 

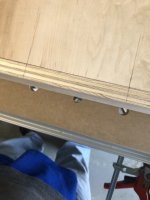
Breaking down Sheet goods with the TS75 and 1900 track, I measure 26" cut and it's like a mm or two short of that.  Doing some reading it looks like may need to make sure my track is on my good side not my track side.  Not 100% sure how I had it originated looking back but I'm guessing my 1-2mm is the saw kerf.

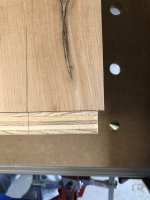
Not sure what's going on with the domino.  laid out my parts and scribed my lines.. popped dominos in and put them together and it's like it shifted 5mm or so down so down.  not sure at all how this happened.

Not sure what happened, more frustrated with myself than anything I guess and be more aware were my cut lines are.  Cutting on the MFT3 table is usually fine but I'm aligning the scribe line to the kerf the saw cut in the MDF.  Also need to figure out why my domino isn't sliding very smooth and sometimes jerks when it starts to go in the wood, maybe I'm pushing to fast.

Ray

 
[member=71469]Ray.DuBose[/member] In an ideal world I'd recommend you take an end user training class. Once the saw is married to the guide rail after its first cut wherever you place the rail is where it's going to cut. Line up the splinter strip with the pencil line and that's what you'll get.

Domino requires a slow and steady plunge, fast release. I like to position myself so I'm using my hip to basically do the work. Hand at rear of machine against my hip and I go slow. It makes a difference.

Hang in there. One thing I've learned is when something goes wrong it isn't the tool it's something I'm doing wrong.
 
Like DynaGlide said, the plastic edge of your guide rail is the key to using a track saw. Where the plastic line lays is exactly where the inside edge of your saw blade will be. Line up to that, instead of trying to use the kerf in your table.

There's so little resistance on the Domino, it's very easy to over-feed it. Just take it slow and the cut quality will improve. You'll figure out the optimum feed rate for the material you're cutting after a few dozen mortises.

This is strictly a guess, but I'm guessing your Domino joints didn't come together correctly because you didn't index off the mating surfaces. It isn't important that the mortise be in the exact center of your material, but it is important that you reference from the adjoining surfaces of both pieces.
 
"Line up the splinter strip with the pencil line and that's what you'll get."

Provided your track is laying on the 'keeper' piece, that is, the piece your measurement is of.

So you are correct in your thinking that IF you had the track laying on the offcut piece then the saw kerf would remove about 2mm from the piece you want.

It's best if possible to place the track on the piece you want so that the track will support the top surface of the wood and prevent splintering. You can go back and analyze you cuts and figure out where the track was placed for the cut. If you offcut (the waste piece) has a nice clean edge and your workpiece has a slightly ragged edge then you probably had positioned the track on the offcut. Sometimes that can't be helped, but in most cases you can avoid it.
 
Been there done that.

Just take your time. This isn't different than any other sport/job/hobby - practice makes perfect. Get some scraps and get busy.

I've been a track saw user for over 20 years. Close to two years ago I switched to a plunge saw. Last weekend the ends of my cuts had a curve to them. I stopped and got some scrap wood and found my issue was letting the saw rise before the blade stopped.

Just a different way to learn to work.
 
Another newb mistake to make with the saw (that I made too many times initially) is to line the track to the line, but have the track the wrong way around such that the kerf cuts into the part rather than into the off cut. Parts end up a few mm too short b/c the saw kerf ate it up.
 
Yea that's what I think I'm doing with the saw.. I'm not keeping tabs as to my track orentation.  so like the 26" piece is true 26" one direction and then like a couple mm's less on the other direction.  Just things I didn't have to consider in the past.

todd_fuller said:
Another newb mistake to make with the saw (that I made too many times initially) is to line the track to the line, but have the track the wrong way around such that the kerf cuts into the part rather than into the off cut. Parts end up a few mm too short b/c the saw kerf ate it up.
 
Yea I had the domino oriented the right way but I'm guessing I screwed up mating my pieces.  The lines seem to be aligned still but the whole thing is shifted over. 

View attachment 1

View attachment 2

jeffinsgf said:
Like DynaGlide said, the plastic edge of your guide rail is the key to using a track saw. Where the plastic line lays is exactly where the inside edge of your saw blade will be. Line up to that, instead of trying to use the kerf in your table.

There's so little resistance on the Domino, it's very easy to over-feed it. Just take it slow and the cut quality will improve. You'll figure out the optimum feed rate for the material you're cutting after a few dozen mortises.

This is strictly a guess, but I'm guessing your Domino joints didn't come together correctly because you didn't index off the mating surfaces. It isn't important that the mortise be in the exact center of your material, but it is important that you reference from the adjoining surfaces of both pieces.
 

Attachments

  • IMG_2348.jpeg
    IMG_2348.jpeg
    193.1 KB · Views: 221
  • IMG_2350.jpeg
    IMG_2350.jpeg
    135.8 KB · Views: 253
I always use the narrow setting on my Domino for one side of the wood and the middle width setting for the other side. This gives me some “wiggle room” when mating the two pieces.

I will get a jerk on the Domino if the bit contacts the wood too quickly. It’s like other things in life, slow first then faster
 
Ray.DuBose said:
Yea I had the domino oriented the right way but I'm guessing I screwed up mating my pieces.  The lines seem to be aligned still but the whole thing is shifted over. 

View attachment 1

View attachment 2

Okay, your mating surfaces are flush...that's good. Did you align the Domino to your pencil lines, or did you use the built-in stops? Do your two panels measure the same? Is the other end flush, but the pictured one is offset, or are both offset?
 
Ray.DuBose said:
The lines seem to be aligned...
I think that’s the problem - If your lines are aligned but your edges aren’t, then the only explanation is that the lines must be wrong. So to me, this looks like an issue with your marking up, rather than something you did wrong with the domino itself.

It’s also possible you marked up the position for your dominos, then flipped the horizontal board over without realising, and put the dominos in the wrong side (by drawing your domino line across the whole edge of the piece, you’ve made it easier to make orientation mistakes later on).
 
Ray, please check to see if your DF 700 is properly aligned, meaning that the scribed lines on your tables is cent red with the cutter.
If it’s not aligned correctly then the cutter will shift your mortise to out side on part A and the other way on part B.
Check out “ half inch shy” you tube for pointers and alignment tipsRick
 
If there was an alignment issue on the machine, his pencil lines wouldn't line up after he fitted everything together.

I think before he goes chasing alignment problems with the machine, he should rule out a simple, easy to do marking-up error.
 
Agreed.  And on one he's about 1mm off and the other two are nearly spot on.  So he just needs a little practice lining it up and plunging to keep the machine on the mark.  The good news Ray is that it's a short learning curve.  If you can, get yourself a combination square so you can set your marks consistently on both panels. 
 
Yea, it was like it slid over before I put the marks down.  all my marks lined up.  Redid how I layed out and the rest of it seem to go o.k. It's defiantly me and not the machine.

Spandex said:
If there was an alignment issue on the machine, his pencil lines wouldn't line up after he fitted everything together.

I think before he goes chasing alignment problems with the machine, he should rule out a simple, easy to do marking-up error.
 
Mike Goetzke said:
Been there done that.

Just take your time. This isn't different than any other sport/job/hobby - practice makes perfect. Get some scraps and get busy.

I've been a track saw user for over 20 years. Close to two years ago I switched to a plunge saw. Last weekend the ends of my cuts had a curve to them. I stopped and got some scrap wood and found my issue was letting the saw rise before the blade stopped.

Just a different way to learn to work.

What Mike said!  And thanks for the reminder about not letting the saw rise before the blade stopped.  I have to keep reminding myself - it chews up the splinter strip and makes weird marks on the piece you're cutting.  I have the same thing with the Kapex and lifting too early... tends to send pieces shooting.  No bueno.

Ray - I've been in your shoes for the last couple years.  I've done a lot of projects in that time and just now feel like I'm getting the hang of things.  Best thing you could do now is watch some more of the great how to videos and read more of the detailed manuals and posts.  There are some awesome supplemental manuals for the Domino/MFT.  And lots of knowledgeable users have great Youtube videos.
After that, practice on scraps before you make the real thing.  I have to constantly remind myself to make a trial piece before jumping in.  I tend to practice on the real thing... and then have to go cut another piece.

The Festool setup you have is a huge leap ahead from a basic circular saw and a pocket jig.  It will give you amazing capability... but a good percentage of that capability will only be realized once you are super familiar with how to use the tools.

I had frustration at first with the Domino.  Learned that I was plunging too fast and I was putting downward pressure on the handle.  Now I go slowly and use my push hand by the plug it connector to plunge straight.
I also found that my fence jumped on one of my projects - I pushed too quickly and the bit grabbed.  Found out the fence tightening lever wouldn't cinch down enough.  Quick search showed this is a common problem.  There's a hex screw on the top of that lever that you can loosen - then spin the lever counter clock-wise - then tighten the screw.  This allows you to tighten the lever harder and prevent the fence creep.

Also, if you use the flappers to align edges make sure you test the distance.  There are a lot of post/vids showing how to check that.  And it's in the supplemental manual.
Check the center line on your clear gauge, as well.  Mine needed some fine tuning to get things lined up when using marks.  Halfinchshy has a good video on how to set this.

From a fellow Festool noob - hang in there and keep practicing/learning. :D
 
Back
Top