Ash Chairs

Rutabagared

Member
Joined
Jan 27, 2008
Messages
298
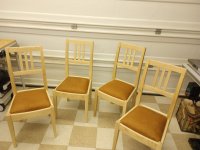
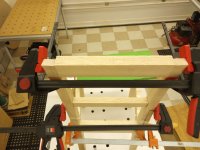
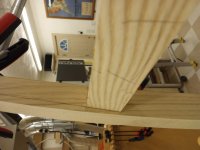
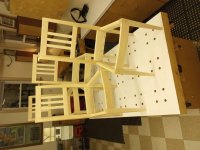
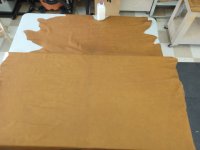
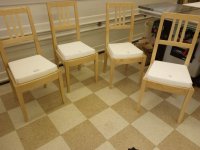
Ash chairs, companions to the Ash Table and Sideboard I recently posted.  Thanks for looking.

Designed in Fusion 360 based loosely on a Garett Hack design in Fine Woodworking many years back.  Chairs are challenging to me. This set in particular as it was the first time using my own design.  The design process seemed to take about as long as the build process.  I always start out with good intentions to log the hours.  But that quickly falls apart.

[attachimg=1]
 

Attachments

  • Ash chairs1.jpg
    Ash chairs1.jpg
    472.1 KB · Views: 386
I’ve found chairs require a lot of mock-ups once the rubber meets the road – i.e., when dealing with the actual parts and their dimensions.  This is necessary to determine seat rail angles/lengths, back assembly rail and slat compound angles/lengths, etc.  I start with a plan view of the seat rails/legs – in particular, what angle to cant the legs inward, width of seat rear (rear rail length and angle with rear legs) and desired front seat width.  From there I determine the desired seat depth.  Then, Fusion 360, mock-up and summoning sohcahtoa, I can determine side rail lengths and their angles of attachment to the front and rear legs.  Front rails are 90º to the front legs.  “Exact” front rail length is the last dimension I determine.

I used only 8/4 stock.  I attempted to pragmatically select the straightest grain stock for the legs and rails, and cut narrower pieces (i.e., anything less than 2” wide) from the center of flat-sawn, 8/4 boards (back slats, lumbar and crest rails).

The good news is that after all this fiddly work, the Festool Domino makes short work of all the mortising.  Angles and compound angles?  - No problem!  Set the fence angle appropriately (just like you would at 90º) register on the workpiece, register the face of the domino as you would with a 90º and plunge away.  The gotchas are ensuring you use consistent reference faces/edges, ensuring selected domino lengths/mortise depths don’t pierce through show surfaces, and staggering domino lengths where they intersect in both front and rear legs.  In other words, the same gothcas as 90º joints.

I always use templates and jigs for rear legs.  Rear leg jig.

[attachimg=1]

Seat rails cut and mortised.

[attachimg=2]


Attachments

  • 3 leg jig.jpg
    3 leg jig.jpg
    592.3 KB · Views: 391
  • 4 rail mortises.jpg
    4 rail mortises.jpg
    539.4 KB · Views: 381
Mock-up time.
Seat rails:
[attachimg=1]
 

Attachments

  • 5 chair mockup.jpg
    5 chair mockup.jpg
    642.9 KB · Views: 384
Back assembly mock-up in order to determine compound angles and lengths of crest and lumbar rails. I draw two lines on the inside surfaces of the rear legs; a centerline for the mortises and a line to register the front faces of the crest and lumbar rails.  I then trial cut scrap rail material until it fits snuggly between the legs registered on these lines.  By the way, the Bessey EHK series rapid action clamps are the bomb.  Ordered for this project and have since ordered many more.  They always ship quickly through HD and they have an attractive set of smaller sizes (6 and 12”).  I 've used them more than any other clamp in the shop, including for edge glue-ups instead of parallel cabinet clamps.

Lumbar rail:
[attachimg=1]

Crest rail:
[attachimg=2]

[attachimg=3]
 

Attachments

  • 10 chair mockup crest rail.jpg
    10 chair mockup crest rail.jpg
    419.1 KB · Views: 365
  • 9 chair mockup 4.jpg
    9 chair mockup 4.jpg
    528.5 KB · Views: 376
  • 8 chair mockup3.jpg
    8 chair mockup3.jpg
    385.4 KB · Views: 371
View from top (I verify the rail faces are coplanar with a straight edge).

[attachimg=1][attachimg=2]
 

Attachments

  • 11 chiar mockup top.jpg
    11 chiar mockup top.jpg
    320.9 KB · Views: 355
  • 12 chair mockup top1.jpg
    12 chair mockup top1.jpg
    507.4 KB · Views: 364
Mock-up for back slat lengths and a sanity check before cutting rail and rear leg mortises. 

[attachimg=1]

I cut the back assembly mortises in the rear legs by offsetting a reference surface (straight-edged piece of ¾” MDF) along a line offset from the desired location by 10mm, registering the base of the Domino against this.

[attachimg=2]
 

Attachments

  • chair layout rail mortises spacers.jpg
    chair layout rail mortises spacers.jpg
    450 KB · Views: 357
  • rear leg mortises.jpg
    rear leg mortises.jpg
    581.7 KB · Views: 348
Time to lay out the back slats.  (Note to self – know the minimum stock thickness requirements of the Domino and leave the slats over-sized, cut the mortises, then plane to final thickness.).  I planed them all to final thickness only to realize they were too thin for mortising.  Redo time.

[attachimg=1]

Miscut mortises plugged.  I don’t remember what led to this.  But I usually miscut at least one set during a build.  I also usually ruin a rear leg and a front leg as well.  Note that the mating mortises (bottom edge of crest rail and top edge of lumbar rail) are cut before stock is shaped.

[attachimg=2]
 

Attachments

  • 15 miscut morts.jpg
    15 miscut morts.jpg
    584.1 KB · Views: 315
  • 14 chiar back slats.jpg
    14 chiar back slats.jpg
    422.9 KB · Views: 339
Cutting curves on crest and lumbar rails.  Determine the angle of the bandsaw table by measuring the angle between the top ends of the rear legs and either reference line on the inside of the rear legs (crest/lumbar rail faces/mortise centerlines).
[attachimg=1][attachimg=2][attachimg=3]
 

Attachments

  • 15 bs table tilt.jpg
    15 bs table tilt.jpg
    606.5 KB · Views: 303
  • 17 Chair crest rail bs.jpg
    17 Chair crest rail bs.jpg
    441.8 KB · Views: 294
  • rear rail.jpg
    rear rail.jpg
    649.8 KB · Views: 288
I highly recommend Highland Hardware’s general purpose bandsaw blades (not the Wood Slicer, which I also recommend).  They are capable of cutting curves and leaving a finish that is comparable to the Wood Slicer).  It also prevents me from switching blades – nuff said.

Smoothing the rail curves.  I decided to try my hand and smoothing them with a new acquisition:
[attachimg=1][attachimg=2][attachimg=3]
 

Attachments

  • 20 chair rail handwork.jpg2.jpg
    20 chair rail handwork.jpg2.jpg
    653 KB · Views: 288
  • 19 chair rail handwork.jpg
    19 chair rail handwork.jpg
    613.5 KB · Views: 284
  • 18 V spokeshave.jpg
    18 V spokeshave.jpg
    505.1 KB · Views: 288
As awesome as the finish was using the spokeshave and files, I still needed finish with abrasives.  My skill level is just not there.
[attachimg=1][attachimg=2]This process took quite a while, but at least I got to make a mess.
 

Attachments

  • 21 chair rail handwork.jpg3r.jpg
    21 chair rail handwork.jpg3r.jpg
    590 KB · Views: 293
  • 22 chair rail handwork.jpg4r.jpg
    22 chair rail handwork.jpg4r.jpg
    562.5 KB · Views: 286
Taking care of the final machining and smoothing.  Grooves for seat pan.

[attachimg=1]

Rear legs.  I bought a lot of new tools for and during this build (spokeshave, two hand planes and several router  bits and files) .  One of those was a LN No. 164 (Low Angle Smooth Plane) – Lovin’ it.

[attachimg=2]

Font legs.

[attachimg=3]

Tapering the back slats (Yes. I certainly could have used  a block plane, but wanted to continue to make friends with my smoother).

[attachimg=5]


Attachments

  • 27 chair slat taper.jpg
    27 chair slat taper.jpg
    674.1 KB · Views: 275
  • 26 chiar leg handork3.jpg
    26 chiar leg handork3.jpg
    636.1 KB · Views: 54
  • 26 chiar leg handork3.jpg
    26 chiar leg handork3.jpg
    636.1 KB · Views: 275
  • 25 chair leg handwork2.jpg
    25 chair leg handwork2.jpg
    605.7 KB · Views: 277
  • 24 chair rail grooves.jpg
    24 chair rail grooves.jpg
    295.7 KB · Views: 280
Smoothing the tops of the rear legs.  Mostly just abrasives, finishing with Mirka Mirlon Total very fine scuff pads.  I love the way ash end grain finishes.

[attachimg=1][attachimg=2][attachimg=3]
 

Attachments

  • 28 chair leg top.jpg
    28 chair leg top.jpg
    416.2 KB · Views: 275
  • 29 chiar leg top 1.jpg
    29 chiar leg top 1.jpg
    104.5 KB · Views: 275
  • 30 chiar leg top 3.jpg
    30 chiar leg top 3.jpg
    147.3 KB · Views: 269
Glue-up.
Time for glue-up.  It has been a long and satisfying road at this point.  As long as the process took, the glue-ups went smoothly.  I went from dozens of components in the morning to four assembled chairs in the late evening.

Back assemblies.
[attachimg=1][attachimg=2][attachimg=3]
 

Attachments

  • 33 chair gluep4.jpg
    33 chair gluep4.jpg
    572.6 KB · Views: 261
  • 32 chair glueup.jpg
    32 chair glueup.jpg
    732.6 KB · Views: 270
  • 27 chair glueup back1.jpg
    27 chair glueup back1.jpg
    449.9 KB · Views: 268
Corner braces.

Template
[attachimg=1][attachimg=2]

I don’t bust this out often, but I find it's the best way to fit the bracket to the rear face of the curved front rails.

[attachimg=3][attachimg=4]
 

Attachments

  • 37 corner braces4.jpg
    37 corner braces4.jpg
    545.6 KB · Views: 262
  • 36 corner braces1 oss.jpg
    36 corner braces1 oss.jpg
    388.5 KB · Views: 269
  • 35 corner braces.jpg
    35 corner braces.jpg
    695.3 KB · Views: 262
  • 34 corner braces1.jpg
    34 corner braces1.jpg
    455.4 KB · Views: 260
After finishing. It’s time to build the seat pans and upholster.
[attachimg=1]

The seat pans took a stunning amount of time.  Setting all the gaps for clearance of upholstery material, creating the leg cut-outs, matching angles of the side rails, fairing the curve where it meets of front rail, etc.

[attachimg=2]


Attachments

  • 38 seat pan layout.jpg
    38 seat pan layout.jpg
    363.6 KB · Views: 277
  • 39 seat pan.jpg
    39 seat pan.jpg
    521.3 KB · Views: 275
Time to upholster.  I’ve done a few dozen slip seats over the years but never worked with leather.  I ordered it online from the Leather Hide Store.  A bit stressed about using it.  But actually, found it easier than fabric.

Youtube videos are very helpful for upholstering but, like most things, upholstering takes far longer than I remember.  There is also a significant smoothy-squishy factor when applying the fabric/leather down and around the edges.  Leather requires stretching first also.

Leather hide.  The milk serves as a bovine head proxy (good name for a rock band?).

[attachimg=1]

It cuts easy with sharp scissors. Foam cut and fitted (I cut with a bandsaw).

[attachimg=2]

Upholstering requires a lot of staples.

[attachimg=3]

Underside.

[attachimg=4]


Attachments

  • 40 leather hide.jpg
    40 leather hide.jpg
    308.9 KB · Views: 269
  • 41 chair foam.jpg
    41 chair foam.jpg
    442.4 KB · Views: 265
  • staples.jpg
    staples.jpg
    400.5 KB · Views: 269
  • underside.jpg
    underside.jpg
    357.7 KB · Views: 262
Back
Top