Ash side table with integrated grainmatched drawer

Ola C

Member
Joined
Dec 17, 2019
Messages
50
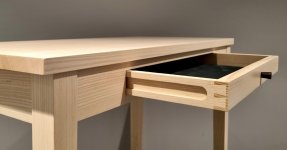
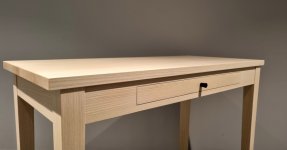
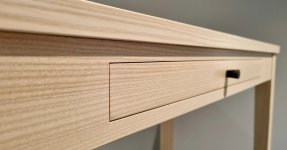
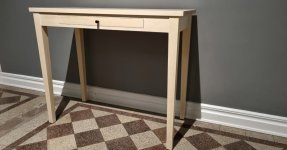
Finished this side table/writing desk for a customer a while back. I think it turned out really nice, especially the grain matching on the drawer-front apron. I did my best in this build to keep a slim apron height but still have a usable drawer height, the sections above and below the drawer are only 15mm thick and have routed in 12x12mm solid steel bars on the inside to keep them stable over time (this is shown in the final picture). Drawer bottom screwed from the underside, also this to maximize available drawer height in a given apron height. Finished with osmo white followed by osmo natural, with the goal to keep the untreated bright look of the ash. Any questions just ask, there are build videos available (link to my channel in signature) if someone wants to have a closer look how it's made.

[attachimg=1]

[attachimg=2]

[attachimg=3]

[attachimg=4]

[attachimg=5]
 

Attachments

  • 20240208_1905522.jpg
    20240208_1905522.jpg
    376.8 KB · Views: 299
  • 20240208_190230.jpg
    20240208_190230.jpg
    369.7 KB · Views: 300
  • 20240208_190724.jpg
    20240208_190724.jpg
    482.4 KB · Views: 298
  • 20240208_195053 (1).jpg
    20240208_195053 (1).jpg
    474.8 KB · Views: 275
  • 20240210_114010.jpg
    20240210_114010.jpg
    537.6 KB · Views: 275
Fantastic job on the grain match and grain selection in general.  I'd love to see a detailed photo of the knob.
 
It looks great. Super simple and the craftsmanship is probably best appreciated by fellow woodworkers.

The only way to get that grain match in my mind is to cut it out from the same position of the table skirt.

How did you manage to cut that with such a small gap?
 
Thanks!

Screendump photo of the knob. it's in ebony and I made it on my metal lathe.

[attachimg=1]

Front skirt/apron/drawer is done using the "standard" technique to first rip the front into 3 pieces, rejoint the ripped faces, cut away the drawer front part and then glue together without the drawer front. Process became a bit more complex due to the routed in metal bars. I show the front build at the 16:00 mark in the video below.
 

Attachments

  • Knob.jpg
    Knob.jpg
    281.4 KB · Views: 249
Ah, I got it.  I watched the video.  It answered my question about the drawer.  I would think I would see a tell tale on the ripping operation.  I did not see it.  I’m going to take a closer look now.

Addendum: 

I looked closely.  Can’t spot the joint even when I know exactly where it is.  Nice work and a nice design.
 
Packard said:
I looked closely.  Can’t spot the joint even when I know exactly where it is.  Nice work and a nice design.

Thanks! Sideways it's a matter if choosing grain that won't be too much affected by cutting away a saw blade thickness. Width wise I think some luck is needed for it to turn out this well. It's very hard to predict how the grains match after ripping and rejointing. Here you can shift the pieces slightly right to left to match them but still a bit of luck is needed.
 
He has a good light source mounted high and angled down.  It does not have quite the coverage needed to light the entire table, but well done.

It is a hot (contrasty) light source.  A soft box would have offered better light coverage, but it would not show the grain as well. 

I agree, nice shots.

I have a small (but bright) flat screen light.  It is very nice.  I read the other day that you can take an old flat screen TV set and turn it into a large flat screen light source.  I have not idea how you tune the set to get a white light though.  But if you are going to throw out a flat screen, I’d try it. 

Pity, because I threw out a 60” set last year.  It would have made a good light source.

Note:  The larger the light source is relative to the subject, the softer the lighting appears.
 
Thanks, but hold your horses [big grin]

I'm by no means any photografer. I took this table to the office since I thought grey would be a nice bakgrund to the ash. Ligthning are the ceiling mounted spots, not possible to angle. If pictures turned out nice it was not thanks to my lightning skillz [wink]
 
Very nice! You've got great lines and wood selection too. "Clean and Simple" does not necessarily translate to easy.
I especially like the use of steel to strengthen the front edge.
 
Crazyraceguy said:
Very nice! You've got great lines and wood selection too. "Clean and Simple" does not necessarily translate to easy.
I especially like the use of steel to strengthen the front edge.

Thanks! And I agree. There's pretty much nowhere to hide in a design like this, even if it looks simple. Got to be super careful with everything, a teared out edge can't be saved by a round and aiming for small gaps around the drawer and straight lines everything need to be very consistent. 
 
Back
Top