Bad chuck?

mrFinpgh

Member
Joined
Oct 30, 2015
Messages
568
Preface: I'm not really a drill press power user, but have an old craftsman benchtop press (like this, but not as nice) that I mostly use for drilling perpendicular holes. I've had it for about 5 or 6 years now and generally it's fine.  I don't trust it in terms of runout but usually I'm more worried about angle than precision.

I'm working on a lathe stand with some big mortises and wanted to use the drill press to rough out the bulk of it. I'm using a nice Wood Owl 7/8 brad point auger bit (each mortise is about 1.75" wide and 3" long).  All is going well until I start drilling out the holes between the ends and the bit wants to shift towards the hole. There's a bit of vibration, but I've got the workpiece trapped between two fences.

Eventually, whole chuck came right off with the bit in it.  This happened once before and I just knocked the chuck back onto the quill assembly and moved on.  However, today, no amount of knocking seemed to make it stick. At best, I'd get it running for a couple of holes but as soon as any sideways pressure happened it popped back off.

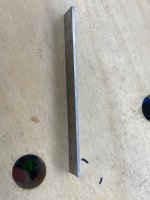
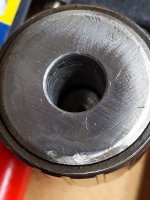
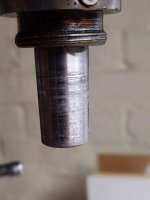
I tried cleaning off the taper and socket with acetone, followed by 99% alcohol, just to be sure nothing was interfering with the fit.  I did notice that the surface on the quill looks pretty rough, as does the inside of the chuck's socket.

[attachimg=1]
[attachimg=2]

I'm guessing that the surface of these two things is probably interfering with making a good strong wedged fit, and that's part of why the chuck keeps falling off.  Am I headed in the right direction?  Or should I be looking at something else?  Would this issue have anything to do with how much runout my drill press seems to have?


Attachments

  • PXL_20230227_034820219.MP.jpg
    PXL_20230227_034820219.MP.jpg
    421 KB · Views: 336
  • PXL_20230227_034903909.MP.jpg
    PXL_20230227_034903909.MP.jpg
    248.9 KB · Views: 322
This did way too much spinning (working/ fretting) on itself before it came apart. Fixing it successfully is going to be a challenge. You might be able to smooth/blend/polish the taper of the quill, with some effort and perseverance. A good file and some abrasive will be able to help. Getting it perfect, or at least close enough to keep the run-out at a minimum, will be the hard part.
Fixing the "hole" in the chuck is a no-go. It could be done, by some expert in a machine shop, but the cost would far outweigh the price of a new one.

Overlapping holes is not in the wheelhouse of an auger bit. That is Forstner bit territory.
 
You can actually buy abrasive tapered cones off Aliexpress from memory to hone the inside of MT/NT tapers, etc.

Failing that, glue emery cloth (not sandpaper) to a clean taper and start spinning! This will help clean up all but the very inside top of the taper.
 
Wood Owl bits have 3 flutes and one flute can easily snag any predrilled space and force the bit off center…like CRG mentioned, use a Forstner for this application.

A nasty looking Morse taper.

If you’re going to try to fix it, go slow as any material removed from either taper forces the tapers deeper and eventually if too much material is removed you’ll then have to remove material from the end of the male MT to prevent it from slipping.

 
I am NOT recommending this, but years ago my chuck kept coming off when I was making some rosettes.  I was aggravated and grabbed a bottle of lock-tite that I inherited, and slapped it back together.  That was over 20 years ago.  Unfortunately, I later learned there are two main types of lock-tite. Blue and red.  (many variations in each color).  But basically the blue is semi-permanent-you can break it apart eventually.  The red is permanent and I mean permanent.- You will break a bolt off or strip the threads using red lock-tite.  I used red on my chuck.  Let's just say it has not fallen out since.   
 
Thanks, guys. I'll be switching to a Forstner bit for the remainder of these holes, then. For some reason, i thought brad points were supposed to be good for this, but I guess not. Shows you how often I use a drill for mortising.

Does it make more sense to try and replace the chuck?  I'm guessing replacing the male side of the MT might be a bigger deal than swapping the chuck out.  Would I be able to replace the male MT on such an old machine?  Time is in short supply these days so I'm not opposed to spending some money if a couple replacement parts save more than a couple hours of frustration.

 
Yardbird said:
I am NOT recommending this, but years ago my chuck kept coming off when I was making some rosettes.  I was aggravated and grabbed a bottle of lock-tite that I inherited, and slapped it back together.  That was over 20 years ago.  Unfortunately, I later learned there are two main types of lock-tite. Blue and red.  (many variations in each color).  But basically the blue is semi-permanent-you can break it apart eventually.  The red is permanent and I mean permanent.- You will break a bolt off or strip the threads using red lock-tite.  I used red on my chuck.  Let's just say it has not fallen out since. 
[member=72457]Yardbird[/member] a little heat will break the bond of red
 
guybo said:
[member=72457]Yardbird[/member] a little heat will break the bond of red
[/quote]

Thanks guybo-did not know that.  I can't imagine anything would go wrong with me trying that.
 
Is it possible to replace the male end of the MT that's in the drill press quill? In your photo is that a pin that's at the top of the photo that could be driven out? Maybe locate a parts list/operators manual for the drill press to help figure things out.

The inside taper of the drill chuck actually doesn't look too bad...tough to tell though. The male end of the taper looks to have 2 built-up ridges near the top of the taper. You may not have to completely remove the ridges just minimize the small burrs that have formed in the area, easy does it with 400 or 600 emery paper a little at a time. My experience is if you can get a nice fit with only 50% of the mating tapers you're probably good to go.

When I install the drill chuck on my drill press (#3 MT) I'll use a plastic mallet and sharply drive the MT into position by striking the bottom of the drill chuck. They're meant to be sharply driven home. Cleanliness of the taper & the socket is mandatory. I use alcohol and a rolled up paper towel with several treatments.
When replacing the chuck, a drop of oil on my fingertip and that's wiped around the male taper, just a very thin film of oil for protection, not lubrication, to prevent the tapers from rusting and welding themselves together.

 
Most drill presses I've seen the taper is part of (machined into) the quill and not replaceable without doing the entire quill and assembly. Sanding with emery paper is all that's really needed to bring it up to snuff.
 
I appreciate all the replies.

Is there a specific technique for sanding the taper on the quill?  Should I be backing up the emery paper with something stiffer?

Should I be using any kind of marking on the metal to ensure consistent/even progress?

Metalwork is definitely not my forte, but I'm game to try it if it can be done.
 
mrFinpgh said:
I appreciate all the replies.

Is there a specific technique for sanding the taper on the quill?  Should I be backing up the emery paper with something stiffer?

Should I be using any kind of marking on the metal to ensure consistent/even progress?

Metalwork is definitely not my forte, but I'm game to try it if it can be done.

My only advice is that on both the male and female parts, you only want to remove the "high spots", i.e. the material that was deposited by the gouging. That way you will be left with, for example, 75% of the original surface. You do not want to remove any more of the original surface, if at all possible. The best you can hope for is two "potholed/gouged" surfaces that have no high spots and can mate as well as possible (you can test for this with "bluing"). If you remove more of the original surface, you will probably never get the parts to fit together correctly, nor to have the correct, concentric axis.

I would start with the male on the chuck, which is far easier to access. When that is done, you might be able to wrap the emery paper around it (paper side against the chuck taper), and then use that as sort of a reamer to work on the female arbor.

Good luck, Dick
 
Glue it and wrap it around in a spiral (in the opposite direction you'd be spinning it) on a MT chuck or whatever you have that is in good nick, trim the top end off, and twist away.

The inside will simply follow the shape of the outside as it's a straight angled taper for MT.

If you're feeling particulary adventurous you could raise the table and insert the MT with the emery cloth into a vise very securely clamped to the table, and gingerly lower the quill in the slowest speed onto it with light pressure after having lined it up. This will make the job a lot faster.

Not for the faint hearted though, but easy goes and should be fine.
 
I've mentioned several times in the past that I rely on precision flat ground stones to maintain the surface finish on MT tooling. I purchased mine from Kinetic Precision...very nice people to deal with. There's a lot of information on this link if you're interested.
https://www.kineticprecision.com/all-about-pfg-stones1

You can see how nice the Morse tapers come out when dressed with the Kinetic Precision PFGS.

[attachimg=1]

I've also used the stones to refine the ruler edge on my double squares. They operate much smoother, feel almost like a caliper.

[attachimg=2]

Here's a before & after of the ruler edge.

[attachimg=3]

[attachimg=4]
 

Attachments

  • 12833.jpg
    12833.jpg
    860.4 KB · Views: 195
  • 11518.JPG
    11518.JPG
    728.3 KB · Views: 174
  • 11506.JPG
    11506.JPG
    701 KB · Views: 189
  • 11512.JPG
    11512.JPG
    693.3 KB · Views: 188
[member=44099]Cheese[/member]  “I've also used the stones to refine the ruler edge on my double squares.”

When you do that are you concerned about affecting the parallelism between the two long edges?
 
Michael Kellough said:
[member=44099]Cheese[/member]  “I've also used the stones to refine the ruler edge on my double squares.”

When you do that are you concerned about affecting the parallelism between the two long edges?

No, because they don't remove material, only the small burrs and after that, it then further polishes/refines the surface. That article I referred to gives some great information.

However, if you really want to get deep in the weeds, Robin Renzetti will definitely take care of that. He has lots of great information in this video because he's not selling a product like Kinetic Precision but selling the process instead that's needed for fine burr removal in precision tools/tooling.
Starting around the 8 minute mark Robin measures a 1x6x6 block with an optical flat, then proceeds to use a PFGS stone on it.  [big grin] A high recommend.
=2
 
Cheese said:
I've mentioned several times in the past that I rely on precision flat ground stones to maintain the surface finish on MT tooling. I purchased mine from Kinetic Precision...very nice people to deal with. There's a lot of information on this link if you're interested.
https://www.kineticprecision.com/all-about-pfg-stones1

You can see how nice the Morse tapers come out when dressed with the Kinetic Precision PFGS.

I've also used the stones to refine the ruler edge on my double squares. They operate much smoother, feel almost like a caliper.

That is a whole other level..  very impressive for sure. 
 
mrFinpgh said:
That is a whole other level..  very impressive for sure.

FWIW...I contacted Spencer Webb the owner of Kinetic Precision and asked if he had considered grinding stones that could be used on the inside of the MT.  [smile]  He replied that taper stones were indeed on his list and would be released at some point.  [cool]

A lot of the more serious MT damage could be mitigated early on if these PFGS stones had been available years ago. Once the taper spins, people just ram the thing back into the socket and have at it again...I know I've done it.
With the introduction of the stones, it'd be so easy to stone both of the tapers the first time they spin. I'd bet that would take care of the problem 90% of the time.

The condition of the #2MT in the tailstock of my lathe is similar to but not nearly as bad as the taper on your drill press. I'm slowly reaming it out with a #2MT reamer a little at a time. I may just get lucky and be able to repair it but I have my doubts. Thus, I've also been searching for a new tailstock ram for a 60 year old lathe just in case.  [smile]
 
The MT in my old mill is why I got an NT40 quill in the new mill. Having the chuck come out under load really gets annoying. If I had an MT drill I'd definitely Loctite it good and proper.
 
I ended up doing the following:

1. Wrapped some 400g emery paper on a metal dowel for a backing.
2. Held the dowel against the male taper and slowly rotated the taper a couple times.
3. Wiped the taper down thoroughly w/ 99% ethanol.
4. Repeated with 600g.
5. very gently ran paper on the inside of the chuck to knock off any burrs.
6. Wiped that out as well.
7. Heated the female taper on the chuck w/ a heat gun for about 5 minutes.
8. Pressed the heated chuck onto the taper w/ as much force as I could musted.
9. let the chuck cool off overnight
10. Switched to a forstner bit.

This let me get on with the work of roughing out the rest of my mortises -- nothing is coming apart so far, and the runout doesn't seem worse than before.  Time will tell, but hopefully the light touchup and heating the chuck will make things work for a while.
 
Back
Top