Bead board panels, crown, & base without a miter saw.

iamnothim

Member
Joined
Feb 5, 2014
Messages
1,436
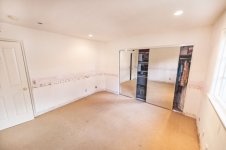
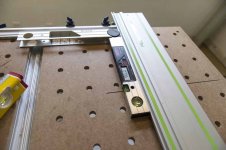
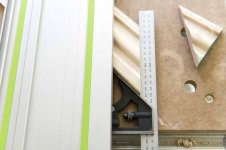
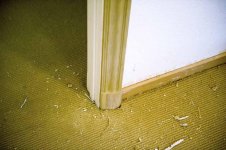
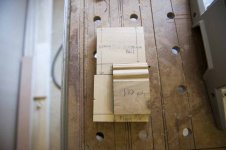
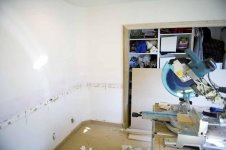
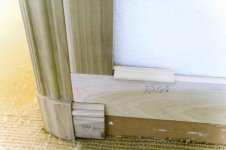
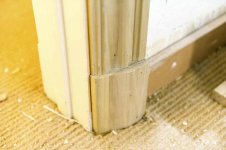
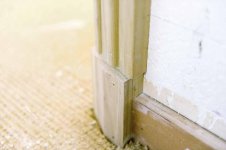
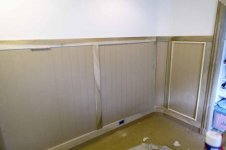
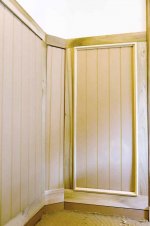
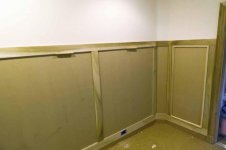
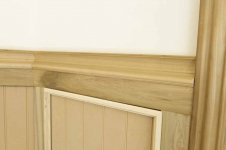
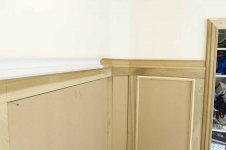
I have started this thread to document installing bead board panels, case, base and crown in my daughters room.  I will try to use the MFT/3 and TS55 REQ exclusively to make the cuts.  My fallback is a single bevel Hitachi 12” miter saw.

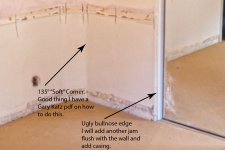
My challenges are cutting the crown on the flat, using a Collins Coping Foot on a Carvex for the first time, installing baseboard backer, and making thicker plinth blocks for the base/casing.  There is also a significant wave on one wall where a doorway was covered over.  I will have my drywall man float any gaps when I am done.  He just finished skim coating the upper walls and ceiling yesterday.

My experience has been installing bead board in my laundry room (documented here) and a whole bunch of Gary Katz finish carpentry videos.

Here we go….

[attachimg=1]
[attachimg=2]
 

Attachments

  • Bead_Panel-1.jpg
    Bead_Panel-1.jpg
    92.7 KB · Views: 2,423
  • Bead_Panel-2.jpg
    Bead_Panel-2.jpg
    128.3 KB · Views: 2,524
I finished installing new jams and header skirt in the closet.  This will allow the case to hide the bullnose and the ugly aluminum header on the wardrobe doors.  I also hand planed the plinth blocks using a #6 and a low angle block plane.  I was wishing I had an HL850.  That said, after sharpening the irons on a Tormek and slicking the plane with camilla oil it wasn't too bad.  It took a lot longer to get to this point than I expected but everything is flush and square.

Later today I'll cut down the plinth blocks and start to install the case.  Next I'll cut the stiles and rails.

[attachimg=1]

[attachimg=2]

[attachimg=3]
 

Attachments

  • C_Room-2.jpg
    C_Room-2.jpg
    63.8 KB · Views: 2,048
  • C_Room-3.jpg
    C_Room-3.jpg
    27.9 KB · Views: 2,023
  • C_Room-1.jpg
    C_Room-1.jpg
    79.7 KB · Views: 2,033
Should the top of the plinth blocks be equal to, or taller than the top of the baseboard?
 
iamnothim said:
Should the top of the plinth blocks be equal to, or taller than the top of the baseboard?
To quote Get Your House Right:
For a 8' ceiling a 5 1/2" casing is recommended.
There are three options for the height of a plinth:
1) equal to hieght of baseboard,
2) equal to height of baseboard flat
3) with tall baseboard > 6 3/4 divide the flat portions and align plinth with lower flat board. Resolve the upper flat and cap into casing.

For
 
Tim Raleigh said:
iamnothim said:
Should the top of the plinth blocks be equal to, or taller than the top of the baseboard?
To quote Get Your House Right:
For a 8' ceiling a 5 1/2" casing is recommended.  I already purchased the base.  Saroyan 2231 3 3/8".  I think I can get away with this because the panels are plate rail height.  Apx 5'
There are three options for the height of a plinth:
1) equal to hieght of baseboard,
2) equal to height of baseboard flat  "Baseboards Flat"  Why don't I understand this?  I was thinking a 1/4" proud of the top of the base, because the face of the case to the face of the plinth is 3/8"
3) with tall baseboard > 6 3/4 divide the flat portions and align plinth with lower flat board. Resolve the upper flat and cap into casing.

For

Tim..  Thank you very much.  I'lll cut the plinth in an hour or so.

I made my first miter on the MFT.  Came out spot on.  It took significantly more time than using a miter saw.  Unacceptable for production work.  However for a guy making sawdust in a garage.... Great.[attachimg=3]
 

Attachments

Tim Raleigh said:
1) equal to hieght of baseboard,
iamnothim said:
Why don't I understand this?  I was thinking a 1/4" proud of the top of the base, because the face of the case to the face of the plinth is 3/8"[/font][/size]

In the base you show in the picture, the flat is the area that is, well flat vs. profiled. On your base molding, the flat starts at the bottom of the base and ends at the start of the first cove profile.

You can do anything you want, or looks good to you. In this  case I would mock up either even with the top or the case or even with the top of the flat.

I usually do this in Sketchup but it is easily done on a wall with some bits and pieces.

Good luck.
Tim
 
Thanks Tim.
I finished making the remaining plinth block and installing the case and a backer spacer for the lower rail and base. Today I will start on the panel frames.  [smile]  I get to start the frames with a dopy 135 deg. sloppy inside corner.

My good friend T.C. decided to buy a Makita compound miter saw and then lend it to me for the project.  Hey, what was I going to do?  As such I will edit the title of the thread.  I used the track saw, with rail dogs, to rip a piece of case that was tight to a corner as well as ripping the backer spacers.  It is invaluable.

This project really makes me respect pros like Tim and Tom Bader.  They be on their third job by now.

[attachimg=1]

[attachimg=2]

[attachimg=3]
 

Attachments

  • C_Room-7.jpg
    C_Room-7.jpg
    85.1 KB · Views: 1,787
  • C_Room-6.jpg
    C_Room-6.jpg
    65.9 KB · Views: 1,747
  • C_Room-5.jpg
    C_Room-5.jpg
    46.3 KB · Views: 1,734
Would you mind posting a few better closeups of that plinth block? [huh]
 
GreenGA said:
Would you mind posting a few better closeups of that plinth block? [huh]

Just finished for the day.  Not a problem

[attachimg=1]
[attachimg=2]
[attachimg=3]
 

Attachments

  • C_Room-7A.jpg
    C_Room-7A.jpg
    40.2 KB · Views: 1,671
  • C_Room-8.jpg
    C_Room-8.jpg
    42.9 KB · Views: 1,688
  • C_Room-9.jpg
    C_Room-9.jpg
    31.2 KB · Views: 1,646
Plinth blocks.

I took two pieces of 1 x 5 poplar and glued them together.
I wanted four blocks 125mm high, so I cut the laminated piece about 600mm long.
I marked the faces and cut off a 45deg corner using my Carvex and butterfly plate.
Sadly I do not own a table saw.
I used a #6 bench plane and a block plane to get the desired faces.
Lastly I cut the 125mm blocks.

Today I rewired a plug and switch on the wall I'm working on.  I mounted a single gang box for the outlet on the bottom rail parallel to the floor.  The box for the switch is cut in a stile.

EDIT:
I'm certain this has been noticed...

[attachimg=1]
 

Attachments

  • C_Room-9E.jpg
    C_Room-9E.jpg
    42.4 KB · Views: 1,661
Made some good progress today.
All the bead board panels and the one panel trim are just resting in the frames.

[attachimg=1][attachimg=2]
 

Attachments

  • C_Room-10.jpg
    C_Room-10.jpg
    30.1 KB · Views: 1,550
  • C_Room-11.jpg
    C_Room-11.jpg
    49.2 KB · Views: 1,530
After all the planning .... it doesn't look quite right.
So I made a change.
What do ya'll think?

[attachimg=1]
 

Attachments

  • C_Room-12.jpg
    C_Room-12.jpg
    26.2 KB · Views: 1,546
It looks like the beads disappeared. I did notice that some where not centered in the panel is that what you mean by didn't look right or was there something else.
 
The cap is deep cove about 3" tall

Sure enough I eighty sixed the bead altogether.  It looks out of place with all the molding.

That's a good catch.  If I kept the bead it should be centered.

I copied the plinth design from a house in Hancock Park in L.A.
 
Today I put the cap on the top rail of the wall I've been working on.  I also cleaned up the relocation of the electrical boxes.
Still undecided about using the bead in the panels.

I'll have to delete the name of the thread if I don't.  [big grin]

[attachimg=1][attachimg=2]
 

Attachments

  • croom-1.jpg
    croom-1.jpg
    60 KB · Views: 1,476
  • croom-2.jpg
    croom-2.jpg
    59.4 KB · Views: 1,526
Just finished making sawdust out of some mighty nice panel trim.  [embarassed]

That little 135deg section kicked my @**
Finally figured I'll make the long points a mil or two wider than the opening and nestle it just on the edge.  Hope to cut it correctly tomorrow.
 
I've been plodding along.  All the frames are finished and the top cap is installed.
All that's left is to trim seven panels and put the crown molding up...  Fill.... spray.

My Collins Coping foot for my Carvex arrived.  Two things....
1) I'm glad I opted for the barrel Carvex.
2) I need practice.  A lot of practice.  After four tries I copped out and finished the fine work on a piece of cap with my scroll saw.  We'll see how I do on the crown molding.

[attachimg=1]
 

Attachments

  • Panel-1.jpg
    Panel-1.jpg
    64.6 KB · Views: 1,258
Back
Top